DIY roasted peppers

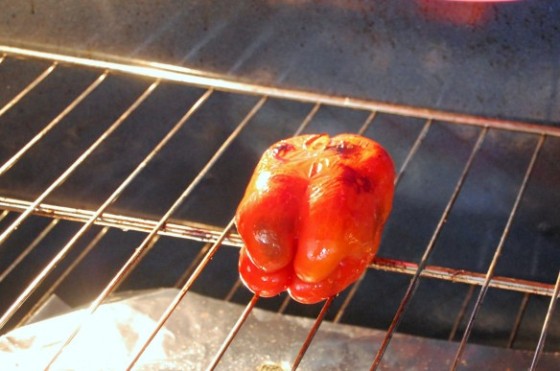
dsc_5302-e1326737962210Ah yes, ye olde bell pepper. This post may seem a little random at the moment, but this skill is necessary to complete my next post. So today, I give you a tutorial on how to roast red peppers. Don’t worry, it’s easy 🙂

Preheat your broiler or grill to high heat. If you’re using your oven, place a sheet of foil on the rack below the one you’ll be placing your pepper on. If you want the process to be faster, place it closer to the broiler. My short attention span tends to favor having the rack lower in the oven, so that my pepper doesn’t just turn into flames and smoke.

Take one (or more) beautiful red pepper(s) (or whatever kind of pepper you wish to use). Washed and patted dry. Then, rub said pepper with oil. I used olive oil. Place this now oiled pepper into your oven or onto your grill and cook until the skin starts to blister and char, rotating as necessary until all sides are done.

Remove the pepper and place in a bowl. Cover with plastic wrap and allow to rest 15 minutes or until cool enough to handle. Once cooled, uncover and peel the skin off. Don’t worry, it’ll come right off. Slice or dice into desired pieces and,  Voila – you now have roasted peppers!

Too lazy? Of course you could always purchase the pre-roasted peppers in a jar, but where’s the fun in that?

“BUT WHAT WILL I USE THEM ON????”

Um, everything? Inside sandwiches, atop pizzas, blended into soups, added to pasta or tacos or as part of an antipasti… the possibilities are pretty much endless here. You can even use any kind of pepper you want, here I used red peppers, but I’ve used poblanos in the past, hatch chiles, etc…

how to get pizzeria-style pizza at home

pizza

For those of you who aren’t aware, I also contribute to a food website called Foodbeast. Every once in a while I give them an “exclusive” post, one that you can only read there. And this, my friends, is one you don’t want to miss.

If you want to find out how to make delicious pizzas like this prosciutto and arugula pie (without any fancy expensive equipment), check out my most recent post on how to get pizzeria-style pizza at home over at Foodbeast.

how to caramelize onions

dsc_2984Caramelized onions are an easy way to add flavor to anything you make – like sandwiches, pizza, or even bruschetta. They are simple to make, and everyone will tell you that the key is to cook them low and slow over a lllllong period of time.

If you’re like me, you’re already ahead of the game because you only need a small amount of onions. See? You’re already winning. Five cups of onions will yield about 2 cups of caramelized onions – so my 2  medium-ish onions made about 1/2 C of caramelized onions (which is all I really needed for BF and I). If you want more, by all means throw ’em in – it will take a bit longer for them to caramelize, though.

you’re missing the full cuteness – they can see me at the window and then they all run and hide in the bush

While simple in theory, these can cause problems for someone like me who is short on both patience and attention (so what if some of us get distracted by the cute little quail chicks in the back yard).

Solution? Start them around medium to medium-high to begin the cooking process, and then turn them to low/med-low once they’ve already begun to brown, so that you can avoid burning them.  If you have a view of the back yard through your window, maybe you can watch the little critters play while your onions caramelize. Caramelized onions will make your house smell amazing and add a delightful bit of sweet to your savory dishes.

How to Caramelize Onions

What you need:

  • Onions
  • Oil & butter
  • Salt
  • dash of sugar
  1. Heat pan on medium/medium-high and add a drizzle of olive oil (enough to coat your onions with). It’s better to use stainless steel than nonstick, to encourage browning.
  2. If you like, you can add a bit of butter as well…
  3. Once the butter is melted and the oil is shimmering, add your onions. Stir frequently to coat them in the oil. Let the onions sweat (release their liquid) stirring occasionally.
  4. As soon as they start to brown a little bit, turn the heat to low/medium-low and continue cooking. (Patience is your best friend here) Add a sprinkle of salt over them and stir to incorporate.  If you want some additional sweetness, you may sprinkle a tiny bit of sugar over them as well. Sometimes I add a dash of balsamic vinegar as well.
  5. Whatever you do, don’t leave the kitchen, stand by their side faithfully stirring every few minutes making sure they don’t burn.
  6. If you build a good layer of caramelization on the bottom of your pan, feel free to add a few tablespoons of water, or even a dash of white wine, to deglaze the pan. That will take all that delicious brown color and flavor from the bottom of your pan and put it right into your onions, where it belongs.
  7. After about 30 minutes, depending on how many onions you’re using, you may be done! If not, just continue stirring and deglazing until your onions are fully caramelized, an additional 30 minutes, more or less.

how to infuse your own vodka

infusion

Well, my friends, the weekend is upon us. It’s finally Friday and I know what I’m doing when I get home – pouring myself a cocktail. Is there really any better way to unwind after a stressful week than with a cocktail? I love me a good cocktail – and when it comes to cocktails, I’m a vodka girl. I don’t want your tequila, or your rum, or your fancy-pants wine – just give me a little vodka and a little juice and send me on my merry little way.

So what’s a finnicky girl like me to do to spice up her cocktails while not spending a ton of money on flavored vodkas? Flavor her own, of course! There is no better time to make your own vodka than in the summer, when berry season is in full-swing and you’ve got more berries than you know what to do with.

Hopefully this summer’s posts will serve me well next year in remembering to not buy every container of berries that I walk by (I bought two more containers of strawberries yesterday – but it was such a good deal!)… I need to go to berryholics anonymous… it’ll be OK, though. My strawberry vodka reserves are getting low anyway, so it’s about time to infuse some more… 😉

The great thing about berry vodkas is that, while they recommend to let them sit for quite a while, once the berries have lost their color they’ve lost most of their flavor as well. So even though I might leave them in there for a couple weeks, after the first few days my vodka is already rich with the color and flavor of whatever berries I happen to be infusing. Mix a bit with some lemonade and you’ve got yourself a berry lemonade cocktail, add a splash of fizz if you’re feelin’ sparkly

How to Infuse Your Own Vodka (or other liquor):

  • Berries, washed and diced
  • Vodka (or other liquor – make sure it’s relatively neutral in flavor)

1. Fill your container about 1/3 with washed berries of your choice

2. Fill it the rest of the way with liquor

3. Set in a cool place (we use our fridge, because “room temp” at our house is like 78 degrees).

4. Shake it around once in a while

Some things to know…

* The smaller you chop your fruit (like strawberries, pineapple, or melon), the faster your liquor will infuse. Blueberries don’t need to be chopped, but you will probably want to score them with a knife (or just smoosh them a little). Blackberries and things of that nature are probably OK to stay whole. With citrus, it’s best to just use the rind, but make sure you don’t get any of the pith with it!

* Shake your container every once in a while to mix it up a bit.

* Once your liquor has infused, strain out your fruit for permanent storage.

* If you want to make a “liquer” instead of “liquor” – after you remove your berries add some simple syrup.

* Since I like to re-use things, I re-use washed grapefruit jars, which causes my BF to make fun of me for making “moonshine”… just be forewarned that if you use a jar someone may make fun of you and call it “moonshine”. If this happens, tell them to “shut it” and promptly make yourself a cocktail. 🙂

* I usually try to let them infuse for about a week or two, but I’ve been known to make a drink after just a few days of infusion after an especially rough day. So long as there is a good amount of color in the vodka, you should be ok.

* DO NOT try to eat the fruit, all of its flavor is now in the liquor. This isn’t sangria, people.

*You can find bottles for very cheap at The Container Store or Sur la Table

strawberry cupcakes – and how to fix buttercream frosting

strawberry cupcake main

I’m still working through the summer strawberry harvest, not that I’m growing them – but I can’t seem to stop buying them. I don’t know what I plan to do with all these strawberries, but I always seem to find something. Today? Strawberry cupcakes with strawberry swiss meringue buttercream frosting (quite a mouthful, no?). This is probably my favorite frosting in the whole world, and I’m not generally a “frosting” person. I’m usually perfectly content to eat my cupcakes sans frosting and call it a day, but this frosting… this frosting is absolutely divine.

This wasn’t my first time making buttercream frosting, but it was my first time breaking it. “Broken buttercream” is apparently a common problem in the baking world, I guess I was just lucky that I’d never encountered it. It was so scary… I didn’t know what to do with myself. Luckily, I remembered this book that I got when I worked at Sur la Table.

I remember the exact moment I decided to buy the book, a coworker was looking through it and commented on how “it even shows you how to fix broken buttercream!” That seemed like a handy enough thing to know, and it gave me that last little nudge I needed to buy it. Not that I “needed” to buy it, I don’t think I “needed” a single thing I bought there. Sidenote: never work for a store you enjoy shopping at – I’m pretty sure I made negative money working there. I basically paid them to let me work there. Sad.

Broken buttercream happens when your mixture becomes too warm or too cold, and it causes the buttercream mixture to separate. The initial problem, I thought, was that my buttercream was too warm. I am in the desert, after all, and the butter was definitely a bit too soft as I was adding it. I remember thinking “I’m surprised this is working” just moments before I saw the frosting separate. The solution for broken buttercream that is too warm is to cool the bowl in an ice bath while continuing to beat How the heck am I supposed to create an ice bath around my mixer anyway? I tried holding a bag of ice up, but then my hand got cold so I just stuck the whole thing in the fridge for about 30 minutes. After that, I took it out and began whipping to no avail. I chilled it longer… another 30 minutes… nothing.

My stupid buttercream was stupid broken and I was so angry (since I didn’t really care about the cupcakes, they were merely a vessel for delivering this magical frosting into my mouth). Then I realized I had probably chilled the buttercream too much, and that now I had the opposite problem – my buttercream was too cold. Apparently, buttercream is the Goldilocks of frostings. Stupid Goldilocks, I never liked her much anyway.

I was one step from throwing it out and starting over when I had one last burst of motivation. The book said to put the bowl over simmering water for a few minutes until it was warmed… that wasn’t happening. Instead, I just soaked a dish towel with really hot water, rung it out, and held it against the side of the bowl while whipping with the paddle attachment. Voila – great success! Now that I spent like four times as long making this frosting as I had intended, it was FINALLY time to frost my cupcakes. At least I learned a valuable lesson… just look at those beauties 🙂

Strawberry Cupcakes

Printable Recipe

  • 2 3/4 C all-purpose flour
  • 1/2 C cake flour, (not self-rising)
  • 1 Tbsp baking powder
  • 1 tsp salt
  • 8 oz unsalted butter, softened
  • 2 1/4 C sugar
  • 3 large eggs
  • 1 large egg white
  • 1 C whole milk
  • 1 1/2 tsp vanilla extract
  • 2 C diced strawberries
  • Strawberry Swiss Meringue Buttercream

1. Preheat oven to 350 degrees. Line muffin tins with paper liners. Whisk flours, baking powder, and salt in a large bowl.

2. Cream butter and sugar with a mixer until light and fluffy. Add vanilla, then eggs (1 at a time) beating after each addition. Scrape down sides of bowl.

3. Add dry ingredients to butter mixture in 3 additions, alternating with milk and ending with dry (so 1/3 flour>1/2 milk>1/3 flour>1/2 milk>1/3 flour). Mix on low until incorporated. Scrape sides of bowl. Stir in strawberries.

4. Divide batter among muffin cups, filling each 2/3 full. Bake cupcakes until testers about 20 minutes until testers come out clean. Let cool in tins on wire racks. Cupcakes will keep, covered & unfrosted for up to 3 days, unless otherwise noted.

Strawberry Buttercream Frosting

Printable Recipe

  • 4 large egg whites, room temperature
  • 1 1/4 cups sugar
  • 3/4 pound (3 sticks) unsalted butter, softened, cut into tablespoons
  • 1 1/2 cups fresh strawberries, pureed
  1. Place whites and sugar in a heatproof mixer bowl set over a pot of simmering water. Whisk until sugar dissolves and mixture registers 160 degrees on a candy thermometer. (or until the mixture is smooth when rubbed between fingers)
  2. Remove from heat and attach bowl to a mixer. Whisk on medium speed for 5 minutes. Increase speed to medium-high, and whisk until stiff, glossy peaks form, about 6 minutes. Reduce speed to medium, and add butter, 1 piece at a time, whisking well after each addition.
  3. Switch to a paddle attachment. With mixer on low, add strawberry puree, and beat until smooth, 3 to 5 minutes. Use immediately, or cover, and refrigerate up to 2 days.

[Recipe from Martha Stewart: Cupcakes]