pain au thanksgiving

11.14 turkey pain 2

I know that by now we have seen every possible use of Thanksgiving leftovers under the sun. We’ve seen them in pies, in soups, in sandwiches, and in salads, but one I had not seen was this masterpiece.

Imagine, if you will, your Thanksgiving leftovers tightly wrapped in a croissant dough and baked to perfection.  I think my knees just went weak…

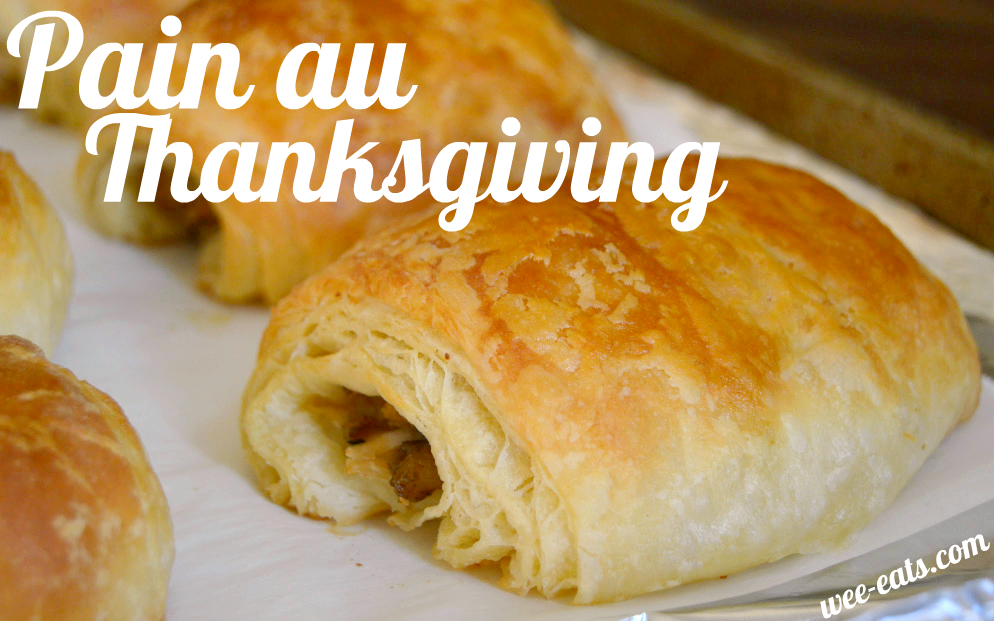
May I present to you Pain au Thanksgiving! It’s very similar to its cousin pain au chocolate but instead of being filled with chocolate, it is filled with an entire Thanksgiving dinner … all rolled up into flaky buttery croissant dough… which is where it has apparently always belonged.

As soon as I got this idea I couldn’t wait to make it. I knew that I had to do it before Thanksgiving, so that you could use it for your leftovers. Of course, the added bonus of me getting to eat TWO Thanksgiving dinners this month may have weighed on my decision as well.

11.14 turkey pain 2.2

For these, I used a standard croissant dough (you can use your own favorite recipe, I used this one only because I had successfully used it before). If you’re short on time (or motivation) you could even use store-bought puff pastry or some of those refrigerated “crescent” rolls in a pinch. Just keep in mind that a different dough may yield a different amount of pastries. My recipe yielded 24 pastries each one about 4 by 2 inches when baked.

For the filling, I used turkey, stuffing, and mashed potatoes. I toyed with the idea of putting the gravy inside, but decided it would a> be too messy and b> be much better alongside the sandwich. Because, if there’s one thing I love more than a sandwich, it’s a sandwich with a jus for dipping.

I also opted to leave out the cranberry sauce since Mr. Eats turned his nose up at it. You’re welcome to include it if your guests are more cranberry-friendly – I personally think it would have been delicious stuffed inside or even drizzled on top as a glaze.

If you’re wondering what on earth you are going to do with 24 thanksgiving pastries, fear not! You can freeze the pains (baked or raw) and keep enjoying that turkey dinner for up to three months.

11.14 turkey 0055


Pain au Thanksgiving

Yield: 24 Pain au Thanksgivings                                                                  [  Printable Recipe ]

Time: 1 hour (prep), 8 – 18 hours (refrigeration), 15 – 20 minutes (baking)

For the croissant dough:

  • 1 1/2 cups milk, warm (105°F–110°F)
  • 1/4 cup brown sugar, packed
  • 1 Tablespoon + 1/4 teaspoon active dry yeast
  • 3 3/4 cups all-purpose flour (plus extra for dusting)
  • 1 Tablespoon kosher salt
  • 3 sticks unsalted butter

For the filling:

  • Thanksgiving leftovers: turkey, stuffing, mashed potatoes, whatever you want!

Baking & Serving: 

  • 1 egg beaten with 1 Tablespoon water
  • Gravy, for serving

Directions

Making the dough:
1. In the stand of an electric mixer with a dough hook attachment, mix the milk, sugar, and yeast. Let sit until foamy (appx 5 min). In a separate bowl, whisk together the flour and salt, set aside until yeast has foamed.
2. Add flour/salt mixture to yeast, while mixing on low. (I usually add half, then once incorporated add the rest)
3. Once it comes together into a smooth, slightly sticky mass, shape it into a rectangle about 1 ½ inches thick, wrap tightly in plastic wrap and set in the fridge for about an hour until chilled

Laminating the dough:

1. Once dough is chilled, line up sticks of butter and smash with a rolling pin between two sheets of parchment paper until they are roughly the shape of an 8 x 5 inch rectangle. Wrap and chill, swapping butter for dough in the fridge.croissant 1
2. Unwrap dough and roll out onto a lightly floured surface, dusting with flour as necessary* into a 16 x 10 in rectangle. Arrange dough w shortest side nearest you, put butter rectangle in the center, and fold like a letter—cover the butter with the bottom 1/3rd of dough first, then with the top. Brush off any excess flour with a pastry brush.

3. Turn dough 90 degrees so new shortest side is near you, then pound with a rolling pin at even intervals, making uniform impressions (this will help the butter to spread). Roll dough again into a 15 x 10 inch rectangle. Brush off any excess flour, and fold in thirds again, stretching the dough as needed to square off the ends—thus forming a 3 layer 10 x 5 inch rectangle.

dsc08507

4. Give yourself a congratulatory pat on the back for doing your (presumably) first ever “fold”, rewrap the dough in plastic wrap, and stick it back in the fridge at least another hour. (I’m not going to lie, I got a little impatient and may not have waited the whole hour… on that same note, I also left the house a while between another fold and it was in for over an hour, and alas the world has not come to an end)

5. Repeat 5 & 6 three more times, creating a total of 4 “folds”. Once you have completed your last fold, rewrap the dough and place in refrigerator for 8 – 18 hours.

When you’re ready to shape the Pain au Thanksgiving

1. Remove dough from refrigerator, unwrap and cut in half cross-wise. Re-wrap half of dough and place back in the fridge. Just look at all those buttery layers…

11.14 turkey 0278

2. Roll on lightly floured surface into a 16 x 12 inch rectangle, stretching as needed to maintain rectangular shape

11.14 turkey 0280
3. Cut into 4 by 4 inch squares. Stretch each square so that it is slightly elongated and place a small amount of filling of your choice into the center. If you go over 2 tablespoons of filling you will probably have a hard time rolling it into shape.

11.14 turkey 0285

4. Fold one side over the filling and wet it slightly with some water. Fold the other side over and press down firmly to seal.*

5. Place onto a parchment-lined half sheet pan, seam side down. Continue with remaining squares, I was able to fit 8 onto each pan. Once the pan is filled cover with plastic wrap or a kitchen towel and set in a warm spot to proof until doubled in size 1 to 2 hours.

6. Remove other half from fridge and repeat the steps again.


Baking: 

When ready to bake, preheat oven to 375F and make an egg wash by whisking one egg with 1 tablespoon water.
Right before you put the dough into the oven, brush with egg wash. If you feel so inclined, you can sprinkle some shredded cheese on top for added flavor. Bake for 15 to 20 minutes until well-browned.

Notes:

To freeze raw:

Once you have filled and sealed the dough, you can place them seam-side down on a small baking sheet (that will fit in the freezer) and cover lightly with plastic wrap. Freeze for 1 hour until firm, then transfer to a freezer-safe Ziploc bag and return to freezer until ready to bake.

To freeze cooked:
Wrap cooled pains tightly in foil and place into a freezer-proof Ziploc bag.

To bake from frozen (un-baked):
Place frozen dough on parchment-lined sheet and cover with plastic wrap.Place on counter to rise overnight about 8 to 10 hours. Once doubled in size paint with egg wash prior to baking.

If you freeze croissants pre-baked:
Frozen croissants can be thawed overnight prior to reheating or taken from the freezer directly to the oven, in which case they will need a few minutes more to reheat.  Bake for 10 minutes at 375F from thawed, add a few extra minutes if baking from frozen.


olga bread

olga bread 0185

Back home we have this restaurant called Olga’s Kitchen. It’s nothing fancy, but it was located in our town’s main shopping mall, which means I spent a fair amount of time there in my youth.

The main draw of Olga’s Kitchen is their “Olga Bread.” Olga Bread is an extremely soft, pliable, slightly sweet, pocketless flatbread. They serve their gyros, shawarma, and even ham and cheese enveloped in this warm, fluffy stuff, but my favorite way to eat it was always just straight up.

While I was waxing nostalgic to one of my aunts about Olgas, she mentioned to me that she had a recipe for the famed bread and would be happy to share it with me. Skeptical as I am about pretty much all recipes, I knew she wouldn’t steer me wrong… and she didn’t. The result was pretty darn close to the real thing.

I used butter in place of the margarine called for in the recipe, since I don’t own margarine and reading a recipe before I make it is way too much work. The butter gave the bread a more buttery flavor, but I think using margarine would have extended their shelf life as these were a bit stiff by day two. That being said, a few minutes in a preheated oven made them good as new, but if you want to give the recipe a shot with margarine be my guest.

I used our Olga breads to hold our chicken wraps, and then it masqueraded as a naan-replacement to dip into a saucy dinner the next night.

I haven’t been there in years, but Olga’s Kitchen is still around (I looked it up) and is apparently only located in Ohio & Michigan, which means making this recipe is about as close as you are likely to get to the real thing.

olga bread

Prep Time: 50 minutes

Cook Time: 10 minutes

Total Time: 2 hours

Yield: 16 rounds

Ingredients

  • 1 cup milk
  • 1/4 cup honey
  • 1/4 cup unsalted butter or margarine, melted (see notes)
  • 1/2 teaspoon salt
  • 1 package active dry yeast
  • 1/4 cup lukewarm water (105 - 115F degrees)
  • 1 teaspoon sugar
  • 1 egg, lightly beaten
  • 4 cups flour, divided

Instructions

  1. Heat milk to a simmer, then remove from heat. Add honey and butter and pour into a large bowl to cool.
  2. In a small bowl stir sugar into warm water and add yeas packet. Set aside to bloom, about 5 minutes.
  3. Add 1 cup flour to milk mixture and stir well.
  4. Add egg and yeast mixture to flour mixture; stir to combine.
  5. Add additional 1 cup flour and stir to combine. Continue adding flour, 1/4 or 1/2 cup at a time, until sticky dough is formed, don't worry if you don't use all of the flour.
  6. Turn dough out onto a floured surface and knead for 2 minutes until it forms a smooth and cohesive ball. The dough will still be quite loose and sticky, this is how you want it to be, DO NOT add more flour.
  7. Pour 1 tablespoon of neutral vegetable oil into a large bowl and place dough into bowl. Toss once to coat and cover bowl with plastic wrap. Place in a warm place until dough has doubled in size, about 1 hour.
  8. When ready to form dough, punch dough down and divide into 16 equal pieces. Roll each piece into a thin circle, about 8 inches in diameter. I found this was easiest to do by covering the top of the dough with plastic wrap while rolling, which prevented the sticky dough from attaching itself to my rolling pin. Then, I layered each round between plastic wrap to keep from sticking together.
  9. When ready to cook, heat a 10-inch dry skillet (or griddle pan) over medium-high heat.
  10. Drop dough onto pan and cook for about 20-.30 seconds per side. The first side will be well-browned and the second side will be more splotchy. Transfer to towel-lined plate to keep warm while cooking the rest.
  11. Store in an airtight container at room temperature. After the first day, bread is best served reheated in the oven or on a skillet to restore its soft, pliable texture. After the second day, any unused bread can be frozen in an freezer-safe bag and reheated for later use.

Notes

*I used butter in place of margarine which gave the bread a more buttery flavor, but I think using margarine would have extended their shelf life as these were a bit stiff by day two. This is easily remedied by reheating the olga bread to restore pliability.

*I made this by hand, using a spatula and a bowl, because I was too lazy to take out my mixer. You could definitely cut down on prep time by using a stand mixer with a paddle attachment or dough hook, if desired.

https://wee-eats.com/2014/11/11/olga-bread/

dominique ansel’s banana bread

ansel banana bread

As you may have heard, the great Dominique Ansel recently released the recipe for his infamous cronuts. The recipe takes three days, four rises, a deep fryer, and something called a “butter block”. Oh, and let’s not forget to make the glaze and the flavored sugar.

While I may never eat (and will more likely never make) a cronut, what I was more interested in was his much simpler, more approachable recipe for the great and humble banana bread. Because the one thing everyone needs is yet another banana bread recipe, right?

I mean, it’s not like I don’t already have not one but two recipes for banana bread right here on this very site, but I was intrigued. I mean, how amazing can banana bread really be?

I became even more intrigued as I continued reading the recipe… no vanilla, no brown sugar, not even a hint of cinnamon. Clearly this was some sort of trick. Would Mr. Eats even eat a quickbread that wasn’t covered in streusel? I wasn’t sure…

I fought off my urge to tinker with every fiber of my being… No, Natalie, we aren’t adding vanilla. Or brown sugar. That “dash of cinnamon” is definitely off the table – If the great Dominique Ansel doesn’t need it, then neither do I gosh darnit!

ansel banan bread 2

After I congratulated myself on completing a recipe from start to finish by actually following the directions and not tinkering with a single ingredient… I tossed it in the oven and prepared myself for disappointment. I was ready to laugh and scoff and bring Chef Ansel down a peg.

Well color me wrong because this stuff is like banana gold. It turns out, apparently, that you don’t actually need any vanilla, or streusel, or cinnamon. All you need is bananas, flour, sugar, eggs and love. And lots of butter. You’ll definitely be needing that butter. And an over-sized loaf pan (my puny 8 by 5 would not do. Luckily I found some old larger loaf pan that, judging from the looks of it, I can only assume came from my mom or possibly a bomb shelter.

The loaf baked up with an incredibly light and tender crumb on the inside and a delightfully crisp exterior. I was a bit lazy about the banana-mashing so I still had a few chunks of banana, but i like it that way.

It is pure banana essence baked into loaf form and more than anything else – it is addictive.

Score one for Chef Ansel. I’m so sorry I ever doubted you.

ansel bread 4

Since I assumed that his cookbook would be full of cronuts and other complex things that frankly I get tired just thinking about… I had already decided that I wasn’t going to purchase it. However, now that I realize that there could be more gems in there like this banana bread,  I should probably just pre-order it now.

dominique ansel’s banana bread

Ingredients

  • 2 cups sugar
  • 2 cups flour
  • ¾ teaspoon baking soda
  • ¾ teaspoon nutmeg
  • 1 teaspoon salt
  • 1 teaspoon baking powder
  • 3 eggs, room temperature
  • 4 overripe bananas, mashed
  • 14 tablespoons unsalted butter, melted, plus more for greasing pan

Instructions

  1. Preheat the oven to 350°F. Grease a 10" x 5" x 3 ½" loaf pan and set aside.
  2. Combine dry ingredients in a large bowl, whisking to combine.
  3. In a separate medium bowl, lightly beat the eggs and whisk in mashed bananas.
  4. Create a well in the dry ingredients and pour the wet ingredients into the dry. Gently fold the mixture until the ingredients are just combined.
  5. Add the melted butter to the flour and banana mixture, and stir until fully incorporated.
  6. Pour the batter into prepared pan and bake until golden brown and a cake tester inserted in the center of the loaf comes out clean, about 1 hour and 10 minutes.
  7. Allow to cool in the pan for 20 minutes, then turn out onto cooling rack to complete cooling.

Notes

This recipe was found on Tasting Table

https://wee-eats.com/2014/10/18/dominique-ansels-banana-bread/

pumpkin pie bread pudding

pumpkin bread pudding 0084

Last week I was forced to thaw my pumpkin challah ahead of schedule in order to complete its photo-op and I knew that re-freezing it really wasn’t an option. Since I didn’t want all of the challah to go to waste I had to do something with it (poor me), so I went to the easy option: bread pudding.

I took my other bread pudding recipe and adapted it slightly… well, by “adapted” I mean “poured a can of pumpkin into”… That counts as “adapted,” right?

I also switched from white sugar to brown because, to me, pumpkin just screams “BROWN SUGAR” and reduced the liquids a bit to make up for the additional liquid provided by the pumpkin puree. I probably could have reduced the liquids a bit more since I had originally planned to only had 1 cup of pumpkin puree… then I got tired thinking of what I would do with the rest of the can of pumpkin and just dumped the rest of it in.

I mean, what’s the worst that could happen? There is some real science going on here, guys.

I worried that it might be too much liquid, and maybe it was, the pudding took way longer than others have to bake, although that could have been because I insisted on opening the oven door every ten minutes to check on it. (Shame on me, I should know better.)

I’ve included the recipe as I made it below, along with some notes in case you’re interested in scaling back on the liquid.

pumpkin bread pudding 7462

So I took the pudding out of the oven with trepidation, terrified that it was going to be a soggy, soupy mess. Then, after I let it cool off a bit on a wire rack I popped into the fridge to firm up. This step is important…

The refrigerator is where the magic happens.

In the refrigerator, what was once a warm bread pudding transforms into some sort of magical bread pudding/pumpkin pie hybrid. The top of the pudding stays wonderfully crisp while the bottom turned into what I can only describe as pumpkin pie.

Like, literally, the exact taste and texture of a creamy pumpkin pie.

It. was. amazing.

The refrigerator also has the added bonus of firming up the bread pudding enough for you to actually slice and serve it versus having to scoop it with a spoon.  Slicing the pudding also makes freezing it an option. If that’s your thing, you can see my notes on freezing the bread pudding at the end of the recipe.

pumpkin bread pudding 7504

I topped my bread pudding with a healthy dollop of freshly-whipped cream (spiked with some cinnamon).  I suspect that a scoop of ice cream or creme anglaise would be a nice touch, too.

pumpkin pie bread pudding

Prep Time: 10 minutes

Cook Time: 1 hour

Total Time: 2 hours, 10 minutes

Yield: 1 casserole, 8 to 12 servings

Ingredients

  • 6 cups stale bread (I used pumpkin challah)
  • 1 cup heavy cream
  • 1 cup whole milk
  • 1 15-oz can pumpkin puree
  • 5 egg yolks
  • 1/2 cup brown sugar
  • 1 Tablespoon vanilla extract
  • 2 teaspoons pumpkin pie spice
  • 1 cup cinnamon chips

Instructions

  1. Cut bread into 1/2- to 1-inch cubes; set aside.
  2. In a large mixing bowl, whisk together all ingredients except the bread and cinnamon chips.
  3. Once combined, add the bread and cinnamon chips; toss to coat.
  4. Pour into greased baking dish and cover with plastic wrap; refrigerate for 1 hour (or up to overnight).
  5. When ready to bake, preheat oven to 325F. While the oven is preheating, set the bread pudding on the counter to take the chill off.
  6. Once the oven is preheated, remove plastic wrap from bread pudding and cover pudding with aluminum foil bake 20 minutes covered, then remove cover and bake for an additional 30 -50 minutes, until the bread pudding no longer releases liquid when pressed and the internal temperature reaches 165F.
  7. Cool bread pudding on a wire rack for 30 minutes to 1 hour, then transfer to the refrigerator to chill until ready to serve (4 hours or up to overnight). This is where the magic happens.
  8. When ready to serve, either reheat individual servings of bread pudding for about 30 seconds each (being careful not to overheat them) in the microwave or reheat the entire pan in the oven by placing it in a cool oven, covered with aluminum foil. Set oven to 350 and by the time your oven is heated the bread pudding should be warmed through (you can poke it to check, if you like).
  9. Serve with creme anglaise, ice cream, or cinnamon-spiced whipped cream.

Notes

My bread pudding came out beautifully, but you could easily make the following modifications if you are short on any ingredients, however your cooking time may be slightly less: - You could use just 1 cup of pumpkin puree instead of one whole can, keeping other liquid ingredients the same - If you are using a full can of pumpkin puree, you could easily get away with reducing the whole milk and cream by another 1/4 cup each (or just reducing one by a half cup) - You could use all heavy cream or sub in half-and-half instead of using a mixture of heavy cream and whole milk

*As is - this recipe will create a nice crust on top of the bread pudding. If you prefer to not have a crusty top to your bread pudding, leave it covered for the entire baking time.

*The bread pudding magic really happens after its chill in the fridge, so you could serve it fresh from the oven but I strongly recommend the chill. This is what transforms the lower portion to the texture of pumpkin pie.

*You can (and I did) wrap individual servings of bread pudding tightly in plastic wrap and freeze them to enjoy later. Place in refrigerator to thaw and then heat for 30 seconds in the microwave (or warm in the oven).

https://wee-eats.com/2014/10/14/pumpkin-pie-bread-pudding/

Pin it:

pumpkin-bread-pudding-pin

pumpkin challah

pumpkin challah 7435

‘Tis the season for pumpkin and I’ve been practicing my bread braiding lately so naturally my next step would be to braid pumpkin. I mean, duh, obviously.

I believe challah is traditionally a four-rope braid and, although my skills are vastly improved from my first attempt, I have not quite achieved that level of skill yet. So, for the sake of everyone’s sanity, I stuck with practicing my three rope braid. Next time I think I will be ready to level up my skills to four ropes.

Having never made challah, apparently there are about a bajillion different recipes and a katrillion ways to make it, so basically every source of research was useless to me. The only thing I knew was that I wanted to keep it dairy-free, because I feel like if you’re putting dairy in your challah it is no longer challah.

Not that it isn’t some other dairy-licious egg bread, it’s just not challah. Not really. And why would I want to have not-challah when I was craving challah?

pumpkin challah 0007

The end result was surprisingly good, especially when you take into consideration that I had almost no idea what I was doing. It had the perfect challah texture that I was looking for. Though the pumpkin gives the bread a stunning orange hue, the pumpkin’s flavor wasn’t overly pronounced. In fact, if you left out the cinnamon and spices you could easily serve it alongside dinner.  Either version will transform beautifully into french toast or bread pudding, but more on that coming later.

This bread, like all bread, is best eaten the day its made but will freeze beautifully as well. Since I lost my memory card last weekend when I made this bread, these pictures are actually from my defrosted loaf.

pumpkin challah

Prep Time: 30 minutes

Cook Time: 50 minutes

Total Time: 4 hours, 20 minutes

Yield: 1 loaf challah

Ingredients

  • 1/2 cup warm water
  • 1 package instant dry yeast
  • 1 Tablespoon sugar
  • 1/4 cup honey
  • 2 eggs + 2 egg yolks, whites reserved
  • 1 cup pumpkin puree
  • 3 Tablespoons + 1 Tablespoon neutral vegetable oil; divided
  • 1 1/4 teaspoon kosher salt
  • 4 cups all-purpose flour + 1 cup, reserved
  • 1 Tablespoon pumpkin pie spice

Instructions

    Make the dough
  1. Mix yeast with water and sugar; set aside 5 minutes until foamy.
  2. In a stand mixer with a paddle attachment, beat in the pumpkin, 3 tablespoons oil, honey, eggs, yolks, and salt. Beat on medium speed until combined.
  3. Add 1 cup of flour and beat on low until combined. Add additional cup and continue beating until combined.
  4. Continue adding remaining 2 cups flour, 1 cup at a time, kneading until smooth and elastic.
  5. If the dough is too wet and stick, continue adding last cup of flour, 1 cup at a time, until the dough becomes smooth. I actually ended up dumping mine out onto the counter to knead by hand so that I could judge the texture better. You want it to be soft enough to keep a dent when your finger pokes it, but not sticky enough to stick to your finger.
  6. Once desired consistency is reached, pour 1 tablespoon of oil into a large bowl. Add dough to bowl and toss to coat. Cover with plastic wrap or a kitchen towel and set in a warm place until doubled in size 60 to 90 minutes.
  7. Shape the dough
  8. Once doubled in size, gentlly punch down the dough and turn out onto a lightly-floured surface.
  9. Divide into 3 equal portions, and roll each into a 14 to 17-inch rope. (You could do a 4 or more ropes of dough but I'm not that skilled).
  10. Once braided, place onto baking sheet and cover with oiled plastic wrap or a kitchen towel and set in a warm place to proof until doubled in size, another 60 - 90 minutes.
  11. When nearing the end of the bread proofing time, preheat the oven to 375 F. I usually set mine above the stove and turn the stove on about 30 minutes into proofing. The heat from the stove warms the top of the oven just enough to give my bread an extra boost.
  12. Beat remaining two egg whites. Brush bread with egg white and place into oven. Bake 40 to 50 minutes.
  13. Check on the bread at the 30 minute mark, if it is browning too quickly tent with foil and continue cooking. You can tell the bread is done when it is a beautiful deep golden brown and is firm and hollow when tapped. The internal temperature should be around 190F, for those of you who are into that sort of thing.

Notes

This bread, like all bread, is best eaten the day it is baked but will freeze beautifully as well. To freeze bread, wrap tightly in plastic wrap then again in foil to freeze. Thaw bread still wrapped at room temperature for a few hours or overnight.

If you don't want to make this all in one day, you could allow the bread to do its first rise overnight in the fridge. Bring to room temperature for 30 minutes to one hour before proceeding with shaping the dough.

https://wee-eats.com/2014/10/07/pumpkin-challah/

pumpkin-challah-0007 pin