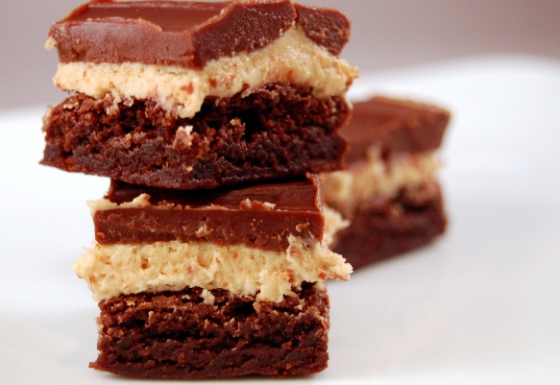
peanut butter truffle brownies

peanut butter truffle brownie main

“I bet this is what heaven tastes like.”

Well, that’s what one of my official taste testers said at least. I’m bound to be biased where chocolate and peanut butter are involved, but I received nothing but praise over these babies, so I’m pretty sure they’re a solid bet.

I was initially worried that the peanut butter layer was too sweet and not peanut buttery enough, but was reassured that it was the perfect amount of peanut butter flavor. I’m a huge fan of peanut butter though, like, left unattended I will work my way to the bottom of a jar huge. So yeah, I’m always going to think something needs more peanut butter. It’s just my nature.

I did alter the filling a bit from the original recipe, and resorted to a box mix (gasp!) since I was short on time and had a work potluck to make these for. So if you’re short on time and need to cheat, who am I to judge? Otherwise, given how good these were with boxed brownies, I’m sure using your favorite go-to brownie recipe as a base will only make them more spectacular.

I cut mine into 1-inch squares (and then promptly consumed three of them), but these babies are RICH. I’m sure a regular person would be content with just one square. Enjoy 🙂 Another win for Pinterest (and another loss for my waistline). Oops.

Thank goodness it’s Mardi Gras and calories don’t count today. 🙂

Peanut Butter Truffle Brownies

[ Printable Recipe ]

Brownie Layer:

1 batch of your favorite brownies (13×9-in pan)

Peanut Butter Layer:

1/2 Cup of butter, softened
3/4 Cup of creamy peanut butter
2 Cups of powdered sugar
2-3 Teaspoons of milk (if needed, I didn’t need it)

Ganache Layer:

1/4 Cup of creamy peanut butter
2 Cups of semisweet chocolate chips
1/4 Cup of butter
2 Tbsp of heavy whipping cream

1. Preheat oven to 350 degrees. Butter the bottom and sides of a 9×13 metal baking pan. Put a long piece of parchment or foil in the bottom, letting the ends extend slightly over the sides. Butter the parchment paper.

2. Make your brownies according to recipe directions. Remove pan and let cool completely on a rack.

3. While the brownies cool, make the peanut butter filling; fix a stand mixer with paddle attachment or use an electric mixer. Combine the peanut butter and remaining filling ingredients in a bowl and beat until smooth and creamy and spreadable (add a few teaspoons of milk, one at a time, If it’s not spreadable).

4. Take the cooled brownies and spread an even layer of peanut butter. Place in the refrigerator until filling is set, about 30 minutes.

5. While the filling sets, make the ganache; take a small saucepan and a glass or heatproof bowl. Simmer water and place the bowl over the saucepan. Melt the ganache ingredients together and stir to combine.

6. Take the chilled brownies and pour the ganache over the top. Spread gently. Chill until set.

7. When ready to serve, lift the brownies out of the pan using the ends of the parchment paper. Slice into 1-inch squares with a sharp knife, wiping with a warm damp towel between cuts.

[ Adapted from somekitchenstories ]

brookies!

brookies

Why choose between a brownie and a cookie when you could have both?? I spotted this recipe over at beautiful disasters and had to try it. Unfortunately, the universe aligned against me and not only did I not pay attention to proper ingredient amounts, but the oven temp on the original recipe was off as well. The result? Somehow I still ended up with chewy, delicious, brownie-like cookies. Amazing, right?

These reminded me of my fudgy cookies that I use for ice cream sandwiches. They have a nice cookie exterior with a chewy brownie center. These are sure to take care of any chocolate cravings you may have. Make sure to chill the dough a bit so they don’t spread too much!

BROOKIES! (Brownie – Cookies)

[ Printable Recipe ]

  • 1/4 c. butter – that’s a half stick butter (I may have spaced out and used a whole stick, oops?)
  • 2 (1 ounce) squares unsweetened chocolate, chopped
  • 3/4 c + 3/4 cup chocolate chips, divided
  • 3/4 cup flour
  • 1/2 teaspoon baking powder
  • 1/2 teaspoon salt
  • 2 eggs
  • 3/4 cup sugar
  • 1 teaspoon vanilla extract
  1. combine butter, unsweetened chocolate, and 3/4 c. chocolate chips in a saucepan. Cook over low heat, stirring constantly, until butter and chocolate melt; let cool.
  2. Beat eggs, sugar, and vanilla in a large bowl. Gradually add flour, salt and baking powder, beating well. Then add the chocolate mixture and beat well. Stir in remaining 3/4 c. chocolate chips.
  3. Scoop dough onto baking sheets, 1 inch apart. Bake at 350 degrees F for 8-10 minutes. Cool slightly on baking sheets;  finish cooling on wire racks

[ Thanks for the recipe, Casey! ]

mocha brownie cupcake

mocha cupcake

It’s a cupcake, no, a brownie, no, a cupcake… It’s chocolate. And coffee. It’s “mocha”. Gail sent me this recipe for our baking date this weekend. It’s straight from the Hershey’s website where they call it a “European Mocha Fudge Cake”. As I was reading the recipe I decided that it looked suspiciously similar to a brownie recipe.

To save time, and, more importantly, to use these super cute cupcake wrappers, we baked them into cupcakes. Once baked, our suspicions were confirmed – little brownie cupcakes, browniecakes, cup-brownies. Cup-brownies? That should be right… Call them whatever you want, I will call them delicious. And Gail will back me up 110%.

The real star here is the frosting. The mocha “frosting” is really just a coffee-flavored whipped cream topping. It’s amazingly light and sweet, like a sweet caffe latte. Once you pair the coffee topping with the dark chocolate brownie, delicious mocha love is born. Yes, ladies and gentleman, when chocolate and coffee fall in love and get married, that is where mocha comes from. (Be sure to tell all your children). I’m pretty sure Gail and I could have polished off that whole bowl of frosting alone, but we restrained ourselves… We deserve a frickin’ medal.

I was so good, I used the leftover frosting for a second dessert, I can’t wait to try it when I get home! If it’s good, maybe you’ll get to know what it was… [insert suspenseful music]

Mocha Brownie Cupcakes

Printable Recipe

  • 1-1/4 cups (2-1/2 sticks) butter
  • 3/4 cup Cocoa
  • 4 eggs
  • 1/4 teaspoon salt
  • 1 teaspoon vanilla extract
  • 2 cups sugar
  • 1 cup all-purpose flour
  • 1 cup finely chopped pecans (nope, we left these out)
  • COFFEE WHIPPED TOPPING (recipe below)
  1. Heat oven to 350°F. Line two 12-cup cupcake pans with the prettiest liners you can find.
  2. Melt butter in small saucepan. Remove from heat and add cocoa; cool slightly.
  3. Beat eggs in large bowl until foamy. Add salt and vanilla, then gradually pour in sugar, beating well. Add cooled chocolate mixture and blend thoroughly.
  4. Fold in flour. Stir in pecans. (if using)
  5. Pour mixture into prepared pans.
  6. Bake  about 18 minutes or until wooden pick inserted in center comes out clean. Cool 5 minutes; remove from pans to wire racks to finish cooling.
  7. Once cooled, frost with coffee topping. Refrigerate 1 hour or longer before serving. Store covered in refrigerator.

.

COFFEE WHIPPED TOPPING

  • 1-1/2 cups cold whipping cream
  • 1/3 cup packed light brown sugar
  • 2 teaspoons powdered instant coffee
  1. Whip cream with instant coffee until frothy, add brown sugar and continue to whip until stiff peaks form.

[Adapted from Hershey’s]

sweet n salty

sweet n salty brownie

It always feels good to unwind after a stressful day/week/month with some good, old-fashioned kitchen therapy. Spending time in the kitchen becomes such a zen experience for me. Something about baking in particular is very therapeutic. It even gives you extra time to wind down in the middle of the process. While things are baking you can clean the dishes you used, read a magazine, watch a show, dust the book shelves, have a cocktail… ya know, relax.

Well, following a crazy week/month at work, helping my mom move this weekend, the stress of remodeling, oh and our garage door broke on Friday, I needed some kitchen therapy. So today, after I finished all the laundry, gymed, and straightened up a bit- BF headed out to fix our garage door (poor guy can’t get a break) and I headed into the kitchen to find my sanity.

This recipe can be found in Baked Explorations (the second book released by Baked Bakery in NYC- still unclear how BFF and I missed it when we went… we really have to get back there). Since I have been too poor/cheap to purchase this particular book, I’ve been stuck just leafing through the recipes in stores and staring longingly at it through store windows. 🙁 That is, until I saw Brown Eyed Baker‘s post for “Sweet & Salty Brownies”. Finally, my first glimpse into the wonderful world of Baked Explorations.

The Baked Brownie alone is intense, rich, and decadent. This version basically takes the Baked Brownie – which is already a 10 on intensity, and turns it up to 11. I was expecting this to be: layer of brownie > layer of caramel > layer of brownie. Nope. Somehow this magical thing happens where the caramel becomes one with the batter, forming this crazy sweet-salty-caramel-brownie hybrid dessert that has just enough brownie “crust” to make it a solid piece. You can actually tell which brownies have more of the caramel in them, because they look “wetter” than the ones that have less. (So you know which ones to go for ;-))

My attempts at describing the brownie really do it no justice, you will just have to try one for yourself. Just trust me when I say that the salty caramel accents the chocolate brownie perfectly… and to make sure you have a tall glass of milk nearby when you eat one.


Sweet & Salty Brownies – Recipe from Baked Explorations

Printer-Friendly

Caramel Filling:
1 C sugar
2 Tbsp light corn syrup
½ C heavy cream
1 tsp fleur de sel
¼ C sour cream

Brownie Batter:
1¼ C AP flour
1 tsp salt
2 Tbsp unsweetened cocoa powder (I used Valhrona)
11 oz dark chocolate, coarsely chopped (my least favorite part of brownie-making)
1 C (2 sticks) unsalted butter, cut into 1-inch cubes
1½ C sugar
½ C brown sugar
5 eggs, at room temperature
2 tsps vanilla extract

Topping:
1½ tsps fleur de sel
1 tsp coarse sugar

For the Caramel:

1. In a small saucepan, combine the sugar and corn syrup with ¼ cup water, stirring them together carefully so you don’t splash the sides of the pan. Cook over high heat (I started on medium, then turned it up to medium-high when I was ready to give it my full attention) until an instant-read thermometer reads 350 degrees F, or until the mixture is dark amber in color, 6 to 8 minutes.

2. Remove from the heat, and carefully add the cream (it will spit) and the fleur de sel. Whisk in the sour cream. Set aside to cool.

it'll end up like this

it’ll end up like this – creamy and dreamy

Make the Brownie Batter:

Preheat oven to 350 degrees F.

1. Butter the sides and bottom of a glass or light-colored metal 9×13-inch pan. Line the bottom with a sheet of parchment paper, and butter the parchment.

2. In a medium bowl, whisk together the flour, salt and cocoa powder.

3. Melt chocolate and butter together in a heat-proof bowl over simmering water. Once melted to a smooth consistency, turn off the heat, and add both sugars. Whisk until completely combined and remove the bowl from the pan. The mixture will look something like:

4. Add 3 of the eggs to the chocolate mixture and whisk until just combined. Add the remaining eggs and whisk until just combined. Add the vanilla and stir until combined. Do not overmix!

5. Sprinkle the flour mixture over the chocolate & gently fold into the wet ingredients.

Assembling the Brownies:

1. Pour half of the brownie mixture into the pan and smooth the top with a spatula. Drizzle about ¾ cup of the caramel sauce over the brownie layer in a zigzag pattern, making sure the caramel doesn’t come in contact with the edges of the pan. Use an offset spatula to spread the caramel evenly across the brownie layer, leaving about a ½-inch border around the edges. In heaping spoonfuls, scoop the rest of the brownie batter over the caramel layer. Smooth the brownie batter gently to cover the caramel layer.* (see tips)

2. Bake the brownies for 30 minutes, rotating the pan halfway through the baking time, and check to make sure the brownies are completely done by sticking a toothpick into the center of the pan. The brownies are done when the toothpick comes out with a few moist crumbs.

3. Remove the brownies from the oven and sprinkle with the fleur de sel and coarse sugar.

4. Cool the brownies completely before cutting and serving.

*Tips

*Every time I make Baked brownies I’m afraid I under-baked them. Despite my toothpicks coming out clean, even over-baking a batch, they are always ooey-gooey inside to the point that I’m not convinced they’re fully cooked. Rest assured that they are. (or that I’m certifiably crazy)

*When you’re doing the top brownie layer, I suggest spooning the batter from the outside in. I am bad at following directions and just started dumping the batter in which caused the caramel to push through its “1/2-inch border”… oops!

*Again, be careful with the 2nd brownie layer, as the leaked caramel glued some of my brownies to the pan, and made a terrible, terrible mess… (see below)
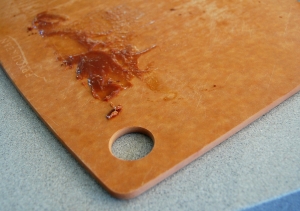
sticky caramel mess

sticky caramel mess

*A lot of people are afraid of cleaning up after caramel, it’s really not that bad. Remember- caramel is made out of sugar, which dissolves in water. All you need is hot water, let it sit, and voila- you’re done!

*It was easier to cut the brownies after chilling them in the fridge for an hour

*The brownies can be stored, tight wrapped at room temperature, for up to 4 days.


If you like this recipe, you’ll love these:


Nutella Brownie Bites

nutella bites main

This weekend was BF’s brother’s birthday. And if there’s one thing I know about him, it’s that he loves nutella. In a way that may even rival my love of peanut butter.

Unfortunately, we’ve been training new-hires at work the past week, so I haven’t had a lot of spare time or energy to exert on projects, and since I am not personally in love with nutella, I had no go-to recipe for him. So I found a recipe that wouldn’t require going to the store, but that would still be nutella-y enough for him: brownies.

This particular recipe had just 3 simple ingredients: nutella, eggs, and flour. Since I’m never one to leave a recipe as-is, I added vanilla extract and mini chocolate chips, just for good measure. I really wanted to make a nutella-ganache frosting for these, but due to a traffic accident on my way home from work on Friday, I got home with just enough time to get changed and head to the restaurant for his birthday dinner. And to gift-wrap his treats, of course.

This is even easier than my usual blondie recipe- It took maybe 30 min from start to finish (including baking). I wasn’t blown away by these but, as I stated, I’m not a big nutella person. Given the simplicity of the recipe, though, you can’t really complain. Plus it only makes about 12 – 15 of the little guys, which means I don’t have a whole bunch of extras laying around tempting me to eat them…

If you’re a fan of nutella, and in a hurry for a chocolatey treat, go for it! I certainly haven’t heard any complaints from him.

Nutella Brownie Bites – Adapted from Desserts 4 Today

Printer-Friendly

Yields – 12 – 15 bites

  • 1/2 c nutella
  • 1 egg
  • 1/2 tsp vanilla extract
  • 5 Tbsp flour
  • 1/3 c mini chocolate chips

1. Mix egg, nutella, and vanilla extract in bowl. Add flour and whisk to combine. Once smooth, fold in chocolate chips.

2. Fill mini-muffin cups  with batter and bake @ 350F 12 – 15 minutes, until a toothpick comes out clean. (I would err on the side of underbaking for extra gooeyness)