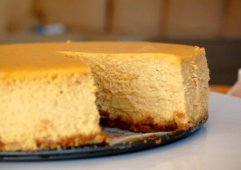
triple chocolate pumpkin pie

photo (5)

It’s Sunday.  2013.  New year, new day, new week.  New pie?

Yeah, that sounds right.

I made this particular pie as an accompaniment to our regular pumpkin pie that I made for Thanksgiving.  I wanted to try something new, but didn’t want to start some sort of Thanksgiving mutiny all over a pie, so I figured if I made TWO pies, then I could also make this one.

I know what you’re thinking, because I was thinking the same thing, “chocolate pumpkin pie??? weeeeird.”  I know.

But at the same time, it seems like it should work, my logic was basically something along the lines of, “Chocolate?  Good.  Pumpkin?  Good.  Chocolate + Pumpkin?  Double good?”

My first bite was like “woah, definitely tastes like chocolate”… like super chocolatey.

Then the second bite, “definitely tastes like pumpkin”… as the subtle pumpkin flavor came in for back-up.

“… but it tastes good” … Bite three, “It tastes really good”

Particularly with a touch of cinnamon whipped cream.

DSC_7631

Now I realize fall is long gone, but that doesn’t mean my extreme love of pumpkin just packs its bags and goes to Florida for the winter.

Nope.  My love of pumpkin persists all year long.  So why couldn’t you make a pumpkin pie in January, or February, or even August?

I hope you can tell from the picture that this pie is amazingly creamy.  The chocolate layer on the bottom protects the crust from getting soggy, providing a nice crunch to contrast with the smooth, creamy filling.

This pie has not one but three kinds of chocolate.  Semi-sweet chocolate, milk chocolate, and bittersweet chocolate.  I had to lighten it a little bit for the BF since he’s not a fan of dark chocolate.  I basically just replaced a portion of the chocolate at each step with milk chocolate.

I know a lot of you have some New Years resolutions to follow, but pumpkin is practically a health food, dark chocolate is full of antioxidants, and I’m sure your New Years diet doesn’t start until tomorrow, anyway…. Right?

Triple Chocolate Pumpkin Pie

[ Printable Recipe ]

  • 2 cups graham cracker crumbs (about 16 crackers)
  • 6 Tablespoons (3 oz) unsalted butter, melted
  • 1 Tablespoon sugar
  • 2 Tablespoons packed brown sugar
  • 1/4 teaspoon salt
  • 1/2 teaspoon ground cinnamon
  • 3 ounces bittersweet chocolate, finely chopped
  • 6 ounces semisweet chocolate, chopped
  • 4 Tablespoons (2 oz) unsalted butter, cut into small pieces
  • 1 (15-oz) can solid-pack pumpkin
  • 1 (12-oz) can evaporated milk
  • 3/4 cup packed brown sugar
  • 3 large eggs
  • 1 Tablespoon cornstarch
  • 1 teaspoon pure vanilla extract
  • 1 1/2 teaspoons coarse salt
  • 3/4 teaspoon ground cinnamon
  • 3/4 teaspoon ground ginger
  • 1/4 teaspoon ground nutmeg
  • Ground cloves
  • 1 ounce milk chocolate, melted

Make the crust

1. Preheat oven to 350 degrees. Combine graham cracker crumbs, butter, sugars, salt, and cinnamon in bowl.
Firmly press mixture into bottom and up sides of a deep, 9 1/2-inch pie dish. Bake until firm, 8 to 10 minutes.

2. Remove from oven, and sprinkle bittersweet chocolate over bottom of crust. Return to oven to melt chocolate, about 1 minute.
Spread chocolate in a thin layer on bottom and up sides. Let cool on a wire rack.
Reduce oven temperature to 325 degrees.

Make the filling

3. In a large heatproof bowl set over a pot of simmering water, melt semisweet chocolate and butter, stirring until smooth.
Remove from heat.

4. Mix pumpkin, milk, brown sugar, eggs, cornstarch, vanilla, salt, cinnamon, ginger, nutmeg, and a pinch of cloves in a medium bowl.
Whisk 1/3 pumpkin mixture into chocolate mixture. Whisk in remaining pumpkin mixture until completely incorporated.

5. Transfer pie dish to a rimmed baking sheet, and pour pumpkin mixture into crust.
Bake until center is set but still a bit wobbly, 55 to 60 minutes. Let cool in pie dish on a wire rack.
Refrigerate until well chilled, at least 8 hours (preferably overnight). Before serving, drizzle melted milk chocolate on top.

thursday things

God bless Trader Joes: I finally found a delicious turkey bacon.  The most delicious turkey bacon in all the land.  I used it to make this “healthy” breakfast with a fat free english muffin, and a perfectly-poached egg.

Drooling?

Side note: What’s the deal with measuring cups these days? My recent guest star, Kabrina, and I were discussing these recently. Here is her measuring cup, less than one year old and my measuring cup, also very young:


The difference?

I can see the faint lines in mine (if I hold it up to the window) and then draw them on with a marker. I essentially paid for a blank piece of glass. Thanks.

I know for a fact that when I was a child, we had one measuring cup, and it lasted for my entire childhood. So what gives? The cup has one job: measure things. And it fails. It fails at its ONLY REASON FOR EXISTING.

Ok Pyrex, whatever cheap paint you’ve switched to, I’m sure it’s saving you buttloads of money, but it’s time to stop. I promise that I will drop my measuring cup and it will shatter into 1,000 pieces and I will have to buy a new one… eventually. You don’t have to attempt to expedite the process with horrible paint.

Know what else has to stop? Communal tables in restaurants. Oh, how they fill me with a fiery rage. I am happy to see that I am not the only one who despises communal seating at restaurants… I realize it saves you money, and I realize that it’s “convenient” (for the restaurant) but it’s SO UNCOMFORTABLE! It’s like being on an airplane, you’re surrounded on either side with people you don’t know and you have to decide which is more awkward: ignoring the people two inches away, or interrupting their dinner by talking to them.  Let’s just stop the madness now.

On a much happier note, there’s a new video of my golf boyfriend (that’s two links btw). I’ve never been a fan of golf, but I would watch it if he was my man. How could you say no to charm like that?

This insanely cute pillow from A Beautiful Mess almost motivates me to be crafty enough to make it. I’ll put that on my pinboard to forget about and probably never make…

Speaking of pins, the Fall Flavors board is up and running! Which means that this is basically me for the next three to four months:

… Like my pumpkin muffins with cream cheese filling or the best pumpkin cheesecake in the world! (yes, i stand by that statement)


Speaking of pumpkin, my friend posted this hilarious picture on Facebook. I promptly died from laughter.

That’s all for this week, have a fabulous weekend!

gooey butter cake

gooey-butter-cake

WARNING: THIS STUFF IS RICH.

I mean, really rich. And it takes a lot for me to say something is “rich”. Of course, what else could you expect from something out of the Momofuku recipe collection?

WARNING: NOT FOR THE FAINT OF HEART

Don’t believe me? Ingredients include: A stick of butter. A package of cream cheese. Oh, and  pound of powdered sugar. No big deal.

WARNING: ADDICTIVE

Baked in an 8 x 8 pan, this recipe claims to make 64 servings. 64 1-inch squares. Trust me, you’ll only need one square… but you’ll probably be back for more.

gooey butter cake

Yield: 64 1-inch squares

Ingredients

  • 'For the base:
  • 1 pound yellow cake mix (usually one box)
  • 4 ounces butter, melted
  • 1 egg
  • 'For the gooey butter topping:
  • 8 ounces cream cheese, softened
  • 2 eggs
  • 1 pound powdered sugar
  • 1 teaspoon vanilla extract

Instructions

  1. 1. Preheat the oven to 350°F. Meanwhile, make the base by mixing together the dry cake mix, butter and 1 egg. Pat it into a parchment-lined 8-by-8-inch pan.
  2. 2. Make the gooey butter topping by creaming together the cream cheese, remaining 2 eggs, sugar and vanilla. Pour it over the base cake mixture, spreading all the way to the edges. Bake for 30-45 minutes, or until the edges are a light golden brown, and the center still tender, but cooked. (think: cheesecake)
  3. 3. Allow to cool completely in pan. Turn out onto a cutting board and cut into 1-inch-squares.

Notes

* For easier slicing, place in the freezer until firm, cut while cold, and transfer to mini-muffin papers.

*It is also helpful to have a warm, damp, clean rag to wipe your knife on in between slicing.

https://wee-eats.com/2012/01/01/gooey-butter-cake/

[ recipe courtesy of Momofuku Milk Bar ]

You may also like…


Peppermint Crack

peppermint crack 1

This wonderful little concoction is called, simply, “crack”. And, if you sprinkle peppermint on top, it becomes immediately festive “holiday crack” or “peppermint crack” or… something equally addictive but slightly more festive, it doesn’t really matter what you call it.

Sorry it’s too late for Christmas, but I’m sure you can make it for your New Year’s party as well. Or maybe for someone you fought with over the holidays and need to make up with? One bite of this and they won’t be able to stay mad… It’s so simple, and you wouldn’t believe what the actual ingredients are… the flavors, though, my god… salty, crunchy, chewy, sweet…. addictive. I guess that’s why they call it “crack”.

“Crack”

[ Printable Recipe ]

  • 51 saltine crackers (or less, if you want to use the larger matzo crackers)
  • 1 cup unsalted butter
  • 1 cup dark brown sugar
  • 1 teaspoon vanilla extract
  • 12 ounces high quality dark chocolate (70% or greater)
  • 2/3 cup crushed candy canes or peppermints (optional)


  1. Preheat oven to 350°F. Line a 12 x 17 inch jelly roll pan with foil. Place saltine crackers salt side up and side-by-side in the pan as tightly as possible without overlapping. Use saltine pieces to fill any gaps at the bottom of the pan. Set aside. Chop chocolate so pieces are about the size of standard chocolate chips and set aside.
  2. In a medium saucepan melt butter over medium heat stirring frequently with a spatula. Once butter has melted, add brown sugar and vanilla stirring to combine. Cook for about 5 minutes or until mixture is an even dark brown color and has begun to bubble. Remove from heat and pour over saltines using spatula to spread sauce.
  3. Bake crackers for 5 minutes or until butter mixture begins to bubble. Remove from oven and sprinkle evenly with chocolate allowing the heat to melt the chocolate. Spread chocolate evenly with the spatula so all of the crackers are completely covered. (I had to pop mine back into the oven for a minute to encourage my chocolate to melt)
  4. Let the chocolate cool to the touch, but not harden. Sprinkle crushed candy canes or peppermints (if using) evenly on top and refrigerate until chocolate sets and hardens. Break apart and serve..


[ adapted from serious eats ]

home made gifts – pistachio cherry biscotti

cranberry-pistachio-biscotti

This is “American” biscotti, not as hard and tooth-breaking as their Italian counterparts. The salty pistachio pairs well with the sweet, fruity cherry. You could add whatever mixins you like, but I think they’d still have been great left plain.

Make sure you don’t use the pistachio “kernels” though, their flavor is too overpowering for these. Unfortunately, it’s what I accidentally grabbed at the store so that’s what I used. I had to just imagine how much more delicious they’d have been if I’d used proper pistachios. 🙂

Cherry Pistachio Biscotti

[ Printable Recipe ]

  • ½ cup chopped pistachios
  • ½ cup sweet or sour dried cherries
  • 6 tablespoons (3/4 stick) unsalted butter
  • 2/3 cup sugar
  • 1/4 teaspoon salt
  • 1 teaspoon vanilla extract
  • 1 1/2 teaspoons baking powder
  • 2 large eggs
  • 2 cups unbleached all-purpose flour

Preheat the oven to 350°F. Lightly grease (or line with parchment) a large (18 x 13-inch) baking sheet.

In a medium bowl, whisk salt, baking powder, salt, and flour. Set aside. In a medium-sized bowl, beat the butter and sugar until fluffy. Beat in the eggs and vanilla, don’t stress if your mixture looks a little curdled. Lower the mixer speed, add the flour, and mix until smooth. The dough will still be soft and sticky. Stir in the pistachios and cherries.

Transfer the dough to the prepared baking sheet, shaping it into a rough log about 14 inches long. It will be about 2 1/2 inches wide and about 3/4 inch thick.

Bake the dough for 25 minutes. Remove it from the oven and let cool until you can handle it (5 minutes, or up to 20 minutes). Lightly but thoroughly spritz the log five minutes before cutting, making sure to cover the sides as well as the top. This will soften the crust a bit to make slicing the biscotti easier. While you wait, reduce the oven to 325°F.

Cut the biscotti into 1/4- to 3/4-inch slices. Without nuts or any add-ins, is easy to slice thin. Once you start adding chips, almonds, raisins, and other chunky ingredients, a 3/4-inch slice is more realistic. When you’re slicing, be sure to cut straight up and down, if you cut at an angle, biscotti may be thicker at the top than the bottom, and they’ll topple over during their second bake.

Set the biscotti upright on the prepared baking sheet. Bake for 25 minutes. Remove from the oven and transfer them to a rack to cool.