strawberry buttermilk ice cream + bombesticks

bombesticks main

Apparently Jeni Britton Bauer and I are soul mates, because I was churning Strawberry Buttermilk Ice Cream on Friday when they posted on their Facebook that the very same flavor was debuting for the season in their ice cream shops. Then Sunday, just two days after I made my very own bombe sticks, they posted about them on their page! Clearly, we are meant to be, and obviously you guys need to get on it and make these STAT.

Since I don’t have an ice cream cone maker, I had to use store-bought ice cream cones. Everything else, though, was made from scratch. Who knew that all you needed to do to make magic shell coating was mix some coconut oil with chocolate? If you’re not a fan of coconut, look for refined coconut oil which has none of the coconut flavor. It also magically turns your chocolate into an amazing magic chocolate shell sauce. Liquid when it’s warm and solid once it’s cold.

I’m not gonna lie, these are a bit of work, so don’t feel guilty if you decide to use store-bought ice cream. If you’re feeling extra motivated, though, scroll down for Jeni’s strawberry buttermilk ice cream recipe. I just wanted to surprise the Boyfriend with one of his favorite flavors from our local ice cream shop, and there happened to be a similar recipe in Jeni’s book. You can also try one of my other ice cream recipes: green tea, peanut butter, or chocolate.

Chocolate Bombesticks

Printable Recipe

Chocolate Bombe Shells

  • 12 ounces chocolate (I used dark), chopped
  • 1/3 cup coconut oil

Optional:

  • Sugar
  • 8 standard sugar ice cream cones
  • 2 pints ice cream, softened
  • 1/2 cup garnish, such as Rice Krispies, chopped nuts, crushed pretzels, or cornflakes

Preparation

  • Combine dark or white chocolate and coconut oil in a medium metal bowl; set over a medium saucepan of simmering water. Stir until chocolate is almost melted. Remove from heat and continue stirring until completely melted and smooth. **Or you can melt it in 30 second intervals at 50% power in the microwave, but be very careful not to burn it!
  • Let cool slightly (if it’s too hot, it’ll melt your ice cream), 10–15 minutes.

Assembly

  • To hold cones upright, fill 8 medium glasses halfway with sugar and set aside. OR – I used a long plastic container and covered it with a couple sheets of foil, poking holes for where I would put my ice cream cones. This doesn’t work as well as I’d like, but it gets the job done.
  • Working with 1 cone at a time, spoon chocolate mixture inside cone and swirl to coat. Pour excess back into bowl, then dip top 1/2 inch of cone into chocolate, allowing excess to drip back into bowl. Set cone upright in prepared glass (or other rigged container) and chill in refrigerator until chocolate hardens, about 15 minutes. Repeat with remaining cones.
  • Line a large rimmed baking sheet with foil. Pack some ice cream into cones, then top each with a small scoop of ice cream. Lay cones on prepared sheet and freeze until hard, about 1 hour.
  • Rewarm bombe shell. Working with 1 cone at a time, dip ice cream into bombe shell, rolling to coat. Quickly sprinkle on desired garnish. Freeze until hard, about 10 minutes. Wrap each cone in foil and return to freezer until ready to use.

Book says this can be made 1 week ahead, but I suspect they will last longer

Roasted Strawberry Buttermilk Ice Cream

[ Printable Recipe ]

Roasted Strawberries :

  • 1 pint strawberries, hulled and sliced ½ inch thick
  • 1/3 cup sugar
  • 3 Tbsp lemon juice

Ice Cream Base :

  • 1 ½ cups whole milk
  • 2 tablespoons corn starch
  • 2 oz cream cheese, softened
  • 1/8 teaspooon fine sea salt
  • 1 ¼ cups heavy cream
  • 2/3 cup sugar
  • 2 tablespoons light corn syrup
  • ¼ cup buttermilk

For the strawberries:

Preheat oven to 375F degrees. Combine strawberries and sugar in glass or ceramic baking dish and mix well. Roast just until soft, 8 – 10 minutes. Let cool slightly

Puree strawberries in food processor with lemon juice. Measure ½ cup of pureed berries and refrigerate the rest for another use (like to pour on top of pancakes later)

For ice cream base:

Mix about 2 tablespoons of the milk with cornstarch in a small bowl to make a slurry. Whisk cream cheese and salt in medium bowl until smooth. Fill a separate large bowl with ice water.

Combine the remaining milk, cream, sugar, and corn syrup in a 4-quart saucepan; bring to a rolling boil of medium-high heat. Boil for 4 minutes, then remove from heat and gradually whisk in the cornstarch slurry. Bring mixture back to a boil over medium high heat and cook, stirring with a heatproof spatula until slightly thickened, about 1 minute.

Gradually whisk the hot milk mixture into the cream cheese until smooth. Add reserved ½ cup strawberry puree and the buttermilk; blend well. Pour mixture into a 1 gallon Ziploc freezer bag and submerge sealed bag in ice water and chill in fridge until cold – about 30 minutes.

Churn ice cream base in canister until thick and creamy – about 20 minutes. Pack ice cream into storage container ( a large, square Ziploc container is the perfect size ), top with parchment and seal with lid. Place in coldest part of your freezer until firm, at least 4 hours.

matcha ice cream

matcha ice ream main

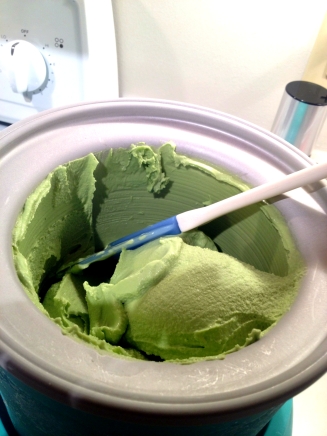
For Christmas I got my bestie a cuisinart ice cream maker. After spending almost six months paralyzed with fear, and trying to decide which ice cream would be “the” ice cream worthy of christening the ice cream maker. After months of reassurance and debate, I am happy to announce that she has finally taken it out of the package.

The winner? Green tea ice cream, using the vanilla bean ice cream recipe from Jeni’s Splendid Ice Creams as a base. She was kind enough to snap a few pictures with her iphone when she finished (hence the pics for this wonderful post). I’ve made a couple of recipes from this book myself, all with great success.

Jeni’s has long been our favorite ice cream in Columbus, and has recently gone viral nationwide. Check your local grocer to see if they sell it near you. You absolutely MUST try it. MUST. If you have the pleasure of dining at an actual Jeni’s, it may look something like this:

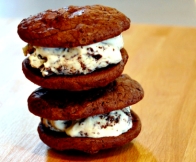
This weekend, after spending the week in triple digits, I plan to cool off with some ice cream sandwiches (filled with Jeni’s ice cream, of course). Those classic cookies plus Jeni’s ice cream are sure to take the edge off of the heat this weekend.

“Matcha-Made In Heaven”  Ice Cream (c/o “BFF” aka: The Great Sarah Chang)

*Sarah Chang is a very motivated individual who wanted to use the same non-homogenized milk that Jeni’s Splendid Ice Creams uses. I have always made mine with homogenized milk, but have included the directions on how to make the ice cream with non-homogenized milk as well

[ Printable Recipe ]

  • 2 cups whole milk* (500 ml)
  • 1 Tablespoon + 1 teaspoon (11 g) cornstarch
  • 1 ½ ounces (3 Tablespoons) cream cheese, softened
  • 1/4 teaspoon fine sea salt
  • 1 ¼ cups (313 ml) heavy cream
  • 2/3 cups (133 g) sugar
  • 2 Tablespoons light corn syrup (30 ml)
  • 4 packets rishi matcha
  • ⅛ tsp kosher salt

1. Fill a large bowl with ice water.  In a small bowl, mix 2 Tablespoons of the milk with the cornstarch.

2. In another large bowl, whisk the cream cheese and salt until smooth.

3. Combine the remaining milk with heavy cream, sugar, and corn syrup in a large saucepan.  Bring milk mixture to a boil.  Cook over moderate heat until the sugar dissolves, 4 minutes (must be exact for correct consistency). Remove from heat, add green tea packets  and let steep for 5  minutes.

4. Return milk mixture to sauce and gradually whisk in the cornstarch slurry.  Return to a boil and cook over moderately high heat until the mixture is slightly thickened (you should be able to draw a line in the mixture on a spoon), about 1 minute.  Remove from heat.

5. Gradually pour the hot milk mixture into the cream cheese and whisk until smooth.  *If you are using nonhomogenized milk and cream pour the heated mixture into a food processor and process for 2 minutes. Pour mixture into a gallon bag and seal tightly.  Set baggie in the ice water bath (I added a few spoonfuls of salt to the water bath to lower the temperature…SCIENCE!), cover with some ice, and let stand, until cold, about 20 minutes or longer.

6. Once chilled*, pour the mixture into an ice cream maker and freeze according to the manufacturer’s instructions.

Pack the ice cream into a plastic container.  Press a sheet of plastic wrap directly onto the surface of the ice cream (to prevent ice crystals) and close with an airtight lid.  Freeze until firm, at least 4 hours.

*If you are using nonhomogenized milk you will need to pour into a food processor twice:

1. After mixing the heated milk mixture with the cream cheese, CAREFULLY pour the heated mixture into a food processor and process for 2 minutes.

2. After chilling the mixture in the ice bath, CAREFULLY pour the chilled mixture (you can do this easily by cutting off one corner) into a food processor and process again for 2 minutes.

[ Adapted from: Jeni’s Splendid Ice Creams at Home ]

If you like this, or ice cream in general, you may also like:


buckeye state

buckeye state main

We all know about my undying love for Jeni’s. Earlier this month, when I made her “Milkiest Chocolate Ice Cream in the World” I couldn’t shut up about how good it was. Well, when I returned to her book to make my favorite “Buckeye State Ice Cream”, I swear I could have died after that first bite. I can confidently say that any recipe you make out of Jeni’s book is guaranteed to be a hit. And this one? If you, like me, have an affinity for all things chocolate and peanut butter – you must make this. You simply must.

This ice cream is pure buckeye bliss. For those of you who aren’t from the Ohio –  Ohio is affectionately called “the buckeye state”, because the best thing we can think to be known for is a slightly poisonous, inedible tree nut. For this reason, we created our own super awesome “buckeye”, which looks like the nut, but is made of chocolate and peanut butter and is very edible. In fact, it is probably the sole reason that Ohians everywhere are obsessed with the combination peanut butter and chocolate. We have “buckeyes”, then buckeye bars, buckeye brownies, buckeye ice cream…. you name it and we’ve “buckeyed” it. Hence, Jeni’s “Buckeye State Ice Cream” which is the perfect combination of peanut butter ice cream and chocolate.

I love that Jeni gives us her secret of pouring the melted chocolate into the churning ice cream, which causes the chocolate to break into tiny pieces that evenly disperse throughout the container of ice cream. This ensures that each bite has the perfect amount of chocolate in pieces that are the ideal size to complement the peanut butter’s flavor as the chocolate pieces melt away on your tongue (vs other ice creams that can end up with a giant hard piece of frozen chocolate to gnaw on).

(Also tasty sandwiched between two big fudgy cookies)

Again – BUY HER BOOK. I promise I’m not getting paid to tell you that, I wish I was though. Because I tell everyone I see to BUY JENI’S SPLENDID ICE CREAM!

Jeni’s Buckeye State Ice Cream

Print Me!

  • 2 C whole milk
  • 1 Tbsp + 1 tsp corn starch
  • 1 1/2 oz (3 Tbsp) cream cheese (I used ‘lite’)
  • 1/2 C peanut butter (I used Jif Natural)
  • 1/2 tsp fine sea salt (I used 1/4 tsp)
  • 1 1/4 C heavy cream
  • 2/3 C sugar
  • 2 Tbsp light corn syrup
  • 2 Tbsp honey
  • 4 oz chocolate (I used 70%)

1. Fill a large bowl with ice water, set aside. Mix 2 tablespoons of the milk with the cornstarch in a small bowl and set aside.

2. Whisk the cream cheese, peanut butter, and salt in a medium bowl until smooth. (This part was hard, so I didn’t do a very good job, which didn’t really matter because it’s going to all melt later anyway) You can probably just smoosh and stir it together with a spatula and be fine.

3. Combine remaining milk, cream, sugar, corn syrup, and honey in a large sauce pan and bring to a rolling boil of medium-high heat. Boil for 4 minutes. (Keep a watchful eye on it to make sure it doesn’t boil over the sides of the pan) Remove from heat and gradually whisk in cornstarch slurry.

4. Place pan back on burner and bring the mixture back to a boil and cook, stirring with a spatula until slightly thickened – about 1 minute. Remove pan from heat (again).

5. Gradually whisk the hot milk mixture into the peanut butter mixture until smooth. Keep whisking… Once it’s smooth pour the mixture into a 1-gallon freezer bag and submerge in the ice water. Let sit until it’s chilled, at least 30 minutes.

6. Pour ice cream base into the frozen canister and being spinning.

7. While the ice cream is spinning, melt your chocolate in a double boiler, or in the microwave (on 50% power in 30 second intervals, stirring between each interval). Set aside until cool, but still pourable.

8. When the ice cream is almost done, drizzle the melted chocolate through the opening of the ice cream machine and allow it to solidify and break up in the ice cream for about 2 minutes. At this point, some of the chocolate solidified all together into one piece and tried to make my ice cream overflow over the sides of my mixer, so have a spoon handy in case you have to reach in there and break it up.

9. Pour ice cream into a storage container and freeze for at least 4 hours, until firm.

[Recipe Credit: Jeni’s Splendid Ice Creams at Home]

[Ice cream cookie recipe here]

Photo featured on SE

an ode to jeni’s

choco ice cream main

Generally speaking, I’m not big on ice cream. I can eat soft serve and frozen yogurt all day long, but ice cream is just too… cold. Or hard. Or something. Definitely too something. There is one exception to this – my annual trip home to Columbus always has a planned stop at Jeni’s Splendid Ice Cream. Jeni’s is the best ice cream I have ever put in my mouth, and now that I live 2,000 miles away I have no way to fulfill my Jeni’s cravings (Shipping is $35!!! I don’t know what’s more crazy – that they charge $35 –with a $65 minimum purchase– or that I debate paying that much just to have it!).

I’m super excited, too, because Jeni’s has been getting all kinds of attention lately. They’ve been featured over and over in various lists of the country’s best ice cream spots. I won’t be as excited when I head back to their store and find them even more jam-packed than usual, but for now I’m happy for them. At the same time, I hate everyone who gets to go there, while I’m left to shake like fiend 2,000 miles away. [Dear Jeni’s, please come to Scottsdale/Phoenix area – I need you.]

It was 118 degrees out this day, this poor scoop of ice cream didn’t stand a chance…

Then, a glimmer of hope, a small ray of sunshine in my dark, Jeni-less life. Jeni just released a cookbook! All of my favorite ice cream concoctions were finally at my fingertips… I was drooling just thinking about it. I ordered the book as soon as I was able and anxiously awaited its arrival. I knew it wouldn’t be as good as eating Jeni’s authentic ice cream, but it should at least get me through those rough patches where I really just need my Jeni’s fix.

It was really difficult to decide which recipe to make first, in the end I settled on what appeared to be pretty much the easiest ice cream recipe I’ve ever seen in my life. No tempering egg yolks, no whisking until my arm wants to fall off… the hardest part of this recipe was waiting until it was cold enough to eat. (Then again, I like eating the less-frozen version of ice cream better anyway). Even after it’s completed the freezing process (which took somewhere longer than 4 hours but less than 24 hours), this ice cream is super creamy and melts into pure chocolate bliss once it hits your tongue. It’s like eating a frozen truffle – well, the inside of a frozen truffle. God, this stuff was good, my mouth is watering again just thinking about it…

I really wish I could have taken some better pictures, but even our A/C can’t take the bite out of a 118 degree day. Maybe next time  😉 For now, you can use this on its own, or make ice cream sandwiches!

Moral of the story? BUY JENI’S ICE CREAM BOOK – unless you’re in Columbus, then just go there!

{A huge “thank you” to Jeni’s publisher for giving me permission to post this recipe}

The Milkiest Chocolate Ice Cream in the WorldJeni’s Splendid Ice Cream at Home c/o Artisan Publishers

Print Me!

  • 1 C whole milk
  • 1 Tbsp + 1 tsp cornstarch
  • 2 oz bittersweet or semisweet chocolate (I used Trader Joe’s 72% Dark, figuring it was close enough)
  • 1/4 C heavy cream
  • 1 C evaporated milk
  • 2/3 C sugar
  • 2 Tbsp light corn syrup
  • 1/3 C unsweetened cocoa powder
  • 1/4 tsp fine sea salt

1. Mix 2 tablespoons of the milk with the cornstarch in a small bowl (this is called “making a slurry”). Set aside.

2. Chop chocolate and put it into a medium bowl. Fill a separate large bowl with ice water.

3. Combine the remaining milk, the cream, evaporated milk, sugar, and corn syrup in a large saucepan and bring to a rolling boil over medium-high heat. Add the cocoa, whisking until well-mixed. Continue boiling for 4 minutes.

4. Remove the pan from heat and gradually whisk in the cornstarch slurry. Return to heat and bring back to a boil, stirring with a spatula, until slightly thickened (about 1 minute).

5. Gradually whisk the hot milk mixture into the chocolate. Add salt and whisk until chocolate is melted and mixture is smooth.

6. Pour mixture into a 1-gallon freezer bag and submerge sealed bag in ice water until cold (appx 30 minutes).

7. Pour bag contents into frozen ice cream machine and spin until thick and creamy (about 25 minutes in Cuisinart 2 gallon machine).

8. Transfer ice cream to mouth storage container and press a sheet of parchment directly against the surface. At this point it is basically soft serve ice cream, go ahead – try a bite. Freeze until firm – at least 4 hours. (At the 4 hour mark, mine was still rather soft. Mom described the ice cream as being “like a frozen chocolate pudding” – I didn’t check it again until the next day when it was completely firm). Once firm the ice cream still melts like a divine chocolate truffle when it hits your tongue.