cute caprese bites

dsc_5871-2smal

When the first thing out of Boyfriend’s mouth when he enters the kitchen is “OH MY GOD, ARE YOU TRYING TO KILL ME WITH CUTENESS!?” I consider that a win.

This army of cuteness couldn’t be easier to assemble, nor more delicious. Cherry tomatoes and basil are two things I pretty much always have on hand, I just happened to have a container of boccacini hanging out in the fridge that I just had to use up, so out came these little guys.

Sweet, salty, creamy…. perfect.

I wish I had more to say about them, but I just don’t. I think the pictures sum it up pretty good.

So the “recipe” if you’d like to call it that is as such

Cute Caprese Bites

  • 12 cherry tomatoes
  • 12 boccacini balls
  • 12 leafs of basil
  • Fleur de sel (optional)
  • Good quality balsamic vinegar (optional)

Cut cherry tomatoes in half, sprinkle boccacini with sea salt.

Place boccacini on bottom half of cherry tomato, top with basil leaf, and replace top of tomato. Skewer with a toothpick (or something fancier if you wish).

Sprinkle with sea salt and drizzle with balsamic vinegar. I suspect a drizzle of pesto might not be a bad idea either… ooh, or maybe pesto and balsamic on the side so you can dip into whichever you prefer… mmm

Enjoy

If you can’t find boccacini, just cube some fresh mozzarella and call it a day. 🙂

You may also like:

stuffed pasta shells

stuffed shells

What’s more comforting than a big tray of pasta on a cool winter night? Answer: Not much. Then again, it’s been in the high 70s here so what do I know about winter? The biggest chill I get is coming out of the air conditioning vents in my car as I drive home from work…

Hey, don’t judge.

I made these stuffed shells for my momma when she came over to celebrate “Second Christmas” with us. She missed out on first Christmas due to circumstances beyond our control, so last weekend I had her come over, open presents, and enjoy a good home-cooked meal.

Half of these were left vegetarian (just for fun), but since I had some extra prosciutto lying around that I didn’t want to waste, the other half had prosciutto added to them. Both were delicious, and show just how customizable this recipe really is. 🙂

As an added bonus, you can make these in advance to bake the next day, or even freeze them for a future dinner! Play around with the flavors, do what you like, but definitely add these to your dinner rotation.

Stuffed Pasta Shells

[ Printable Recipe ]

  • 16 – 20 jumbo pasta shells (you’ll want extra in case when some break)
  • Shredded italian cheese
  • 1 jar of your favorite pasta sauce

For the filling:

  • 15 oz ricotta (I prefer Trader Joe’s, but do what you will)
  • ½ cup grated parmesan cheese
  • 1 large tomato, finely diced
  • ½ medium onion, finely diced
  • 3 cloves garlic, minced
  • Fresh basil, minced
  • 1 egg, lightly beaten
  • 7 oz prosciutto, diced (optional)
  • salt & pepper

Lightly grease a 9 x 13 baking dish and pour a layer of sauce on the bottom.
If you’re baking these right away, might as well get that oven heated to 350F
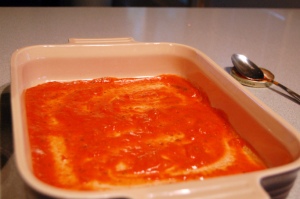
1. Bring salted pasta water to a boil, and cook shells according to package directions. When done, spread out on a baking sheet to cool. Try to gently separate any that have fused together.

2. In a medium bowl, mix together the filling ingredients adding salt and pepper to taste. Realizing you probably don’t want to “taste” the filling on its own, probably about a ½ teaspoon or so of salt and a few grinds of pepper should do?
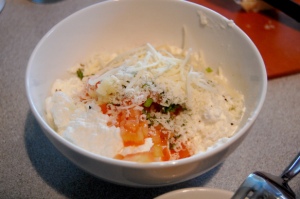
3. Once the shells have cooled, fill them with the ricotta mixture and arrange in the baking dish. Top off with more pasta sauce, shredded cheese, and grated parmesan. You can, at this time, either refrigerate the shells (covered) for tomorrow, or throw them in the oven.

4. When ready to cook, bake shells for 30 – 40 minutes, until the cheese is nice and bubbly and shells are heated through.

*If you’re going to freeze them, fill them and place them on a freezer-safe dish. Freeze about 20 minutes until firm, then place in a freezer-safe bag and store in your freezer until ready to use. When ready to bake, cover the bottom of a baking sheet with sauce, place the shells on top, cover with more sauce and cheese, then bake COVERED for 30 minutes, uncover and continue to bake for another 15 -20 minutes until hot and bubbly.

how to get pizzeria-style pizza at home

pizza

For those of you who aren’t aware, I also contribute to a food website called Foodbeast. Every once in a while I give them an “exclusive” post, one that you can only read there. And this, my friends, is one you don’t want to miss.

If you want to find out how to make delicious pizzas like this prosciutto and arugula pie (without any fancy expensive equipment), check out my most recent post on how to get pizzeria-style pizza at home over at Foodbeast.

rigatoni with chipotle cream sauce

bigrig main

Apologies for the long delay in posting – those of you who follow me on facebook I had to take a work trip to Mesa Verde National Park. For those of you aren’t familiar with it, it’s a national park located just outside of Mancos, Colorado… more on that to come later. For now, I will reward your patience with a delicious pasta recipe 🙂

Around here, we have a restaurant called Oregano’s, and at Oregano’s they have something called “the big rig pasta.” The big rig pasta consists of rigatoni in a spicy tomato-chipotle cream sauce. Crazy, right? Initially I was conflicted, what on earth is chipotle doing with pasta? But I love chipotle… So the shock faded away and was replaced with my undying love of all things chipotle.

Once I tasted the “big rig” pasta, I was hooked. When the craving struck, I was thinking about it for days. Seriously, days. Oregano’s isn’t a restaurant we can really go to very often because it’s always crowded. Even at “old person” dinner time, which is when BF and I like to eat, there is usually an unreasonably long wait. As much as I love Oregano’s, I do not love it enough to sit in the hot Arizona sun for an hour while we wait for a table to open up. The only way for me to satisfy this craving was to (attempt to) recreate the dish at home.

I used just a basic tomato cream sauce, and added a chipotle pepper (or two) to it. How much you add really just depends on how spicy you want it. If you add too much, the cream will help to mellow it out a bit, but not completely (it’s always easier to add more than to take it away). When I served it initially for dinner, it actually was a little bit shy of the amount of cream the sauce really needed. I adjusted the cream for round two and it had a much more rounded, well-balanced (less fiery) flavor. All-in-all, I consider this a win. It’ll get me through those tough times when I just need a “big rig” fix, but don’t want to have to wait around for it.

Chipotle-Tomato Cream Sauce

[ Printable Recipe ]

  • 1-2 Tablespoons olive oil (enough to cover the bottom of your pan)
  • 1 small yellow onion, chopped
  • 2 small carrots, peeled and chopped
  • 2 small celery ribs, chopped
  • 2-3 cloves garlic, minced
  • 1 – 2 chipotle peppers, minced
  • 1 28-oz can whole tomatoes
  • Salt & pepper
  • 1/2 cup (more or less) heavy cream
  • Fresh basil
  • Pasta, cooked according to package directions (I used rigatoni)
  1. Warm the olive oil over medium heat.  Add the onion, carrots, and celery and saute, stirring, until the vegetables are softened but not browned. Sprinkle with salt and pepper and stir again to coat. Add garlic and stir until fragrant.
  2. Add tomatoes and crush with a spoon. Cover and cook at a gentle simmer for 45 minutes, or until the vegetables are completely tender. Stir and add chipotles & 4 basil leafs for last 15 minutes of cooking, simmering with lid slightly ajar.
  3. Remove basil and puree the sauce using an immersion blender (you can use a regular blender or food processor, but you will have to do it in batches and there will be lots of transferring of hot liquids and the like).
  4. Once pureed, stir in ¼ cup cream and place back over medium/medium-low heat, and bring the sauce just to a simmer.  Taste and adjust the seasoning, with salt and pepper, add more cream if desired. Add extra basil on top before serving.

* Sauce may be stored as is in refrigerator for up to 3 days or in the freezer for up to 3 months.  If freezing, leave out the cream until you reheat the sauce, adding in the last 10 minutes of simmering before serving.


chicken parmesan

chicken parm 1

Chicken parmesan gets a bad rep for a number of reasons. Your usual chicken parmesan will arrive either soggy, drowning in sauce and cheese or dry and deep-fried – thrown on top of some pasta. This chicken parmesan is neither soggy, nor dry, and especially not fried. This chicken parmesan allows you to achieve a crispy chicken that is still tender, and has no melty cheese or sauce on top (except that last shaving a parmesan you see on top of mine – melted ever so slightly by the heat of the still-warm chicken).

Most breaded items are dredged in flour, then egg, then breading. I got the idea of dipping them in garlic butter from a recipe I saw over at simply recipes. It was rather ingenius, if I do say so myself. If you prefer the old-fashioned way, go ahead, but you’ll save a dish if you do it this way.

It’s baked, not fried, which means that you have time to clean up your mess, set the table, sit back and relax – whatever you like for the time that the chicken is in the oven. Using thin-sliced chicken helps it to cook faster, and if you’re a breading freak (like yours truly) make sure you use panko to get them extra crispy, and cut them into “nuggets” to get a higher breading-to-chicken ratio. The nuggets also make it a little more ‘kid-friendly’ – just serve them with the tomato sauce to dip in on the side. 🙂

Chicken Parmesan

[ Printable Recipe ]

  • 1 lb thin-sliced* chicken breast (cutting into nuggets is optional)
  • 1/2 stick butter
  • 2 cloves garlic
  • 1 1/4 cup panko bread crumbs
  • 1/2 cup freshly-grated parmigianno-reggiano (or a mix of parm & pecorino)
  • 1/2 teaspoon salt
  • 1/4 teaspoon garlic powder
  • 1/4 teaspoon onion powder
  • 1/2 teaspoon italian seasoning
  • a few grinds of the pepper mill

1. Preheat oven to 450F. Melt butter in small bowl. Add garlic and stir to combine.

2. In a separate bowl (I actually like to use a paper plate, so I can just throw it away when I’m done), mix together bread crumbs, cheese, and seasonings.

3. Dip chicken in melted butter, then bread crumbs, being sure to press it into the bread crumbs for maximum adhesion.

4. Place on parchment-lined baking sheet and cook at 450F for 15 – 20 minutes until cooked through. If you have to brown it more, turn it up to broil at the end, but be sure to keep a close eye on it! You can flip them half-way through, if you like, for more even browning, but you will end up sacrificing some of the delicious breading.

*If you don’t want to buy thin-sliced (it does cost more), you can slice your own and/or pound it thin