not your average chicken sandwich

sangsmall

Close your eyes, wait don’t do that or you won’t be able to read this. Read this, then close your eyes and imagine, if you will, grilled ciabatta with basil mayo layered with warm, grilled chicken breast, asiago cheese, roasted red peppers (see, told you you’d need these), arugula and red onion. Do you see it in your mind’s eye? Can you smell it? Taste it?

For some reason I NEEDED this sandwich. I woke up with it in my head, had all of the ingredients on hand, and my brain was just repeating over and over “grilled chicken sandwich”, “asiago”, “roasted red peppers”, “ciabaaaataaaaaa”…. Which really isn’t a normal thing for it to repeat, normally it’s more along the lines of, “CHOCOLATE CAKE”, “PEANUT BUTTERRRRR”.

My brain (and stomach) were being held hostage, so I had no choice but to make it happen, and it was every bit as delicious as I imagined.

Ok, now wipe the puddle of drool off of your desk and go get the ingredients and make this sandwich. Now.

Oh, and you can serve it with some roasted red pepper soup and asiago croutons. For this meal, I just doctored some Trader Joe’s Roasted Red Pepper & Tomato Soup with a little chicken stock, asiago, basil, and croutons. It was a match made in heaven.

I’m not really one to brag, but this meal just really hit the spot for me. Warm, comforting, homey, and filling…. just wow.

As much as I loved this sandwich, I can’t end this post without mentioning how much I love my new light box (thanks BF!). This thing is amazing. Of course, natural light reigns supreme for photos, but I am in a serious state of shock when I can take photos like the ones here on a day like this:

Gross, right? Without this light box I would have been screwed. Royally screwed. These photos wouldn’t have even been an option. My only wish is that it had come with more backdrops, but no biggie. I can easily fashion my own backdrops with a little cloth and some velcro. I just need the time… and motivation.

*Update – I’ve been using leftover ingredients from this sandwich to make wraps for lunch during the week …. still delicious 🙂

Asiago Chicken Sandwich – serves 2 (but can easily serve more)

[Printable Recipe]

For sandwich:

  • 1 (½ lb) chicken breast, cooked and sliced
  • 1 red bell pepper, roasted
  • ½ small red onion, sliced
  • 4 slices asiago cheese
  • handful arugula
  • 1 small loaf ciabatta, sliced in half
  • basil mayo (recipe follows)

For mayo:

  • ¼ cup mayo
  • bunch of basil, minced
  • 1-2 cloves garlic, minced
  • 1 Tbsp olive oil
  • salt and pepper to taste

1. Make your basil mayo by combining the ingredients in a small bowl or food processor. Keep refrigerated until ready to serve.

2. Roast your red pepper(s) if you haven’t already, peel off the skin, cut to desired size and set aside until ready to use.

3. Cook your chicken breast as desired. I marinated mine in some stock, salt, pepper, olive oil, garlic, and thyme. Then grilled it over high heat for 6 minutes each side, then rest tented with foil for ten minutes. Set aside.

(You can do everything up to here a day ahead of time, and save grilling the bread for last. Or, don’t even grill the bread and have a tasty cold sandwich instead 🙂 )

4. While the chicken is resting, spread basil mayo on your ciabatta (you won’t all of the mayo). Grill over medium high to high heat until toasted (alternatively, you can toast it in a nonstick skillet, or under the broiler).

5. Assemble sandwiches however you like (some people like the toppings on the bottom, some like them on top, whatever you do, just get them in there)

short rib grilled cheese

short rib cheese

Even though I was convinced I just saw this recipe a couple weeks ago in my Bon Appétit, I went back to my bookshelf and turns out… February 2010 cover recipe. No big deal. Apparently the cover picture was just hibernating in my subconscious waiting for the perfect time to spring out and jerk my hunger chains. Grilled cheese and short rib sandwich with pickled caramelized onions and arugula… yeah, pretty full of win.

The issue? Finding short ribs. I checked all my usual stores during my regular shopping and didn’t see any. Finally, the morning after thanksgiving, I stopped at the store on my way home from the gym. I found short ribs, but they were the “last chance 50% off buy these before they spoil” short ribs… not gonna cut it. Unfortunately for them, that let me know that the option existed. The friendly man behind the meat counter at my local Safeway grocery store was sweet enough to go in the back and cut them for me fresh. I was so excited… until he handed me the package.

30+ dollars for my package of short ribs!? Wish I had known that ahead of time. I was tempted to dump them into the cooler and abandon my dreams of short rib grilled cheese… but after waiting for like 25 minutes for the poor guy to get them, cut them, and package them specially for me, I felt obligated to purchase them. I went to buy a loaf of hearty bread and… there was none. I probably should’ve anticipated that the store would be ransacked and empty the day after thanksgiving, but I didn’t. what ever happened to home-made rolls, people? Fresh bread for thanksgiving? Come on, lazybones, a loaf of store bought bread on thanksgiving? Really? Leaving me with no options the next day? I gave up and was forced to use wimpy bread, making it more of a knife-and-fork sandwich, but delicious no less.

Still medium defeated, I returned home and began cooking. Sure, I should’ve been eating leftovers, but this sandwich was in my head. I couldn’t get it out. I needed to make it before my brain exploded. I began braising the short ribs on the stove top, made my onions ahead of time, and sat around all day while the house smelled delicious.

Boyfriend ate one and a half sandwiches, they were darn tasty. My issue was with the short ribs themselves. Even after I picked out as much fat as I could, I felt like I threw away pretty much half of my meat. $15 of meat just gone, because I deemed it too fatty. So while the sandwiches were delicious, I don’t know if I would spring for short ribs again, or if I did I might pull the trick of putting the cooked short ribs in the oven to dry out a bit. I bet that would be super tasty…

Regardless, I give you

Bon Appetit’s Grilled Cheese and Short Rib Sandwiches (with Pickled Caramelized Onions and Arugula )

[ Printable Recipe ]

Short Ribs

  • 5 pounds beef short ribs
  • 1/4 cup (1/2 stick) butter
  • 3 celery stalks, chopped
  • 2 large carrots, peeled, coarsely chopped
  • 1 medium onion, chopped
  • 1 1/4 cups dry red wine
  • 1/2 cup low-salt beef broth
  • 1/3 cup medium-dry Sherry
  • 2 garlic cloves, peeled
  • 2 bay leaves
  • 1 large fresh thyme sprig

Pickled Caramelized Onions

  • 1 tablespoon butter
  • 2 large red onions, halved, thinly sliced crosswise (about 6 cups)
  • 4 1/2 tablespoons red wine vinegar
  • 1 1/2 teaspoons sugar

Assembly

  • Butter, room temperature
  • 16 slices country-style crusty white bread
  • 12 ounces Petit Basque or Monterey
  • Jack cheese, sliced
  • 4 cups baby arugula

For the Short Ribs

1. Sprinkle beef with salt and pepper. Melt butter in large wide pot over medium-high heat. Working in 2 batches, cook beef until browned, about 6 minutes per batch. Transfer to large rimmed baking sheet.

2. Add celery, carrots, and onion to pot and sauté until beginning to soften and brown, stirring often, about 5 minutes. Add wine, broth, Sherry, garlic, bay leaves, and thyme sprig; bring to boil, scraping up browned bits. Season with salt and pepper. Return ribs to pot, propping up on sides and arranging in single layer. Cover, reduce heat to medium-low, and simmer 1 hour.

3. Using tongs, turn ribs over in pot. Cover and simmer until ribs are tender and sauce is very thick, occasionally rearranging ribs in pot to prevent sticking, about 1 1/2 hours longer. Uncover and cool 30 minutes.

4. Transfer ribs to work surface. Discard bay leaves and thyme sprig. Spoon off fat from sauce in pot. Remove meat from bones; discard bones. Cut meat into 3/4- to 1-inch pieces, trimming any fat. Return meat to pot.

* Can be made 2 days ahead. Chill until cold; cover and keep chilled. Rewarm just until lukewarm before using.

Pickled Caramelized Onions

1. Melt butter in large skillet over medium-high heat. Add onions, sprinkle with salt, and sauté until beginning to brown, stirring frequently, about 10 minutes. Add vinegar and sugar and cook until almost all vinegar is absorbed, about 1 minute. Season with salt and pepper. Transfer to microwave-safe bowl; cool.

* Can be made 2 days ahead. Cover; chill. Microwave in 15-second intervals until lukewarm before using.

Assembly

1. Line 2 large rimmed baking sheets with waxed paper. Butter 8 bread slices; place 4 slices, buttered side down, on each prepared sheet.

2. Divide short rib mixture among bread slices, about 1/2 cup for each. Divide cheese among sandwiches. Spoon about 1/4 cup onions over each sandwich. Place large handful of arugula atop onions. Top with remaining 8 bread slices. Spread bread with butter.

* Can be prepared 1 hour ahead. Cover with plastic wrap and store at room temperature.

3. Heat griddle over medium heat. Working in batches, cook sandwiches until bread is golden brown and cheese melts, about 3 minutes per side. Transfer to work surface. Cut each in half on diagonal. Transfer to plates and serve.

Meet my new friend, Beef

beef main

Once upon a time ago, I was a vegetarian. Even after I started eating meat, I was never a big fan of beef. Not even a little bit. Once in a while I might get a craving for it and make a hamburger or something, but that was about it. On the off chance that I would eat a steak, I’d order it extra dead – well done.

I don’t know what I was thinking, because beef is flippin’ delicious. No joke. And this sandwich, well this sandwich has an awesome flavor-to-work ratio. While I prefer to sear my meat and sauté my onions, you absolutely have the option of just throwing all of the ingredients into a pot or slow-cooker and just letting it do it’s own thing from there. Doesn’t get much easier than that…

be sure not to overcook the meat – you want to still have it nice and pink inside – top with italian cheese BF adds pepperoncini to his


Of course, doing the extra work is well worth it. Searing the meat and caramelizing the onions gives the end product a richness and depth that it would otherwise lack, and deglazing the pan afterwards is a must. Why would you do all that work just to leave all that extra flavor in the pan? So, if you’re in a hurry, just throw it all in a pot and be done. But if you have the time, do it my way. You won’t be sorry.

PS – This requires advance planning. You need to start at least 8 hours before you want to eat it. I recommend making it over the weekend and saving it for a weeknight when you know you’ll be short on time. As always, feel free to freeze your leftovers to reheat for dinner another night.

Beef Sammies

Printer-Friendly Version

  • 1 whole 2.5 To 4 Pound Chuck Roast
  • Salt & Pepper
  • Olive oil (or any neutral oil)
  • Salt & Pepper
  • 1 whole onion, sliced
  • 2-4 cloves Garlic, minced
  • ½ cup Soy Sauce
  • 1 cup red wine
  • 4 cups low sodium beef stock or broth
  • A few sprigs each: Rosemary, Thyme (optional – but strongly recommended)
  • Baguette or other hearty bread of your choice
  • Italian cheese, for serving

1. About 20-30 minutes before you’re ready to start, take the roast out of the fridge. Cut off any extra-fatty chunks you see on the outside. Salt & pepper both sides of the beef while it’s warming to room temperature, and cover lightly with plastic wrap.

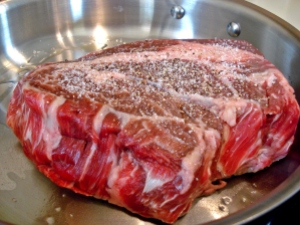
2. When you’re ready to begin, heat a large sauté pan over medium/med-high heat. Add a couple of teaspoons of oil (enough to lightly coat the bottom) to the pan, and then add the meat. Cook it just until it has a nice caramelized brown color (should only take about 3 – 5 minutes per side). Remember, we aren’t really cooking the meat, we’re just searing it for extra flavor. If it sticks to the pan when you try to lift it, that means it’s not ready yet, just give it an extra minute. If you’re motivated, you can sear the sides as well. Most of the time I decide that it’s too heavy to bother and just place it into my crock pot as-is.

step one – sear!

3. Add another teaspoon or two of oil to the pan (if needed) and add your onion slices. Cook, stirring about a minute or two until onion begins to get a golden-brown color, add minced garlic, stirring until fragrant (about 30 seconds) then add them on top of your roast.

4. Carefully add the soy sauce, red wine, and 1 cup of beef stock to your hot pan (it might splatter). Scrape up all the browned bits from the bottom, and once the liquid begins to simmer and reduce a bit, dump that into the crock pot as well. Add additional beef stock until the roast is at least half, but not completely, covered. If you run out of stock, just add water. Should look something like…

My sissy gave me this crockpot, isnt she sweet?

5. Add herbs* (if using), cover, and set to low for 8-12 hours. When it’s done, it should fall apart very easily. If it does not, re-cover and continue to cook longer.

6. When it’s done, remove the sprigs of rosemary and thyme, and shred the meat using two forks. Discard any overly fatty pieces. You can either serve it now or refrigerate it and serve later. I strongly recommend refrigerating for use another day* (see tips!).

7. If refrigerating—allow to cool and then place in the fridge. When ready to warm, remove hardened fat from the top and discard. Place back into slow-cooker (or saucepan) on low heat until warm (the speed will depend on the quantity you are warming up – it can take up to a couple of hours in your slow cooker). If you’re in a hurry, you can warm it over medium/high heat as well, just keep an eye on it so it doesn’t start boiling. Boiled meat is gross.

8. Serve on a baguette or french roll, toasted if desired. I usually stick mine under the broiler a few seconds with some italian cheese to get toasty and warm. Serve with some of the juices reserved on the side for dipping. Yum!

Tips:

*Somewhere along the line I got hooked on ‘Kitchen Basics’ stock. It’s a little more expensive, but comes in a resealable container and has a great, rich flavor. Once I made the switch I never looked back.

*Tying your herbs in a cheesecloth pouch allows the beef to get all the flavor from the herbs, but none of the leaves/twigs. You should be able to find some in the ‘cooking tools’ section of your grocery store.

*Refrigerating the meat allows the flavors to mingle, and also allows the fat to congeal so that you can remove a good amount of it before serving. I definitely recommend refrigerating the shredded meat in broth before eating. Not only does it allow the shredded beef to marinate in the flavorful juices, but once you see all the fat that hardens on the surface, you’ll understand.

*You can also reheat a smaller portion in a covered saucepan over medium-low on the stovetop over medium-low heat

*Put some of the warmed liquid in a separate ramekin or small bowl and use it dip your sandwich in it while eating. (This is in bold on purpose- because it’s important!) 🙂

*If you don’t have a slow-cooker, bring to a simmer on the stovetop and reduce to low, check after 6 hours; or PW cooks hers in a 275F oven for 5-6 hours.


Favorite Turkey Burgers

I can’t believe that just a few short weeks ago, there was snow-topped mountain in the view of my kitchen window… For those of you who think all mountains are snow-capped, those surrounding the Phoenix valley are (almost) never graced … Continue reading