soft baked sugar cookies

soft-sugar-cookieI can’t believe it’s December already. Where did the year go? Also, what happened to my plans to save up this year so that I would be ready for Christmas? This year, like so many others, my friends and family will be receiving my annual cookie boxes in lieu of real gifts. Sorry, guys, find me a job that makes more money, and I will buy you better gifts. Not that anyone’s complained…

Last year’s lineup was: snickerdoodle blondies, TKOs, palmiers, peppermint graham crackers, marshmallows, and friendship bread. This year, I’m still narrowing down my list, but I think that I want to include a sugar cookie. But then there is the issue of what KIND of sugar cookie… I’m trying to narrow my options down… Problem being that I don’t generally make sugar cookies. Not during the other 11 months out of the year, at least.


So this is option 1 – soft baked sugar cookies. Just like you get from the grocery store. You know the ones – they come loaded with frosting and sprinkles, not a speck of brown in sight. Just pure, soft, melt-in-your-mouth pillows of sugar. I thinned my frosting a bit too much, but was already disheartened from not getting it as red as i wanted, so I gave up and just went ahead frosting them. Plus, I thought it looked pretty that way.

I’m not sure if they will make the cut for this year’s Christmas cookie boxes, but I think I can make these again… during one of the other 11 months of the year…

Soft Frosted Sugar Cookies

[ Printable Recipe ]

For the cookies:
4 ½ cups all purpose flour
4 ½ teaspoons baking powder
½ teaspoon salt
3 sticks butter, room temperature
1 ½ cups sugar
3 large eggs
5 teaspoons vanilla extract

For the frosting:
5 cups powdered sugar
⅓ cup unsalted butter, melted
1 tablespoon vanilla extract
7-8 tablespoons milk

Preheat oven to 350 degrees F; line sheets with parchment.

1. In a medium bowl, combine flour, baking powder, and salt.

2. In an electric mixer, beat butter and sugar on medium speed until light and fluffy. Add eggs, one at a time, scraping down the bowl after each addition. Beat in vanilla until blended. Gradually add flour mixture and beat on low just until incorporated. Cover and chill at least 1 hour.

3. When ready to bake, scoop into 1-ounce balls (about 1 tablespoon) and gently press down center to flatten a little bit. Bake 10 – 12 minutes until set, they should not be browned at all. Allow cookies to cool on baking sheet, then transfer to wire rack to cool completely.

4. To frost the cookies, sift powdered sugar into a medium bowl. Add melted butter, vanilla, and milk to the bowl, whisking until smooth. If frosting is too thick, whisk in additional milk as necessary, 1 teaspoon at a time. If frosting is too thin, add additional powdered sugar.

* To save for later, scoop into 1-ounce balls, flatten slightly, then freeze to bake at a later date. Add a couple extra minutes to the baking time if baking from frozen.

*Baking in 1-ounce balls, this batter will make up to 4 dozen cookies

[ Adapted from Annie’s Eats ]

light as air pumpkin cheesecake

chscake22When I set out to make my very first cheesecake, I didn’t know that it would become a huge ordeal. It’s not that the recipe was exceptionally difficult, there were no strange ingredients, no extraordinary techniques… I think that some days the universe just aligns against me. Do you ever have those days? Those days where every little thing that could possibly go wrong does? Luckily, I worked through it, and was rewarded with this delicious cheesecake.

The first sign of trouble was the graham crackers. They just didn’t want to crush (I ended up hand-crushing some of the larger chunks as I was pressing them into the pan out of a final act of desperation), then I didn’t have a pan large enough to make a water bath, nor a kettle to heat enough water for it, and then I discovered that I only had half the amount of cream cheese necessary. A trip or two to the store later and I was ready to go… Thankfully it’s Thanksgiving time so they had those cheap “one-use” roasting pans… Even though I thought it was a perfectly good excuse to buy the $160 fancy roasting pan, the grocery store was much closer, and clearly the more economical choice. 🙂

Returning from the store, If I started the cheesecake THAT MOMENT, I would be right on schedule to pull the cheesecake out of the oven JUST IN TIME to head to dinner. I mixed my spices and whipped my cream cheese, then I decided it would be a great idea to catapult my brand new glass jar of pumpkin pie spice onto the concrete floor. Yes, it shattered. Everywhere.

All of my hopes and dreams, all of my hard work, gone in a puff of orange colored spice dust. This is normally where I would give up, decide that I “gave it my best” and “today was just not my day”, but the crust was already bakes, the cream cheese was already whipped, the pumpkin was already drained… I was too far in to quit now, so I forged on.

Screw it, I’ll just make my own “pumpkin pie spice”. I really wanted to take a picture of my shattered dreams scattered across the kitchen floor, but I had to use every last ounce of motivation to convince myself to carry on. I quickly cleaned up the mess before of glass and spice before the kitties (or my feet) had a chance to track through it…

By the end of my adventure, it looked like a Tasmanian devil went through my kitchen.  As soon as the cheesecake went into the oven I began frantically cleaning… It bakes for 1.25 hours, and we had to leave for dinner in exactly 1.5 hours… Actually, now that I think of it, I think I spotted a sprinkling of pumpkin pie spice that landed inside the pantry…. Note to self: make sure to clean that up when you get home…

When I first saw the recipe, it reminded me of the hauntingly good piece of cheesecake I had at Cheesecake Factory just a couple weeks earlier… Unlike the usual dense cheesecakes, this one was rich and flavorful while still remaining light and airy. A sweet, pumpkiny cloud of delicious…

See that? Much fancier. I actually made some fancy vanilla bean whipped cream to go with my cheesecake, too, but I was so excited with how well the cheesecake came out that I had completely forgotten about it by the time I was eating the cheesecake. Oops? Anyway, I think I came pretty darn close to that one. Although looking at the picture, it looks like their crust went up the sides of the cheesecake. I’ll keep that in mind for next time.

Now that I know the technique, I can apply it to any cheesecake I make. The trick? Are you ready? Heavy cream. Just whip some heavy cream right into the cream cheese mixture and voila – light, airy cheesecake. I know, rocket science, right?

This cheesecake would be the perfect alternative to your run-of-the-mill pumpkin pie this Thanksgiving (or, since it’s Thanksgiving today, maybe next Thanksgiving. But you could make it this year for practice…). I give it five stars, two thumbs up, and two toes up. All of the stars and all of the digits up. I don’t love cheesecake, I don’t even particularly like it, but this cheesecake might just be the talk of your (next) Thanksgiving feast, and I can say with medium certainty that you will be able to accomplish this cheesecake with 90% less disaster than I did. Don’t blame the recipe for my misfortune, I believe in you! You can do it!

Light as Air Pumpkin Cheesecake

[ Printable Recipe ]

Crust
·         5 ounces graham crackers (1 packet/ 9 whole crackers), broken into large pieces
·         3 tablespoons granulated sugar
·         1/2 teaspoon ground ginger
·         1/2 teaspoon ground cinnamon
·         1/4 teaspoon ground cloves
·         6 tablespoons unsalted butter , melted

Filling
·         1 1/3 cups granulated sugar
·         1 teaspoon ground cinnamon
·         1/2 teaspoon ground ginger
·         1/4 teaspoon ground nutmeg
·         1/8 teaspoon ground cloves
·         1/8 teaspoon allspice
·         1/2 teaspoon salt
·         1 can (15 ounces) pumpkin
·         1 1/2 pounds cream cheese ; cut into 1-inch cubes, softened about 30 minutes
·         1 tablespoon vanilla extract
·         1 tablespoon lemon juice
·         5 large eggs , room temperature
·         1 cup heavy cream

For the crust:

1.  Adjust oven rack to lower-middle position and heat oven to 325 degrees. Spray bottom and sides of 9-inch springform pan evenly with nonstick cooking spray, line with parchment.

2.  Pulse crackers, sugar, and spices in food processor until evenly and finely ground, transfer crumbs to medium bowl and drizzle  with melted butter. Mix  until evenly moistened.

3.  Pour crumbs into prepared springform pan and spread crumbs into even layer. Using flat-bottomed glass, press crumbs evenly into pan bottom, then run a spoon around the edges to smooth crumbs into edges of pan.

4.  Bake until fragrant and browned about the edges, about 15 minutes. Cool on wire rack while making filling.

Boil water: bring about 4 quarts water to simmer in stockpot.

Dry pumpkin: Line baking sheet with triple layer of paper towels. Spread pumpkin on paper towels in roughly even layer.

Cover pumpkin with second triple layer of paper towels and press firmly until paper towels are saturated. Peel back top layer of towels and discard.

Grasp bottom towels and fold pumpkin in half; peel back towels. Fold again, into quarters. You can use the towel to help you carry the pumpkin to the bowl when you’re ready to use it.

Prepare spices: In a small bowl, whisk sugar, spices, and salt

Make filling:

1.  In standing mixer fitted with a paddle attachment, beat cream cheese at medium speed until soft about 1 minute. Scrape beater and bottom and sides of bowl well with rubber spatula.

2.  Add one third of sugar mixture and beat at medium-low speed until combined, about 1 minute; scrape bowl. Add remaining sugar in two additions, scraping bowl after each addition. You want to really beat it here, make it nice and fluffy:

3.  Add pumpkin, vanilla, and lemon juice, beating at medium speed until combined, about 45 seconds; scrape bowl.

4.  Add 3 eggs and beat at medium-low until incorporated, about 1 minute; scrape bowl and add remaining 2 eggs , beating at medium-low until incorporated, about 45 seconds. Scrape bowl and beater.

5.  Add heavy cream and beat at low speed (so you don’t spray cream everywhere) until combined, about 45 seconds. Using a rubber spatula, scrape bottom and sides of bowl and give final stir by hand, making sure to scrape up anything that may be lingering in the bottom of the bowl. The mixture will be very runny.

Fill the crust:

1.  Set springform pan with cooled crust on an 18-inch-square doubled layer heavy-duty foil and wrap bottom and sides with foil (that means yo buy the super long tube of “heavy duty” foil). Set wrapped springform pan in roasting pan and fill springform pan with your cheesecake filling, smoothing the surface when finished.
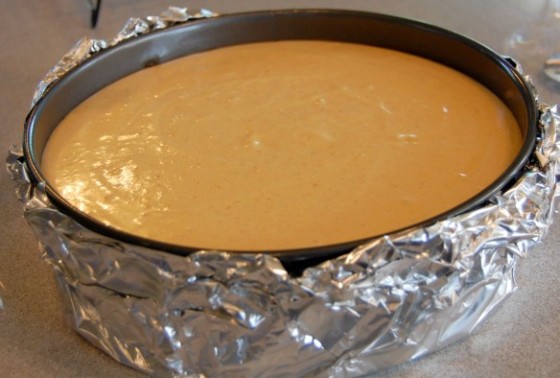
2.  Set roasting pan in oven and pour enough boiling water to come about halfway up side of springform pan. Bake until center of cake is slightly wobbly when pan is shaken, about 1 1/2 hours.*

3.  Set roasting pan on wire rack and use paring knife or offset spatula to loosen cake from sides of pan. Cool until water is just warm, about 45 minutes. (Mine cooled in the water bath while we went to dinner)

4.  Remove springform pan from water bath, discard foil, and set on wire rack. Continue to cool another 3 hours. Wrap with plastic wrap and refrigerate until chilled, at least 4 hours or up to 3 days.

To serve:  Slide thin metal spatula between crust and pan bottom to loosen, then slide cake onto serving platter. Let cheesecake stand at room temperature about 30 before cutting.

NOTES

–   When done, cake should register 145 – 150 F on an instant-read thermometer. Since my instant-read thermometer is not very reliable, I used the “tap the pan” method. This is where you tap the side of the pan and see how wobbly the cake is. The outsides should be still while the center still jiggles slightly.

–    Depending on the oven and the temperature of the ingredients, the cheesecake may bake about 15 minutes faster or slower than the instructions indicate; it is therefore best to check the cake 1 1/4 hours into baking.

–   Although the cheesecake can be made up to three days in advance, the crust will begin to lose its crispness after only one day.

–   To make slicing the cheesecake easy and neat, use a knife with a narrow blade, such as a carving knife; between cuts, dip the blade into a pitcher of hot water and wipe it clean with paper towels.

[ Adapted from America’s Test Kitchen; November 2011 ]

praline pumpkin cake

dsc_4764

This is your new Thanksgiving dessert. You may not know it yet, but it is. Just try it out, just this once, you’ve got time. Two day to Thanksgiving? That’s plenty of time. Get the ingredients tonight, make the cake and whipped cream tomorrow, and assemble the day of. Like I said, plenty of time…

I made this for the first time on the last Thanksgiving I spent at home – three years ago. The following year, making something else wasn’t even an option, I think it was around September when requests for the cake started rolling in. When I mentioned that I might “try something new” last year, I was told that whatever I did, I was still required to make this cake. Required. Can you believe it? The nerve!

Then again, who could blame them?

This year, when I did try something new ( recipe coming soon ), I was sure to make this cake the very same day. Of course that meant we had two desserts for our pre-Thanksgiving meal, but who says that’s a bad thing?

I brought my boss a piece of this cake, I stuck it in the fridge with his name on it, and when I walked by at 7:30 am and he was devouring it, I was sure to make him feel the appropriate amount of shame. “Cake for breakfast?!? REALLY?!?” He confessed he couldn’t help himself. He just wanted to try “a bite”, but it was the best cake he’d ever eaten. Ever. Am I hyping it up too much? I don’t want you to be let down, but I do want you to be motivated enough to try it. Like, now.

This cake is the perfect alternative for those who aren’t into pie, or those who are into pie, but are also into cake. It just different enough from your standard pumpkin pie to be “new”, but still classic enough to not incite a Thanksgiving Day riot. Delicious layers of pumpkin cake, with praline pecan glazed tops, adorned with freshly-whipped cream. Drooling yet?

praline pumpkin cake

Yield: 1 2-layer Cake

Ingredients

    For the Cake
  • · 3/4 cup brown sugar
  • · 1/3 cup butter
  • · 3 tablespoons whipping cream
  • · 1/2 cup chopped pecans
  • · 4 large eggs
  • · 1 2/3 cups sugar
  • · 1 cup vegetable oil
  • · 1 (15-ounce) can pumpkin
  • · ¼ teaspoon vanilla extract
  • · 2 cups all-purpose flour
  • · 2 teaspoons baking powder
  • · 2 teaspoons pumpkin pie spice
  • ( OR 1 tsp cinnamon, ½ tsp ginger, ¼ tsp nutmeg, pinch ( ? tsp) cloves or allspice)
  • · 1 teaspoon baking soda
  • · 1 teaspoon salt
  • Whipped topping:
  • · 2 cups heavy whipping cream
  • · 1/4 cup confectioners' sugar
  • · 2 teaspoons vanilla extract

Instructions

  1. 1 Cook first 3 ingredients in a saucepan over low heat, stirring until sugar dissolves. Pour into 2 greased 9-inch round cake pans; sprinkle evenly with ½ cup pecans. Cool.
  2. 2 Beat eggs, sugar, and oil at medium speed with an electric mixer. Add pumpkin and vanilla; beat well.
  3. 3 Combine flour and next 4 ingredients; add to pumpkin mixture, beating until blended. Spoon batter evenly into prepared pans, starting first with the edges, and then filling the center. If you try to pour it all into the center, your praline topping will get pushed to the edge and boil over. (For this reason, it is a good idea to place your cake pans on a sheet pan, and also put a layer of foil on the rack underneath, just in case there is any spillage).
  4. 4 Bake at 350° for 30 to 35 minutes or until a wooden pick inserted in center comes out clean. Cool cake layers in pans on wire racks 5 minutes; remove from pans, and continue to cool on wire racks.
  5. 5 Place 1 cake layer on a serving plate, praline side up; spread evenly with Whipped cream. Top with remaining layer, praline side up, and spread with remaining whipped cream. Sprinkle cake with chopped pecans (or, if my praline boils over, I like to break up the bits and sprinkle those on top). Store in refrigerator.

Notes

- Line the bottoms of the cake pans with parchment, to ensure most of your praline remains on the cake (and not glued to the pans)

- Bake both cake pans on a sheet pan, and put foil on the rack below to catch any praline spillover.

- If you have spillover, keep the praline pieces and sprinkle them on top for a tasty decoration.

- You can make both items the day before, and store the cake layers, wrapped, at room temperature or in the refrigerator. Store the whipped cream in the fridge (obviously) and “frost” the cake immediately before serving. This will avoid taking up valuable refrigerator space on your special holiday.

- Line the bottoms of the cake pans with parchment, to ensure most of your praline remains on the cake (and not glued to the pans)

- The cake ends up so huge, I’m often tempted to make it into four, thinner layers instead of 2 giant layers... I haven’t done it yet, but if you do, let me know how it goes

https://wee-eats.com/2011/11/22/praline-pumpkin-cake/

cream cheese pumpkin muffins

cream cheese pumpkin muffin 1

I sent half of these muffins to work with the boyfriend, and distributed the rest amongst a few of my coworkers. Since then, I have had a few requests from those anxious to get the recipe, so I figured I better hurry up and post it already…So, by popular demand, I bring you sweet, cinnamony, pumpkin muffins… with cream cheese filling.

Since you have to make the filling a couple hours ahead of time, you can’t make these muffins at the last minute (like you can with pretty much any other muffin or quickbread, hence the “quick”). You can, however, make the filling when you’re thinking about it, and then leave it in the freezer for however long until you decide you want some muffins.

Make sure you let them cool adequately, so you don’t end up with molten cream cheese magma burning the inside of your mouth… not that you would try to eat a muffin before it was cooled anyway… What kind of crazy person does that?

Pumpkin Cream Cheese Muffins

[ Printable Recipe ]

For the filling:

  • 8 oz. cream cheese, softened
  • 1 cup powdered sugar

For the muffins:

  • 3 cups all-purpose flour
  • 1 tsp. ground cinnamon
  • 1/2 tsp. ground nutmeg
  • 1/4 tsp. ground cloves
  • 1 tbsp.pumpkin pie spice
  • 1 tsp. salt
  • 1 tsp. baking soda
  • 4 large eggs
  • 2 cups sugar
  • 1 15-oz can pumpkin puree
  • 1¼ cups vegetable oil

For the topping:

  • ½ cup sugar
  • 5 tbsp. flour
  • 2 tsp. ground cinnamon
  • 4 tbsp. cold unsalted butter, cut into pieces

For the filling: Beat cream cheese and powdered sugar in a medium bowl until blended and smooth.  Transfer the mixture to a piece of plastic wrap and shape into a log about 24 inches long, 1 to 1 ½-inches in diameter.  Fit tightly around the log, and reinforce with a piece of foil.  Transfer to the freezer and chill until at least slightly firm, at least 2 hours.

For the topping: Combine the sugar, flour and cinnamon in a small bowl; whisk to blend.  Add the butter pieces and cut into the dry ingredients until the mixture is coarse and crumbly.  Transfer to the refrigerator until ready to use.

For the muffins: Preheat the oven to 350˚ F and line muffin pans with paper liners.

1.  In a medium bowl, combine the flour, cinnamon, nutmeg, cloves, pumpkin pie spice, salt and baking soda; whisk to blend.

2. In the bowl of an electric mixer combine the eggs, sugar, pumpkin puree and oil.  Mix on medium-low speed until blended. Add dry ingredients in two additions, mixing just until incorporated.

To assemble:

1. Fill each muffin tin with just enough batter to cover the bottom (1 – 2 tablespoons).

2. Slice the log of cream cheese filling into 24 equal pieces.  Place a slice of the cream cheese mixture into each muffin well.

3. Divide the remaining batter among the muffin cups, placing on top of the cream cheese to cover completely.  Sprinkle a small amount of the topping mixture over each of the muffin wells.

4. Bake for 20-25 minutes.  Transfer to a wire rack and let cool completely before serving.

caramel apple pie

caramel apple pie 1

Few things are associated with America, fall, or thanksgiving quite like apple pie. There is something about the time of year that requires apple pies to be made. May or may not have something to do with apples being in season… nah, I’m sure it’s completely unrelated. Definitely something to do with pilgrims and indians and apples… then America was made and everyone feasted on apple pie a la mode… yeah, that sounds about right.

>.>

<.<

>.>

Back east, we have tons of apple orchards, you just go and pick your very own apples, watch some turn into cider, pet some farm animals, get a hot apple fritter, and bring however many pounds of apples you’ve acquired home for fresh apple pie, apple cobbler, apple sauce, or just plain apples.

The apples here are sad when compared to the ones back home, but just like lemonade from lemons, when life gives you apples…. No, don’t make apple-aid. Pie will do just fine. There are a lot of different apple pie camps. Not only is there debate over which apples to use – granny smith, macon, macintosh, golden delicious… So many varieties of apples are available they’ll make your head spin. And then there’s the crust – single crust, double crust, thick or thin crusts… Where’s a girl to start.

Well, for this girl at least, it starts with streusel. Not only does streusel make everything infinity better, it gives this pie a welcome ‘crunch’ that accents the soft apples and makes your mouth go “wow”. Not literally, of course, because then you’d be spilling apple pie out of your mouth, and what a waste of apple pie that would be, I don’t care how shocked you are. Swallow first, then “wow”. There will be no wasting of apple pie in my home. None.

BUT WAIT, THERE’S MORE! Just when you thought you were done, a drizzle of caramel takes it to the next level  – taking the pie up a notch from “apple pie” to “caramel apple pie”… That’s right. I went there. Mmmm … caramel… (did anyone else hear Homer Simpson in their head?)

For my pie, I used a mixture of pretty much whatever I could get my hands on at the store. The apples here don’t carry the same heft as back home, but they worked out just fine. I used, I believe, 2 granny smiths, 2 macintosh, and perhaps even a pink lady. With the added sweetness of the streusel and caramel though, feel free to stick with the tart granny smith for more flavor contrast. Otherwise, mix and match to your heart’s content.

Caramel Apple Pie

Printable Recipe

For the filling

  • 1 recipe single-crust pie dough
  • 3 tablespoons AP flour
  • 1 tsp ground cinnamon
  • 1/8 tsp salt
  • 6 c thinly sliced, peeled apples (about 3 large, or 6 small apples)

For streusel

  • 1 c packed brown sugar
  • ½ c AP flour
  • ½ c quick-cooking oats
  • ½ c butter
  • ½ c granulated sugar

For topping

  • ¼ c caramel topping

Preheat oven to 375F and prepare a pie pan for use.

1. Make pie crust and roll dough to 12-inch circle. Transfer to 9” pie plate.

OR … unroll thawed store-bought pie crust… blasphemy, I know

Make the streusel:

  1. Stir together brown sugar, ½ c AP flour and oats and cut in butter until crumbly.

Prepare the apples:

  1. Stir together sugar, 3 tablespoons of flour, cinnamon, and salt.
  2. Add apple slices and toss to coat. Transfer mixture to pie crust & sprinkle w crumb topping.

Bake

  1. Cover edges of pie with crust covers or aluminum foil and bake 25min @ 375F.
  2. Remove foil and bake additional 25 – 30 min until top is golden.
  3. Remove from oven and drizzle with caramel. Cool before serving