Happy Birthday to Me (and the Chocolate-Peanut Butter Obsession Continues)


I’m here, I’m alive, I’ve survived another year! Go me! I know it’s been awhile since we’ve seen each other, but it’s been a busy year so it’s been hard to find time to sit down and blog. But, I’M BACK KIDS! It’s my birthday gift to me (and you)! For those of you who have been around awhile, you may be aware that every year I make my own birthday cake. This year was no exception. Previous birthdays included:

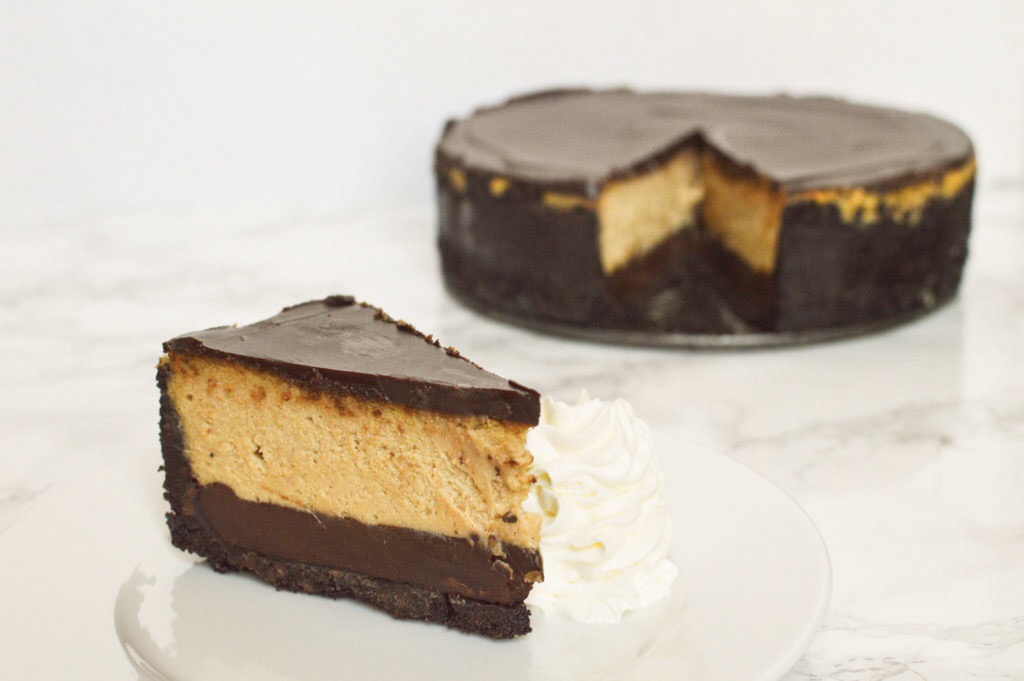
When I saw this cheesecake over on Smitten Kitchen, I just knew I needed to make it for my birthday. With layers of chocolate cookie crust, rich chocolate fudge, and creamy peanut butter cheesecake, all topped off with a chocolate ganache.

Chocolate-Peanut Butter Cheesecake

Ingredients

    For the crust
  • 9 oz (1 package) Nabisco chocolate wafers
  • 1 cup semisweet chocolate chips
  • 1/2 cup dark brown sugar, firmly packed
  • 7 tablespoons unsalted butter, melted
  • For the fudge
  • 1 cup heavy whipping cream
  • 13 ounces semisweet chocolate, chopped
  • 2 tablespoons smooth peanut butter
  • For the cheesecake
  • 2 8-oz packages full fat cream cheese, room temperature
  • 1 1/4 cups smooth peanut butter
  • 1 cup granulated sugar
  • 3/4 cup full fat sour cream, room temperature
  • 3 large eggs, room temperature
  • 1 tablespoon vanilla extract
  • 1/4 teaspoon kosher salt
  • For the ganache
  • 1/3 cup heavy whipping cream
  • 4 1/2 oz semisweet chocolate, chopped
  • 1 tablespoon smooth peanut butter

Instructions

    Prepare the pan
  1. Cover the outside of a 9 inch springform pan with two layers of aluminum foil.
  2. For the crust
  3. Finely crush wafers in a food processor until they make fine crumbs. Add chocolate chips and brown sugar a pulse to combine. Add butter and continue pulsing until thoroughly moistened. (If you don't have a food processor, you can crush the cookies in a heavy duty ziploc bag using a rolling pin, then pour into a bowl and add the remaining ingredients).
  4. Transfer the crumbs to the springform pan and press them up the sides of the pan almost to the top (within a half inch) and into the bottom of the pan to form the crust. Place in refrigerator to chill while you make the fudge.
  5. Make the fudge
  6. Bring heavy cream to a simmer in a saucepan. Remove from heat and add the chocolate and peanut butter, whisking until smooth. Pour into pan and spread into an even layer. Place in the freezer for about 30 minutes, until firm.
  7. Make the cheesecake
  8. Preheat the oven to 325°F
  9. Using an electric mixer fitted with the paddle attachment, beat the cream cheese, peanut butter, and sugar until light and fluffy, scraping down the sides as needed.
  10. Scrape down the sides and add the sour cream, beating to combine.
  11. Add the eggs, one at a time, beating until incorporated.
  12. Add vanilla and beat until incorporated, scraping down the sides and bottom to ensure everything is evenly mixed. Pour cheesecake over the fudge layer.
  13. Bake in a water bath
  14. Place foil-wrapped springform pan into a roasting pan large enough to hold it.
  15. Fill the pan with enough hot water to come 1 inch up the side of the springform pan and transfer very carefully to the oven.
  16. If you don't want to use a water bath, you can bake it without a water bath as well, but the water bath is more gentle. To bake without a water bath, simply place your springform pan onto a baking sheet in the oven. (The baking sheet will make it easier to remove when the cheesecake is done).
  17. Bake the cheesecake for 75 to 90 minutes until the cake is mostly firm but will still jiggle a bit in the middle when poked. If you like to be more scientific, the center of the cheesecake should reach about 150-155°F on an instant read thermometer. The top will be a light golden brown.
  18. When done, allow to cool about 30 minutes on a wire rack, then transfer to the refrigerator for at 3 hours (or longer).
  19. Make the ganache
  20. Heat cream in a small saucepan until simmering.
  21. Remove from the heat and add the chocolate and peanut butter, whisking until smooth and shiny.
  22. Pour onto the cheesecake and spread evenly across the top of the cheesecake.
  23. Return cheesecake to fridge for at least 30 minutes, until the ganache has set.
  24. Serve the cheesecake
  25. Run a small offset spatula or butter knife around the outside of the cake to make sure it doesn't stick to the pan. Unhinge the sides to remove the bottom piece containing the cheesecake.
  26. To cut the cheesecake, run a sharp knife under hot water and wipe with a warm damp cloth. Cut into thin slices, pressing firmly at the bottom to ensure you cut through the crust layer at the bottom, wiping the knife as needed.
https://wee-eats.com/2017/03/15/happy-birthday-chocolate-peanut-butter-cheesecake/

[ Recipe from Smitten Kitchen ]

nonnie’s blueberry buckle

20160717-DSC_1609

This month’s Baked Occasionally is brought to you by the August chapter and was chosen by Mrs. Table. Just like this wonderful summer month this cake is sweet and fill to the top with fruit. Not to be confused with a blueberry coffee cake, the buckle is… well, to be honest I’m not quite sure why it’s not a coffee cake. But it’s not.

Cake batter? Check. Berries? Check. Stresuel? Check! Delicious in the morning and even more delicious alongside coffee? Double check. But no, definitely not a coffee cake.

She may not look like much but what she lacks in presentation she makes up for in flavor. Baked’s blueberry buckle is a sweet, tender cake bursting with blueberries and topped with a sweet, crunchy streusel topping. It’s perfect for breakfast or dessert, or an afternoon snack.

What I liked:

Everything – it was delicious!

What I didn’t:

As per usual, the Baked recipe called for a special tube pan (which my frugal self has yet to purchase). While not nearly as gorgeous as Shannon’s tube pan cake, I did learn that it would fit perfectly into a 10 inch round cake pan. Of course, it will affect your baking time. I ended up using a 10 inch spring form pan so that I could still have the removable bottom feature.

I also threw a little batter into some muffin tins because everything is better in mini form.

You can see Shannon’s post over at A Periodic Table, or pick up the Baked Occasions book and bake along with us next month!

20160717-DSC_1625

nonnie's blueberry buckle

Ingredients

    For the Blueberry Cake
  • 1½ cups (170 g) all-purpose flour
  • 1½ cups (170 g) cake flour
  • 2 teaspoons baking powder
  • ¾ teaspoon kosher salt
  • ¾ teaspoon ground ginger
  • ¼ teaspoon baking soda
  • 1 cup plus 2 tablespoons (225 g) granulated sugar
  • ¼ cup plus 2 tablespoons (90 ml) canola oil
  • 2 ounces (½ stick/55 g) unsalted butter, softened
  • 1 large egg
  • 1 large egg yolk
  • 2 teaspoons pure vanilla extract
  • Zest of 1 lemon (about 1 tablespoon)
  • ¼ cup (60 ml) heavy cream
  • ½ cup (115 g) sour cream
  • 4 cups (14 ounces/395 g) fresh blueberries
  • For the Streusel
  • ¾ cup (165 g) firmly packed dark brown sugar
  • 1?3 cup (40 g) all purpose flour
  • 1?3 cup (40 g) cake flour
  • ¾ teaspoon ground cinnamon
  • 3 ounces (¾ stick/85 g) unsalted butter, melted and cooled slightly

Instructions

    Make the cake
  1. Preheat the oven to 375°F and prepare a 10-cup tube pan or a 10 inch round springform cake pan by lining with parchment and spraying with nonstick cooking spray. (Or butter the pan and dust it with flour, knocking out the excess flour)).
  2. In a large bowl, whisk together both flours, the baking powder, salt, ginger, and baking soda. Set aside.
  3. In a small bowl, whisk together the cream and sour cream and whisk until combined; set aside.
  4. In the bowl of a standing mixer fitted with the paddle attachment, beat the butter, oil and sugar on medium speed until light and fluffy, about 3 to 4 minutes.
  5. Add the egg and egg yolk and beat until incorporated. Scrape down the sides and bottom of the bowl,
  6. Add the vanilla extract and lemon zest, and beat for another 10 seconds
  7. Add the flour mixture to the butter mixture in the standing mixer in three parts, alternating with the cream mixture, beginning and ending with the flour mixture (flour-cream-flour-cream-flour). Beat at medium speed after each addition until incorporated, about 10 to 15 seconds each.
  8. Using a rubber spatula, gently fold the blueberries into the batter. The batter will be very thick.
  9. Transfer the batter to the prepared pan, smoothing the top with a spatula.
  10. Make the Streusel
  11. In a medium bowl, whisk together the brown sugar, flours, and cinnamon until combined (lumps are okay).
  12. Drizzle the melted butter over the mixture and combine until the sugar mixture is thoroughly moistened. You can do this with your hands, a fork, or a spatula.
  13. Pinch off chunks of the topping and drop them over the top of the buckle batter. Use all of the topping and cover the batter completely.
  14. Bake the cake until a toothpick inserted in the center of the cake comes out with a few moist crumbs, 50 to 60 minutes. (Note: Baking time for muffin size was between 15 to 20 minutes)
  15. Set the cake pan on a wire rack to cool for at least 20 minutes. Loosen the cake from the sides of the pan with a paring knife, then push the bottom of the pan up (If using a removable bottom) to release the cake. Use the knife to loosen and remove the cake from the bottom of the pan, then cool completely, topping side up, on a cooling rack.

Notes

* If you don't have a tube pan, feel free to use a 10 inch round cake pan or spring form pan. Preferably something with a removable bottom.

* Portion into muffin tins and bake for 15 to 20 minutes for bite sized treats.

* If the streusel topping browns too much while cooking, just cover it with some foil while the cake continues to bake.

https://wee-eats.com/2016/08/02/nonnies-blueberry-buckle/

[ GET THE BOOK – BAKED OCCASIONS ]
[ CHECK OUT SHANNON’S POST ON A PERIODIC TABLE ]

Disclaimer: This post includes an Amazon Affiliate link. I may earn a small commission for my link to any products or services from this website. 

Baked, Occasionally – Coconut Sheet Cake

coconut cake wee eats

It’s the first Monday of the month, and you know what that means! Time for another #BakedOccasionally, when my good friend Shannon from A Periodic Table and I team up to make something delicious from the latest book from New York’s Baked bakery – Baked Occasions. Continue reading

a momofuku-inspired peanut butter & jelly birthday cake

pbj_cake_wee_eats_1340

It’s become a tradition around here where every year I bake my own birthday cake. It’s my gift to myself every year that I challenge myself a little bit to come up with a recipe and execute it.

It started with the chocolate peanut butter cake, from there I moved on to fluffernutter cake, sweet & salty cake, and then the Momofuku themes with confetti cake, and last year’s chocolate chip cake. This year I fulfilled my childhood dream with my very own peanut butter and jelly cake.

I didn’t just want a white cake filled with peanut butter and jelly frostings, I wanted to create a cake that would literally be like eating a peanut butter and jelly sandwich. And, I think I succeeded.

pbj_cake_slice_wee_eats_1356

I bit of a warning though, while making me extremely happy and excited about achieving my goal, it simultaneously blew my mind eating a cake that tasted like a peanut butter and jelly sandwich. Sort of like eating purple ketchup. It tastes so good but it breaks my brain when I eat it.

That being said, this cake was a huge hit and I highly recommend making this for the PBJ lover in your life.

peanut butter and jelly cake

Ingredients

    You will need
  • 1 recipe browned butter cake
  • 1 recipe peanut butter frosting
  • 1 recipe berry milk crumbs
  • 1 jar of your favorite jelly (you won't use the whole jar)
  • 1/4 cup milk with 1 teaspoon vanilla
  • 1 gallon-size Ziploc bag (for frosting)
  • 6-inch cake ring
  • 2 acetate strips
  • For browned butter
  • 4 tablespoons unsalted butter
  • For the cake
  • 4 tablespoons (½ stick) unsalted butter, room temperature
  • 2 tablespoons brown butter (recipe below)
  • 1 ¼ cups granulated sugar
  • ¼ cup tightly packed brown sugar
  • 3 large eggs, room temperature
  • ½ cup shaken buttermilk, room temperature
  • 1/3 cup grapeseed oil
  • 1 teaspoon vanilla extract
  • 1 ½ cups cake flour
  • 1 teaspoon baking powder
  • 1 teaspoon kosher salt
  • For the peanut butter frosting
  • 1 stick (8 ounces) cream cheese, at room temperature
  • 1 stick (4 ounces) unsalted butter, at room temperature
  • ½ teaspoon vanilla extract
  • 2 cups powdered sugar
  • 2/3 cup smooth peanut butter
  • For the berry crumbs
  • 1/2 cup powderd milk
  • 1/4 cup all purpose flour
  • 2 tablespoons cornstarch
  • 2 tablespoons sugar
  • 1/2 teaspoon kosher salt
  • 4 tablespoons (1/2 stick) unsalted butter, melted
  • 1/4 cup powdered milk (separate from the first)
  • 3 ounces white chocolate, melted
  • 1/4 cup crushed freeze dried berries of your choice (I used strawberries)

Instructions

    Make the browned butter
  1. Place butter in a microwave-safe bowl put a microwave-safe plate on top.
  2. Microwave for 3 to 5 minutes, watching carefully. The butter will pop while browning.
  3. If the butter has not browned enough, microwave again in 1 minute increments.
  4. While the brown butter is cooling, stir periodically to incorporate the caramelized bits of butter. Cool completely before using. (I put mine in the fridge and stirred every 5 to 10 minutes).
  5. Make the cake
  6. Heat the oven to 350°f and line a quarter sheet pan with parchment.
  7. In a small bowl, stir together the cake flour, baking powder, and salt.
  8. In the bowl of a stand mixer fitted with the paddle attachment, combine the butter, brown butter, and sugars. Cream together on medium-high for 2 to 3 minutes and scrape down the sides of the bowl. Add the eggs, one at a time, and mix until combined after each addition. Turn the mixer up to medium-high for 2 to 3 minutes. Scrape down the sides of the bowl once more.
  9. With the mixer on low, slowly stream in the buttermilk, oil, and vanilla. Increase the speed to medium-high and beat another 5 to 6 minutes, until the mixture is nearly doubled in size.
  10. * Remember you’re basically forcing too much liquid into an already fatty mixture that doesn’t want to make room for it, so if it doesn’t look right after 6 minutes, keep mixing.
  11. Once homogenized, stop the mixer and scrape down the sides of the bowl.
  12. Add the flour mixture on low speed and mix for 45 to 60 seconds, just until your batter comes together and any remnants of dry ingredients have been incorporated. scrape down the sides of the bowl. mix on low speed for another 45 seconds to ensure that any little lumps of cake flour are incorporated.
  13. Spread the cake batter in an even layer in the prepared pan and bake for 30 to 35 minutes until the cake bounces back when gently touched and a toothpick entered into the center comes out mostly clean.
  14. Cool cake completely on a wire rack (you can turn it out after 15 minutes, or let it cool completely in the pan). The cooled cake can be stored in the fridge, wrapped in plastic wrap, for up to 5 days.
  15. For the frosting
  16. Frosting should be made when you are ready to assemble the cake.
  17. In the bowl of a stand mixer fitted with the whisk attachment, beat the butter and cream cheese together on medium-high speed until light and fluffy.
  18. Scrape down the sides of the bowl then add peanut butter and vanilla, beat on medium-high to combine.
  19. Scrape down the sides of the bowl again and add the powdered sugar. Beat on low until the sugar is incorporated, then turn speed up to high and beat another minute or so until the mixture is very light and fluffy.
  20. Scoop frosting into a gallon size Ziploc bag or into a pastry bag fitted with a large tip. Set aside.
  21. Make the crumbs
  22. Preheat the oven to 250°F and line a baking sheet with parchment.
  23. In a small bowl, combine the ½ cup milk powder, the flour, cornstarch, sugar, and salt in a medium bowl, stirring to combine. Add the melted butter and toss, using a spatula, until the mixture starts to come together and form small clusters.
  24. Spread the clusters on prepared sheet pan and bake for 20 minutes. Cool the crumbs completely.
  25. Crumble any milk crumb clusters that are larger than ½ inch in diameter, and put the crumbs in a medium bowl. add the extra ¼ cup of milk powder and 2 tablespoons of the berry powder and toss together until it is evenly distributed throughout the mixture.
  26. Pour the white chocolate over the crumbs and toss until your clusters are covered, then continue tossing them every 5 minutes until the white chocolate hardens and the clusters are no longer sticky. You can add additional berry powder while tossing, if desired.
  27. The crumbs will keep in an airtight container in the fridge or freezer for up to 1 month.
  28. Assemble the cake
  29. Mix 1/4 cup of milk with 1 teaspoon vanilla extract.
  30. Warm jelly for 15-30 seconds in the microwave (this makes it much easier to spread).
  31. Using a 6-inch cake ring, stamp out two full circles and two half circles from the sheet cake.
  32. Clean the cake ring and line with an acetate strip.
  33. Place the cake ring atop a cake board or a plate and place the first cake circle into the bottom of the cake ring.
  34. Using a pastry brush, brush with 1/3 the milk mixture. Spread a layer of jelly atop the cake layer and sprinkle with berry crumbs.
  35. Snip 1/2-inch opening from the corner of the Ziploc and twist the top of the bag so the frosting doesn't ooze out. Squeeze a line of frosting around the outside of the cake, and then a smaller circle or two towards the middle. Using a small offset spatula or the back of a spoon, spread the frosting into an even layer.
  36. Top with the two halves of the cake circle to create one full circle, pressing gently but firmly down on top of the cake layer to secure it in place. If necessary, use any cake scraps to fill any gap there is between the two cake halves.
  37. Wedge your second acetate strip between the cake ring and the first acetate strip to secure it in place.
  38. Brush your fraken-cake layer with 1/3 of the milk mixture, spread with a layer of jelly, crumbs, and frosting (deja vu, right?).
  39. Top with final layer of cake, brush with final 1/3 of milk mixture, and spread with peanut butter frosting. Top with berry crumbs.
  40. Place the entire assembled cake into the freezer to set for at least 8 hours, or up to one week. I usually freeze mine for 6 to 8 hours until firm enough to handle, then you can take it out, remove the cake ring (leaving the acetate strips in place) and cover with saran wrap. Return to the freezer until serving day.
  41. Take cake out of the freezer at least 4 to 6 hours prior to serving. You can take it out the night before and place in the refrigerator the thaw, if desired.

Notes

* For help with the assembly, check out Shannon's post or this video from Bon Appetit

https://wee-eats.com/2016/03/29/momofuku-pbj-cake/

[ cake recipe adapted from Momofuku Milk Bar]

wee hacks her wedding cake – white cake with berries and whipped cream frosting

wed cake 2 1117It’s official! Mr. Eats and I have officially survived our first year of marriage and, as far as I can tell, neither of us has murdered the other yet! Go us! In fact, I could even say that I like him more now than ever, but don’t tell him that. I don’t want him to get a big ego.  Continue reading