a momofuku-inspired peanut butter & jelly birthday cake

pbj_cake_wee_eats_1340

It’s become a tradition around here where every year I bake my own birthday cake. It’s my gift to myself every year that I challenge myself a little bit to come up with a recipe and execute it.

It started with the chocolate peanut butter cake, from there I moved on to fluffernutter cake, sweet & salty cake, and then the Momofuku themes with confetti cake, and last year’s chocolate chip cake. This year I fulfilled my childhood dream with my very own peanut butter and jelly cake.

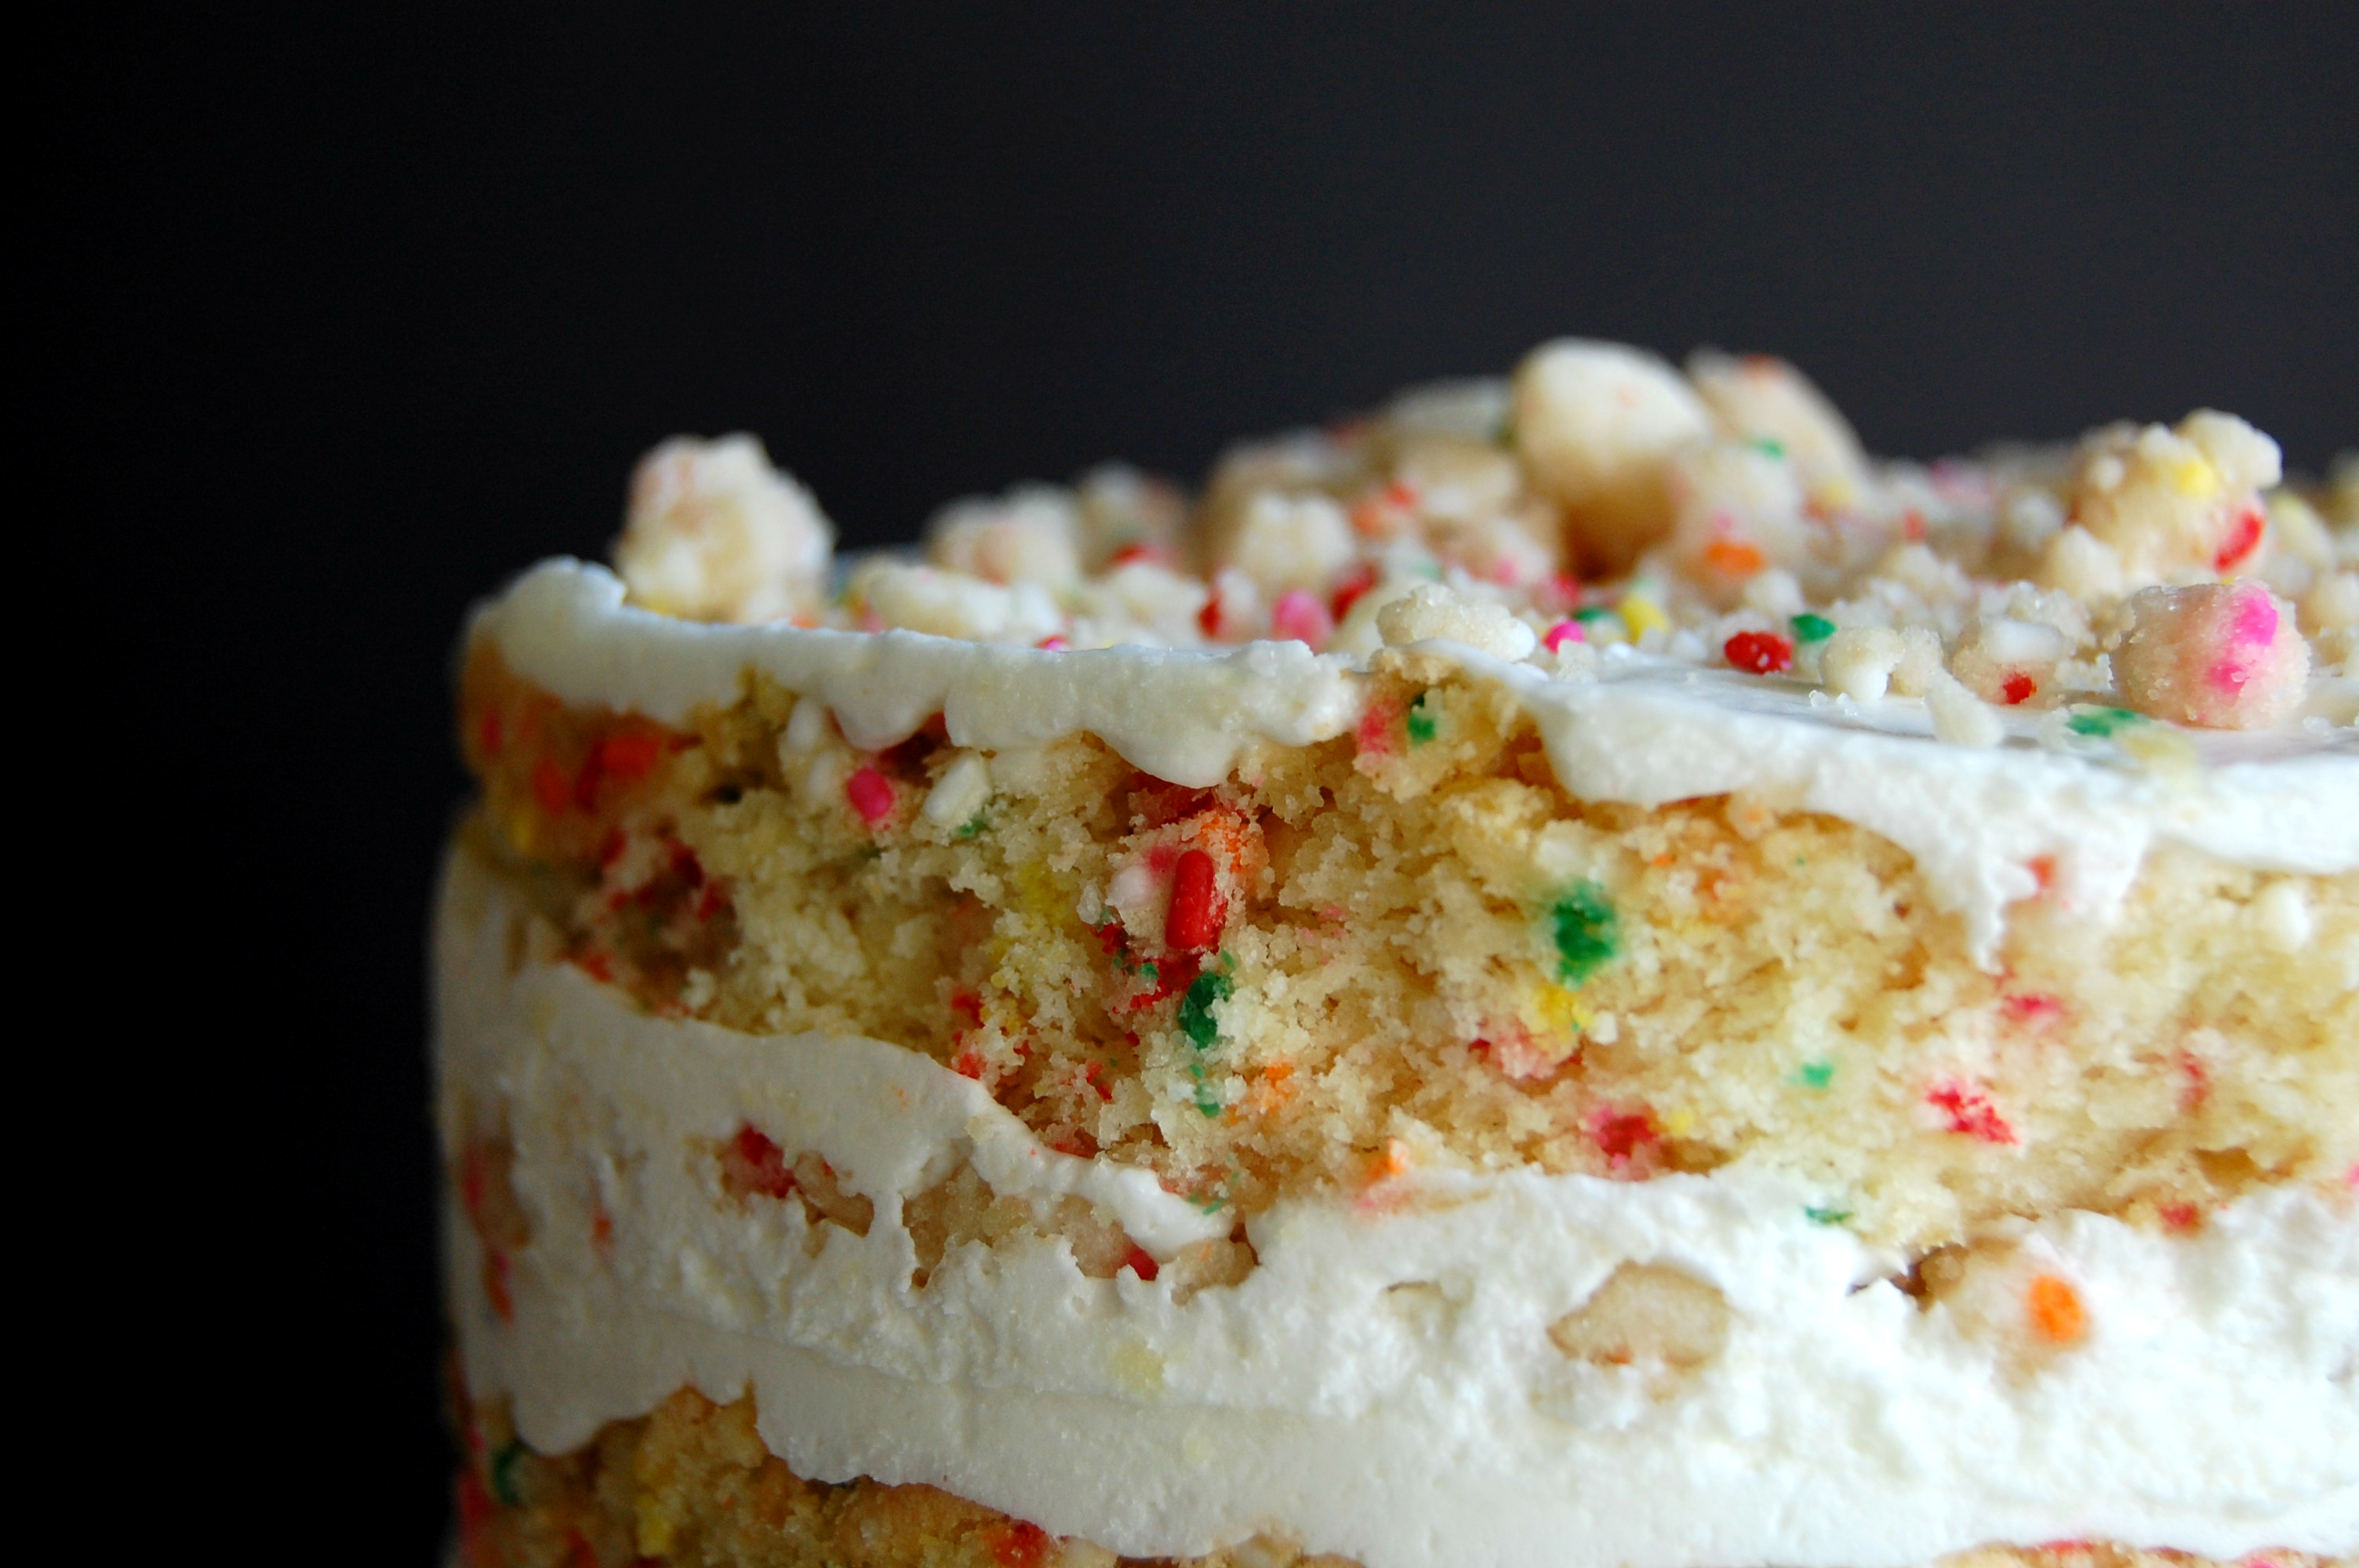
I didn’t just want a white cake filled with peanut butter and jelly frostings, I wanted to create a cake that would literally be like eating a peanut butter and jelly sandwich. And, I think I succeeded.

pbj_cake_slice_wee_eats_1356

I bit of a warning though, while making me extremely happy and excited about achieving my goal, it simultaneously blew my mind eating a cake that tasted like a peanut butter and jelly sandwich. Sort of like eating purple ketchup. It tastes so good but it breaks my brain when I eat it.

That being said, this cake was a huge hit and I highly recommend making this for the PBJ lover in your life.

peanut butter and jelly cake

Ingredients

    You will need
  • 1 recipe browned butter cake
  • 1 recipe peanut butter frosting
  • 1 recipe berry milk crumbs
  • 1 jar of your favorite jelly (you won't use the whole jar)
  • 1/4 cup milk with 1 teaspoon vanilla
  • 1 gallon-size Ziploc bag (for frosting)
  • 6-inch cake ring
  • 2 acetate strips
  • For browned butter
  • 4 tablespoons unsalted butter
  • For the cake
  • 4 tablespoons (½ stick) unsalted butter, room temperature
  • 2 tablespoons brown butter (recipe below)
  • 1 ¼ cups granulated sugar
  • ¼ cup tightly packed brown sugar
  • 3 large eggs, room temperature
  • ½ cup shaken buttermilk, room temperature
  • 1/3 cup grapeseed oil
  • 1 teaspoon vanilla extract
  • 1 ½ cups cake flour
  • 1 teaspoon baking powder
  • 1 teaspoon kosher salt
  • For the peanut butter frosting
  • 1 stick (8 ounces) cream cheese, at room temperature
  • 1 stick (4 ounces) unsalted butter, at room temperature
  • ½ teaspoon vanilla extract
  • 2 cups powdered sugar
  • 2/3 cup smooth peanut butter
  • For the berry crumbs
  • 1/2 cup powderd milk
  • 1/4 cup all purpose flour
  • 2 tablespoons cornstarch
  • 2 tablespoons sugar
  • 1/2 teaspoon kosher salt
  • 4 tablespoons (1/2 stick) unsalted butter, melted
  • 1/4 cup powdered milk (separate from the first)
  • 3 ounces white chocolate, melted
  • 1/4 cup crushed freeze dried berries of your choice (I used strawberries)

Instructions

    Make the browned butter
  1. Place butter in a microwave-safe bowl put a microwave-safe plate on top.
  2. Microwave for 3 to 5 minutes, watching carefully. The butter will pop while browning.
  3. If the butter has not browned enough, microwave again in 1 minute increments.
  4. While the brown butter is cooling, stir periodically to incorporate the caramelized bits of butter. Cool completely before using. (I put mine in the fridge and stirred every 5 to 10 minutes).
  5. Make the cake
  6. Heat the oven to 350°f and line a quarter sheet pan with parchment.
  7. In a small bowl, stir together the cake flour, baking powder, and salt.
  8. In the bowl of a stand mixer fitted with the paddle attachment, combine the butter, brown butter, and sugars. Cream together on medium-high for 2 to 3 minutes and scrape down the sides of the bowl. Add the eggs, one at a time, and mix until combined after each addition. Turn the mixer up to medium-high for 2 to 3 minutes. Scrape down the sides of the bowl once more.
  9. With the mixer on low, slowly stream in the buttermilk, oil, and vanilla. Increase the speed to medium-high and beat another 5 to 6 minutes, until the mixture is nearly doubled in size.
  10. * Remember you’re basically forcing too much liquid into an already fatty mixture that doesn’t want to make room for it, so if it doesn’t look right after 6 minutes, keep mixing.
  11. Once homogenized, stop the mixer and scrape down the sides of the bowl.
  12. Add the flour mixture on low speed and mix for 45 to 60 seconds, just until your batter comes together and any remnants of dry ingredients have been incorporated. scrape down the sides of the bowl. mix on low speed for another 45 seconds to ensure that any little lumps of cake flour are incorporated.
  13. Spread the cake batter in an even layer in the prepared pan and bake for 30 to 35 minutes until the cake bounces back when gently touched and a toothpick entered into the center comes out mostly clean.
  14. Cool cake completely on a wire rack (you can turn it out after 15 minutes, or let it cool completely in the pan). The cooled cake can be stored in the fridge, wrapped in plastic wrap, for up to 5 days.
  15. For the frosting
  16. Frosting should be made when you are ready to assemble the cake.
  17. In the bowl of a stand mixer fitted with the whisk attachment, beat the butter and cream cheese together on medium-high speed until light and fluffy.
  18. Scrape down the sides of the bowl then add peanut butter and vanilla, beat on medium-high to combine.
  19. Scrape down the sides of the bowl again and add the powdered sugar. Beat on low until the sugar is incorporated, then turn speed up to high and beat another minute or so until the mixture is very light and fluffy.
  20. Scoop frosting into a gallon size Ziploc bag or into a pastry bag fitted with a large tip. Set aside.
  21. Make the crumbs
  22. Preheat the oven to 250°F and line a baking sheet with parchment.
  23. In a small bowl, combine the ½ cup milk powder, the flour, cornstarch, sugar, and salt in a medium bowl, stirring to combine. Add the melted butter and toss, using a spatula, until the mixture starts to come together and form small clusters.
  24. Spread the clusters on prepared sheet pan and bake for 20 minutes. Cool the crumbs completely.
  25. Crumble any milk crumb clusters that are larger than ½ inch in diameter, and put the crumbs in a medium bowl. add the extra ¼ cup of milk powder and 2 tablespoons of the berry powder and toss together until it is evenly distributed throughout the mixture.
  26. Pour the white chocolate over the crumbs and toss until your clusters are covered, then continue tossing them every 5 minutes until the white chocolate hardens and the clusters are no longer sticky. You can add additional berry powder while tossing, if desired.
  27. The crumbs will keep in an airtight container in the fridge or freezer for up to 1 month.
  28. Assemble the cake
  29. Mix 1/4 cup of milk with 1 teaspoon vanilla extract.
  30. Warm jelly for 15-30 seconds in the microwave (this makes it much easier to spread).
  31. Using a 6-inch cake ring, stamp out two full circles and two half circles from the sheet cake.
  32. Clean the cake ring and line with an acetate strip.
  33. Place the cake ring atop a cake board or a plate and place the first cake circle into the bottom of the cake ring.
  34. Using a pastry brush, brush with 1/3 the milk mixture. Spread a layer of jelly atop the cake layer and sprinkle with berry crumbs.
  35. Snip 1/2-inch opening from the corner of the Ziploc and twist the top of the bag so the frosting doesn't ooze out. Squeeze a line of frosting around the outside of the cake, and then a smaller circle or two towards the middle. Using a small offset spatula or the back of a spoon, spread the frosting into an even layer.
  36. Top with the two halves of the cake circle to create one full circle, pressing gently but firmly down on top of the cake layer to secure it in place. If necessary, use any cake scraps to fill any gap there is between the two cake halves.
  37. Wedge your second acetate strip between the cake ring and the first acetate strip to secure it in place.
  38. Brush your fraken-cake layer with 1/3 of the milk mixture, spread with a layer of jelly, crumbs, and frosting (deja vu, right?).
  39. Top with final layer of cake, brush with final 1/3 of milk mixture, and spread with peanut butter frosting. Top with berry crumbs.
  40. Place the entire assembled cake into the freezer to set for at least 8 hours, or up to one week. I usually freeze mine for 6 to 8 hours until firm enough to handle, then you can take it out, remove the cake ring (leaving the acetate strips in place) and cover with saran wrap. Return to the freezer until serving day.
  41. Take cake out of the freezer at least 4 to 6 hours prior to serving. You can take it out the night before and place in the refrigerator the thaw, if desired.

Notes

* For help with the assembly, check out Shannon's post or this video from Bon Appetit

https://wee-eats.com/2016/03/29/momofuku-pbj-cake/

[ cake recipe adapted from Momofuku Milk Bar]

thursday things – a very momofuku birthday

milk bar chocolate chip cake 0524

It happened. On Monday I officially said “goodbye” to my 20s and dove headfirst into the big 3-0. I’m officially a grown up, and I know this because I got furniture for my birthday. Yep. Furniture.

Not only did I get furniture, but I was excited about it. EXCITED. ABOUT FURNITURE. WHAT’S WRONG WITH ME?

Continue reading

momofuku confetti cookie

confetti cookie 8401

Why hello there, confetti.

Remember that glorious confetti cake that I made myself for my birthday?  This, my friends, is that very same cake.

Well, in cookie form.

confetti cookie 8415

They taste a lot like sugar cookies, but with confetti cake crumbs inside.  If you like sugar cookies, you will LOVE these confetti cookies.

Love.

See that soft, chewy center and all those colorful sprinkles?  How can you resist?

If you’re lucky enough to live in NYC, you can enjoy these in person at the infamous Momofuku Milk Bar.  If, like me, you are not so lucky, you will have to make them yourself.

Momofuku Confetti Cookies

Printable Recipe

For the crumb:

  • ½ cup granulated sugar

  • 1 ½ Tablespoons brown sugar, tightly packed

  • ¾ cup cake flour

  • ½ teaspoon baking powder

  • ½ teaspoon kosher salt

  • 2 Tablespoons rainbow sprinkles

  • ¼ cup grapeseed oil

  • 1 Tablespoon vanilla extract

For the cookies:

  • 1 cup (2 sticks) unsalted butter, softened

  • 1 ½ cups granulated sugar

  • 1 Tablespoon light corn syrup

  • 2 large eggs

  • 2 teaspoons vanilla extract

  • 2 ½ cups all-purpose flour

  • ⅔ cup powdered milk

  • 2 teaspoons cream of tartar

  • 1 teaspoon baking soda

  • 1 ¼ teaspoons kosher salt

  • ¼ cup rainbow sprinkles

  • 1 generous cup cake crumb

Make the crumb:

  1. Heat oven to 300ºF

  2. In the bowl of a stand mixer, fitted with a paddle attachment, combine the sugars, flour, baking powder, salt,and sprinkles.  Mix on low speed until combined.  Stream in the oil and vanilla and continue mixing until well-combined.

  3. Spread crumbs onto a parchment-lined baking sheet and bake for 20 minutes, stirring occasionally. The crumbs should be slightly moist to the touch; they will dry and harden as they cool.

* Crumbs can be made up to 1 week before the cookies

Make the Cookies

  1. In the bowl of a stand mixer fitted with the paddle attachment, beat the butter until soft.  Add the sugars and corn syrup and cream on medium-high for 2 minutes.  Scrape down the sides and bottom of the bowl and add the eggs ,one at a time, beating for a few seconds after each to combine.  Scrape down the bowl again and add the vanilla, beat again on medium-high speed for 7 minutes.  The mixture will be amazingly fluffy.

  2. In a medium bowl, mix together the flour, milk powder, cream of tartar, baking soda, salt and rainbow sprinkles.  Once your butter and sugars are completely creamed, add the flour mixture in two additions and mix on low speed for 1 minute, just to combine. Scrape down the sides of the bowl with a spatula.  Add the cooled cake crumb and mix on low for about 30 seconds, just to combine.

  3. Portion out the dough into desired scoops onto a parchment-lined sheet pan.  A small cookie scoop will yield a 3-inch cookie, a ¼ cup portion will yield a giant cookie (see the cornflake cookies for more description).  Press the tops of the cookie dough domes flat. Wrap the pan with plastic wrap and place in the freezer to chill for at least 1 hour, or up to 1 month.  Once frozen, you can transfer them to a freezer-safe plastic bag for storage.

  4. When ready to bake, heat oven to 375ºF

  5. Arrange the chilled dough on parchment-lined pan, leaving room for cookie spread.  If using ¼ cup scoops, no more than 4 cookies per sheet, up to 8 if using the small-sized cookie scoop.

  6. Bake cookies for 10 minutes (small scoop) to 15  minutes (large scoop).  They should be lightly browned around the edges.  I left mine slightly underbaked so they were softer and more cake-like (since this is a “confetti cake” cookie)

  7. Let cookies cool on the baking sheet before transferring to a cooling rack to finish cooling completely.


[ Adapted from the Momofuku Milk Bar Cookbook ]


happy birthday to me [ and the momofuku confetti cake ]

confetti cake crop 8477

It’s Saturday, March 16th.  Today is my birthday, but you won’t be reading this until tomorrow.  I spent the whole morning at the spa getting a full body massage thanks to my wonderful, loving boyfriend.  It was, without a doubt, the perfect way to start my birthday.

momo confetti cake top

The best way to continue my birthday?  By eating my birthday cake for lunch, obviously.

confetti cake 8478

I made this cake last weekend and it’s been quietly stashed away in my freezer since then.  Waiting, haunting me in the back of my brain.  For the last week, like a mobius strip in my brain, “confetti cake, confetti cake, confetti cake…”

confetti cake 8471

And even lazy me, despite saying that reading the recipes in the Momofuku Milk Bar Cookbook makes me tired, even I could do it.  And it wasn’t that hard.  Day 1 I made the crumb and cake.  Day 2 I made the frosting, soak, and assembled everything.  Day 3 (which was actually 1 week later) I consumed everything.  Well, ahem, not everything.

instagram confetti cake

Not that I would have any issue taking down a whole cake, but I had plenty of other eating to do and therefor decided to save my tummy’s valuable real estate for dinner with the BF at one of my favorite restaurants.  After slicing my cake, I very carefully laid each piece on a plastic-wrap-lined baking sheet and put it in the freezer to chill for a few hours.  Once hardened, I wrapped each piece individually in plastic wrap and then foil, and placed them in a freezer-safe gallon-sized bag for future consumption.  God bless whoever invented the freezer.

[ UPDATE: Our friends at Bon Apetit have since posted a video showing how to assemble the cake that is infinitely helpful. I recommend you check it out if you are at all intimidated or confused by the assembly instructions! ]

Momofuku Milk Bar Confetti Cake

Makes 1 6-inch round cake

Printable Recipe

For the Crumb:

  • ½ cup granulated sugar
  • 1 ½ Tablespoons brown sugar, packed
  • ¾ cup cake flour
  • ½ teaspoon baking powder
  • ½ teaspoon kosher salt
  • 2 Tablespoons sprinkles
  • ¼ cup grapeseed oil
  • 1 Tablespoon clear vanilla extract


For the cake:

  • ¼ cup (½ stick) unsalted butter, room temperature
  • ⅓ cup vegetable shortening, room temperature
  • 1 ¼ cups granulated sugar
  • 3 Tablespoons brown sugar, packed
  • 3 eggs
  • ½ cup buttermilk
  • ⅓ cup grapeseed oil
  • 2 teaspoons clear vanilla extract
  • 2 cups cake flour
  • 1 ½ teaspoons baking powder
  • ¾ teaspoon kosher salt
  • ⅓ cup + 4 Tablespoons sprinkles, separated


For the soak:

  • ¼ cup milk
  • 1 teaspoon clear vanilla extract


For the frosting:

  • ½ cup (1 stick) unsalted butter, softened to room temperature
  • ¼ cup vegetable shortening, softened to room temperature
  • 2 ounces cream cheese, softened to room temperature
  • 1 Tablespoon + 2 teaspoons light corn syrup
  • 1 Tablespoon clear vanilla extract
  • 1 ¼ cups confectioners’ sugar
  • ½ teaspoon kosher salt
  • ⅛ teaspoon baking powder


Step 1: Make the crumbs
1.  Preheat the oven to 300˚F and line a baking sheet with parchment paper.
2.  Combine the dry ingredients in a mixer until well-mixed.  Add oil and vanilla and continue mixing until they form into clumps.
3.  Spread into a single layer on a baking sheet and bake for approximately 17 minutes, until done.  Err towards under-done rather than over-done, the crumbs will harden a bit once cooled.  Allow to cool on the pan, then transfer to an airtight container for storage.
*Crumbs can be stored up to 1 week in the fridge, or a couple of days at room temperature.

Step 2: Make the cake
1.  Preheat oven to 350˚F and line a quarter-sheet pan (9- or 10-inches by 13-inches) with foil and parchment, greasing if desired (I sprayed with Pam for Baking)
2.   In a medium bowl, whisk together your cake flour, baking powder, salt and sprinkles; set aside.
3.  In the bowl of a stand mixer fitted with a paddle attachment, whip the butter and shortening until combined.  Add both sugars to the butter mixture and cream together on medium-high speed for 2-3 minutes, then scrape down the sides of the bowl.
Add the eggs 1 at a time, beating for about 10 seconds after each one, scraping the bowl after each addition.  Continue to mix on medium-high speed for 2-3 minutes, scraping the bowl at the end of the 3 minutes.
4.  On low speed, stream in the buttermilk, oil, and vanilla.  Beat for 4-6 minutes on medium-high until the mixture is white, has grown to about twice its original size, and is completely homogenous with no streaks running through it, scraping the bowl as necessary.  Don’t worry if it takes a while for everything to get incorporated.
5.  Add the flour/sprinkle mixture and pulse until moistened, then mix just until the flour is incorporated.  Scrape down the bowl one last time to check for any hidden flour bombs.
6.  Pour the batter into the prepared pan and spread it with a spatula to ensure it’s even(ish).  Sprinkle with remaining ¼ cup of sprinkles and bake 25 to 30 minutes until done.  When done, the cake should have a golden top and spring back when gently touched.  If  you’re still not sure you can stick a toothpick into the center and see if it comes out clean – it should be mostly clean with a few crumbs sticking to the toothpick.
7.  Let cake cool in the pan for 10 minutes, then remove from the pan and allow the cake to finish cooling on a wire rack.
*The cooled cake can be, wrapped in plastic wrap and stored at room temperature for one day, in the fridge for up to 5 days, or frozen for one month.

Step 3: Make the frosting
1.  In the bowl of a stand mixer fitted with a paddle attachment, combine the butter, shortening, and cream cheese on high speed for 2-3 minutes until light and fluffy.
2.  Scrape down the bowl, then with the mixer on low speed, stream in the corn syrup and  vanilla.  Continue beating on medium-high speed until the mixture is smooth and glossy white, about 3 minutes.
3.  Scrape down the bowl and add the confectioners’ sugar, salt, and baking powder and pulse to incorporate the powdered sugar.  Once the powdered sugar is mixed in, beat again on medium-high speed for 2-3 minutes, until it is fluffy and white.  Use the frosting immediately.
*Frosting can be stored in the fridge in an airtight container for up to one week, bring to room temperature before using.

Step 4: Assemble the cake
Equipment needed:

  • 2 acetate strips
  • 1 6-inch cake ring
  • 1 6-inch cake board or whatever it is that you would like to use to store your cake on
  • 1 gallon-size zipper bag or pastry bag (for frosting)
  • 1 pastry brush
  • Saran wrap
  • 1 recipe prepared confetti cake
  • 1 recipe prepared frosting
  • 1 recipe prepared confetti cake crumb

1. Make  your cake layers
1.1  Lay your cake on your work surface and cut out 2 6-inch circles using your cake ring.. Using the remaining cake and the cake ring, make a 3rd 6-inch cake out of the cake scraps.  I did this by cutting out the two corner-ish pieces, leaving as big of a piece as possible to be the base for my bottom franken-layer.

confetti cake cut out 8383

There will be a lot of scraps leftover for … quality control.  Yes, that’s what they are for.  Don’t want to get all the way to the end to find out that you don’t like your cake, right?  I put mine in a freezer-safe bag along with my other cake scraps leftover from home made ding dongs.  I’m sure I’ll not have any problem finding something to do with them.

1.2  Clean the cake ring and line it with an acetate strip, and place it Fill your plastic storage zipper bag with frosting, if you haven’t already, and cut a 1/2 to 3/4 inch hole in the corner. Squeeze evenly over the crumbs (see figures 1-4 of the how-to above).onto whatever base you’ve chosen to use – I also placed plastic wrap between the bottom of my cake ring and my cake surface so that I could move my cake as I deemed necessary.

confetti cake 8390 1.3   Place Circle #3 (cake scrap circle) inside the acetate-lined ring.

*Does that sound hard?  If so, cut your rectangular cake into three equal-sized sections and voila – you will have a 3-layer rectangle cake.

2. Mix together your milk soak, and scrape your frosting into a large gallon-size resealable plastic bag or pastry bag.  Cut a ½-inch off the corner of the bag for piping the frosting.

3.  Soak your cake
3.1  Using a pastry brush, generously brush your cake-scrap layer with ⅓ of the cake soak mixture.

4. Layer and frost your cake
4.1  Use the back of a spoon or a small offset spatula to spread the first ⅕ of frosting evenly on the cake.
4.2  Sprinkle the desired amount of the crumbs (up to ⅓ of crumb mixture)  evenly over the frosted cake layer.

*Tip: If you have smaller crumbs your cake will cut more easily when it’s time for slicing

4.3  Here is the tricky part – Now you have to frost on top of cake crumbs.

Pipe frosting in a spiral or grid pattern across the top of your cake.  I was a bit heavy-handed on this so you might want to make sure you only use ⅕ of the frosting here… or make extra frosting if you’re worried about it.  A little extra frosting never hurt anyone.

Use the back of a spoon to spread your lines of frosting evenly over the crumbs.  If you’re confused, please refer to Shannon’s beautiful confetti cake post, as it got me through my Momofuku cake experience.

4.4  Gently tuck your second strip of acetate between the cake ring and the top ¼-inch of the first strip of acetate, so you have a clear ring of acetate 5-6 inches tall-high enough to support the height of the finished cake.

5.  Assemble Layer #2:
5.1  Set Circle #2 on top of the completed layer.  Don’t worry that the acetate strips tend to scrape a bit off of the edges, just fanangle the cake into the ring and then gently press it all together with firm, even pressure.  Be gentle but firm.
5.2  Repeat step 3.1 – 4.3, using 1/3 of the cake soak, then up to 1/3 of crumbs, and 1/3 of frosting on top of the crumb.

6.  Repeat again for the 3rd and final layer – using the remaining cake soak, then we switch it up a little bit. Instead of crumb then frosting, for the final layer we will first frost the top of the cake and sprinkle the top with crumb however you think is most pretty.

7.  You should have a little bit of empty space between the top of your cake and the top of your acetate strip.  Cover with plastic wrap and/or foil and transfer the cake and its base to your freezer.
7.1 Chill for 12 hours (or up to 2 weeks) to set the cake and filling.

momo confetti 2

8.  When ready to serve the cake, remove the cake ring and place on your desired serving piece (this is easiest to do when still frozen).
8.1  Thaw at room temperature at least 3 hours or overnight in the refrigerator.  The cake is best served at room temperature so please let it sit at room temperature at least a few hours before serving.  I left mine wrapped in acetate to protect the sides of the cake layers from drying out.  When ready to serve, remove the acetate strips and slice as desired.

Finished cake can be stored, wrapped in plastic, up to 5 days in the fridge.  After slicing my cake, I very carefully laid each piece on a plastic-wrap-lined baking sheet and put it in the freezer to chill for a few hours.  Once hardened, I wrapped each piece individually in plastic wrap and then foil, and placed them in a freezer-safe gallon-sized bag for future consumption.  God bless whoever invented the freezer. 


[ Adapted from the Momofuku Milk Bar Cookbook & A Periodic Table ]

Guest Post: Momofuku Milk Bar’s Pistachio Cake

pistachio-cake-lr-3

Ok so remember how I went to Boston and ate all of the things and had a blast? Well, all of that was made possible thanks to BFF, her brother, and his wife, Kabrina. Though I’ve never met Kabrina, she’s a fan of the blog, and I’ve been hearing for awhile now that she and I are secretly soul mates… not the “let’s get married” kind, just the “let’s drink lots of wine, bake some stuff, and laugh maniacally” kind… So I was actually pretty excited to get to meet her.

Sadly, I didn’t get to meet her after all, but she is a fan of the blog, and a fan of baking… so we decided to have her guest star this week. It’s like we were baking together, but apart, and I wasn’t actually baking, ya know? She made a cake that I will probably never make because despite my deep love for Momofuku, and my deep love for baking, just looking at the recipes from Momofuku Milk Bar exhausts me. I am far too lazy for that. Although, I did eventually make those darned cornflake cookies… anyway, I digress, this week we give to you (by “we” I mean Kabrina, SHE gives to you)…

Pistachio cake, adapted from Momofuku Milk Bar, by Christine Tosi.         (Tadaa!)

“If I could marry this cake, I would. This cake is so good, I have decided that I can only share it with the people in my apartment, and even then only under certain circumstances. It’s too good to share with a downtrodden neighbor, a friend who is under the weather, a family celebration.  I can’t part with one crumb.”

Warning: this cake is a bit of a process.  And since I’m not into things that are a “process”, the fact that this is the third time I’ve made this cake means that it is so worth the process.
It’s not hard, just involved.
First, you have to make the milk crumbs.  This recipe is slightly annoying because you have to actually make some of the ingredients.  I sort of thought that was what grocery stores were for, but clearly I was wrong. Anyhoo, the milk crumb is a snap to make and completely addictive.  If I did crack I’d have a basis for comparison, but I’ve gotta think its close.
Mix the milk powder, flour, cornstarch, sugar and salt in a small bowl, then pour in melted butter and stir it together until it looks like sandy pebbles.  Spread the crumbs onto a cookie sheet lined (I used a silpat) and bake it at 250 for 20 minutes.  Take the crumbs out and let them cool, then toss them with another 1/4 cup of milk powder, and then drizzle (Christine says “enrobe”) with the melted white chocolate and continue tossing them until they are no longer sticky.
Next make the cake.  Here is another part of the “process”, there are a few ingredients I couldn’t find at the store (both local grocery store and Whole Foods) so I bought them on Amazon: Pistachio paste and Pistachio oil. Truth be told, I didn’t look that hard for them in the stores, so who knows, they could be there. (I have pic of the ones I used).
Heat the oven to 350.  Combine the pistachio paste and glucose in the bowl of your mixer on medium-low for 2-3 minutes.  (I have never made this cake with glucose, I have always used light corn syrup.  My good friend Christine says you can use corn syrup in pinch, but frankly I don’t think I’ll ever use glucose, its really expensive and this cake isn’t cheap to make. Plus its pure heaven with the corn syrup, so why knock it?) Scrape the bowl after mixing.  It is very thick and gooey. ( I have a pic)
Add the egg whites one at a time on low speed making sure to incorporate each before adding the next. Scrape the sides once or twice during this process.
Add the confectioner’s sugar and almond flour on low speed and mix for 2-3 minutes.  Scrape down the sides.
Stream in the pistachio oil and cream on low speed for 1 minutes, then scrape some more.
Last, add the flour, baking powder and salt and mix on low for 2-3 minutes until the batter is smooth and a little  thicker than a traditional cake batter.
Spray a 1/4 sheet pan with Pam and then line with parchment, or just use a silpat, and pour the batter into the pan.  Spread the batter evenly and bake for 20-22 minutes.  The cake should be spongy to the touch on the corners and slightly golden around the edges. Cool the cake on a wire rack.
Third step, make the frosting. Yum, its crazy good frosting and very easy.  Combine the softened butter and confectioner’s sugar in the bowl of a mixer with a paddle attachment and cream it together on med-high for 2-3 minutes until light and fluffy.
Next, add the pistachio paste and salt and mix on low speed for 30 seconds, then crank it up to med-high and let it go for 2 minutes.  Don’t forget to scrape the sides! If the frosting isn’t an even green color, keep mixing on med-high.  I didn’t have much faith in a frosting with so little sugar, but the pistachio paste is VERY sweet, it more than makes up for the paltry sugar.
That’s it!
Now assemble the cake.  Another process.  I also veered from the directions here.  First, this cake is supposed to be round and the three layers stacked using acetate rings.  Not going to happen. I make the three layers by just cutting the cake in thirds in the pan and using the rectangular layers.
Put one layer on a plate, and brush pistachio oil on the top of the layer. (Christine says to “give the layer of cake a good, healthy bath of half the oil”.  I like Christine.)
Next, use the back of a spoon to spread a layer of lemon curd over the cake. (I used store bought lemon curd, but if you are inclined to make this ingredient, knock yourself out.) Sprinkle 1/3 of the milk crumb on top of the lemon curd, and then spread 1/3 of the frosting on top of that.  I’m salivating…
Place the second layer on top and repeat the entire process.  Place the third layer on top and spread with the remaining frosting and sprinkle with the remaining milk crumb.
Get a fork and a glass of ice cold milk and you have just entered heaven.

So, I freeze what’s left of the cake after we have cracked into it because otherwise John and I won’t stop eating it.  I get a small slice every night, and I’m telling you I dream about it at work all day.  Dream about it, I say.
Oh, here is the actual recipe:
Momofuku Milk Bar’s Pistachio Cake
Milk crumb:
  • 1/2 cup milk powder
  • 1/4 cup flour
  • 2 Tbs cornstarch
  • 2Tbs sugar
  • 1/2 tsp kosher salt
  • 4 Tablespoons unsalted butter, melted
  • 3 ounces white chocolate, melted
Pistachio cake:
  • 2/3 cup pistachio paste
  • 3 Tbs glucose ( or 2 Tbs light corn syrup)
  • 6 egg whites
  • 1 3/4 cups confectioner’s sugar
  • 1 1/4 cup blanched almond flour
  • 1/2 cup pistachio oil
  • 1/4 cup heavy cream
  • 1 cup flour
  • 1 1/2 tsp baking powder
  • 1 1/2 tsp kosher salt
Pistachio frosting:
  • 1 stick butter at room temp
  • 1/4 cup confectioner’s sugar
  • 3/4 cup pistachio paste
  • 1/2 tsp kosher salt
Lemon curd (Kabrina uses store-bought, but I’ve included a recipe below as well):
  • 3 lemons
  • 100g (1/2 cup) sugar
  • 4 egg yolks
  • 1 gelatin sheet
  • 115 g (just under 1/2 cup) butter, very cold
  • pinch of salt

Make the crumb:

Preheat oven to 250F.

Mix the milk powder, flour, cornstarch, sugar and salt in a small bowl, then pour in melted butter and stir it together until it looks like sandy pebbles.

Spread the crumbs onto a cookie sheet lined (I used a silpat) and bake it at 250 for 20 minutes.

Take the crumbs out and let them cool, then toss them with another 1/4 cup of milk powder, and then drizzle with the melted white chocolate and continue tossing them until they are no longer sticky.

Make the cake:

Heat the oven to 350.
In a medium bowl combine the add the flour, baking powder and salt; set aside for later.
Combine the pistachio paste and glucose (or corn syrup) in the bowl of your mixer on medium-low for 2-3 minutes. Scrape the bowl after mixing.  It is very thick and gooey.
Add the egg whites one at a time on low speed making sure to incorporate each before adding the next. Scrape the sides once or twice during this process.
Add the confectioner’s sugar and almond flour on low speed and mix for 2-3 minutes. Scrape down the sides.
Stream in the pistachio oil and cream on low speed for 1 minute, then scrape some more.
Last, add the flour, baking powder and salt; mix on low for 2-3 minutes until the batter is smooth and a little thicker than a traditional cake batter.
Spray a 1/4 sheet pan with Pam and then line with parchment, or just use a silpat, and pour the batter into the pan.  Spread the batter evenly and bake for 20-22 minutes.  The cake should be spongy to the touch on the corners and slightly golden around the edges. Cool the cake on a wire rack.
Make the frosting:
Combine the softened butter and confectioner’s sugar in the bowl of a mixer with a paddle attachment and cream it together on med-high for 2-3 minutes until light and fluffy.
Next, add the pistachio paste and salt and mix on low speed for 30 seconds, then crank it up to med-high and let it go for 2 minutes.  Don’t forget to scrape the sides!
If the frosting isn’t an even green color, keep mixing on med-high until it is.
Make the lemon curd (you over-achiever, you):
Zest the lemons. Put the sugar, lemon zest and 80 grams (about 1/3 cup) of lemon juice in a blender and blend until the sugar granules have dissolved.
Add the egg yolks and blend on low until you have a bright yellow mixture. Transfer the contents to a medium pot or saucepan.Bloom the gelatin by placing this sheet in a bowl with cold water for a few minutes to soften.Heat the lemon mixture over low heat, whisking regularly. It will start to thicken as it heats, once it boils, remove it from the stove and transfer it to a blender.Add the bloomed gelatin, butter, and salt and blend until the mixture is thick, shiny and super smooth.Pour the mixture through a fine mesh sieve into a glass bowl and put in the fridge until the lemon curd has cooled completely, at least 30 minutes.This can be refrigerated for up to 1 week.
Assemble the cake (FINALLY)
Assuming you’re following these directions and making a rectangle cake… cut your giant sheet-pan cake into thirds.
Put one layer on a plate, and brush a “generous amount” of pistachio oil on the top of the layer.   Next, use the back of a spoon to spread a layer of lemon curd over the cake.
Sprinkle 1/3 of the milk crumb on top of the lemon curd, and then spread 1/3 of the frosting on top of that.
Place the second layer on top and repeat the entire process.  Place the third layer on top and spread with the remaining frosting and sprinkle with the remaining milk crumb.