After my trip to NYC with BFF a few years ago (HOW HAS IT BEEN THAT LONG?!) I’ve been dreaming of the day when I could once again enjoy the delicious treats from Momofuku Milk Bar. The only issue being that the recipes are unnecessarily complicated. They’re not THAT bad, but when I’m reading a recipe and its ingredients require recipes of their own, I get tired.
Shannon from A Periodic Table re-planted the Momfuku seed in my brain when she posted about them way back in December. Then just last week BFF made them and assured me they weren’t that hard to make. Finally, I couldn’t take it anymore. I had all of the ingredients in my pantry, and these cookies firmly planted in the front of my brain. With Shannon’s post and frantic texts to BFF to guide me, I set on my path to conquer the notoriously finicky Momofuku Milk Bar Cornflake Chocolate Chip Marshmallow Cookie. See, even the name is difficult.

I must admit, they weren’t that difficult to make. Not even that time-consuming (if you manage your time correctly). The cornflake crunch comes together quickly and requires a short cooling time, during which you can whip up your cookie batter. It’s even kinda relaxing since you can gather other things while you beat the butter and sugar for an eternity.
My only qualm was the size of the cookies. They were far too large. I followed the recipe’s “1/3 cup” size ball of dough and ended up with what I decided was a “store-size cookie.” In fact, I’m pretty sure it’s about the exact size of what I received from the real Momfuku Milk Bar. A whopping 4-inch diameter, not that I couldn’t eat it, I just don’t appreciate the guilt that follows eating a giant cookie. And who is going to eat only half of a cookie? I know how that story ends, let me clue you in: there is no cookie at the end of that story.

In hopes of ending up with a more home-appropriate, single-serving cookie (therefore increasing the yield of said cookies, meaning you actually get more cookies to enjoy) I would probably scoop ¼ cup dough balls instead. That being said, I did not do that, so I can’t give you an accurate baking time, I’m going to guess it’ll shear two minutes off the baking time.
Speaking of the baking time, remember how these cookies are notoriously finicky cookies? The recipe as written calls for 18 minutes at 375, bestie (who did smaller cookies) baked hers for 8 minutes at 375…. That’s a bit of a difference, no? Shannon decided on 350 for 12 minutes. I actually baked mine per the original recipe directions with no problems. That being said, I distinctly remember the cookies I got from Momofuku being extra “rare”, where mine came out “medium”. Crisp, crunchy outside and chewy inside, filled with gooey marshmallow and flecks of chocolate….

Sorry I drifted off there for a moment. Back to the baking, let me share with you what my thoughts are on the wide variance in baking times (and temps).
Dough size (and shape) – 1/3 cup is 1/3 cup is 1/3 cup. It is not ¼ cup or 5 tablespoons or just a “guesstimation” of what you think it should be. Reducing the cookie ball to ¼ cup size (per my recommendation) will affect the cookie’s cooking time. Smaller amounts will always need less time (obviously). As for the shape, mine looked like this:

If you bake ball-shaped dough (especially chilled), generally speaking the edges will melt down first, and leave a ball of chewiness in the center (again, depending on oven temperature and baking time).
If you use a ball that is slightly flattened, you are likely to end up with a more uniformly-shaped cookie. If your kitchen is very warm so you couldn’t make a dough ball to save your life, and your 1/3 cup measure is conveniently shaped like a dome with a flat top, voila. That is how I got this cookie shape. I don’t know if this is the shape you want, but it worked out OK for me.

Dough temperature – My kitchen is warm. Very warm. We live in the desert so our house generally hovers around the 76-78 degree mark, but once you turn the oven on for any length of time and the sun starts coming in those windows, the kitchen is definitely warmer. When I scooped my dough, it was way too warm to form them into actual balls, but I did my best (ended up with what you saw above) then chilled the shaped dough for 2 hours.
Oven temperature – Get a thermometer! Make sure your oven is the right temperature. And make sure you preheat it thoroughly – Don’t just throw the cookies in there because it beeped and said it’s ready. Give it some extra time. And don’t leave that oven door open for a thousand years, and FOR THE LOVE OF GOD DON’T OPEN THE OVEN DOOR A THOUSAND TIMES TO CHECK YOUR COOKIES. Unless you’re BFF and you don’t have an oven window. Even then, try to reduce door-opening to a minimum. Start checking them when your house starts to smell like delicious cookies. As a rule, I know whatever I’m baking USUALLY isn’t done until the scent starts to make my tummy rumble.
Baking sheet temperature – I think this is one factor that is easy to overlook. If you put a cold baking sheet in a hot oven, it will take longer to heat up. I’m not a scientist, this is an assumption. The result? Cookie spread. Those thin, lacy edges. I transferred my dough (quickly) from the chilled cookie sheet in the oven to a room temperature sheet (with parchment) for baking.
Parchment paper – or lack thereof. Now, I know Silpats are widely popular and many people have great success with them, but I don’t use them. I find that more often than not, my cookies will spread too much if they are baked on a silicone baking mat. Plus, I’m way too lazy to try to clean that thing off. Some less finicky cookies are fine, I’m sure, but once I started baking regularly, that was one of the first things I noticed. My silicone-sheet cookies always spread too much. Just use parchment. No muss-no fuss easy clean up.

All that being said – these cookies that I was so terrified of making because they are known for being difficult came out just fine. So don’t let any of this scare you. If your first baking attempt doesn’t work, you’re likely to end up with a less pretty (but still delicious) cookie. One you can snack on as-is, or crumble and put in ice cream, or just cry into while you bake at the next temperature. Don’t worry, you’ll be fine. You can always use Shannon’s step-by-step resource to help, like I did… as you can see above. 🙂
Cornflake Crunch + Cornflake Chocolate Chip Marshmallow Cookie
[ Printable Recipe ]
cornflake crunch:
- 5 cups of cornflakes
- 1/2 cup of milk powder
- 3 tablespoons of sugar
- 1 teaspoon of kosher salt
- 9 tablespoons of unsalted butter, melted
cookies:
- 16 tablespoons (2 sticks) unsalted butter, at room temperature
- 1 1/4 granulated sugar
- 2/3 cup light brown sugar
- 1 large egg
- 1/2 teaspoon pure vanilla extract
- 1 1/2 cups flour
- 1/2 teaspoon baking powder
- 1/4 teaspoon baking soda
- 1 1/4 teaspoons kosher salt
- 3 cups cornflake crunch
- 2/3 cup mini chocolate chips
- 1 1/4 cups mini marshmallows
Make the Crunch
Preheat oven to 275˚F.
Pour the cornflakes in a medium bowl and crush them with your hands to one-quarter of their original size. Add the milk powder, sugar and salt and toss to mix. Add the butter and toss well to coat. The mixture should form small clusters.
Spread the clusters onto a parchment-lined sheet pan and bake for 20 minutes, until toasted.
Cool the crunch mixture completely before adding to your cookie mixture. It cools pretty fast, so while you’re waiting on this to finish cooling, begin assembling your cookies.
Make the dough
Line a sheet pan which will fit in your refrigerator with parchment paper.(these cookies have to chill!)
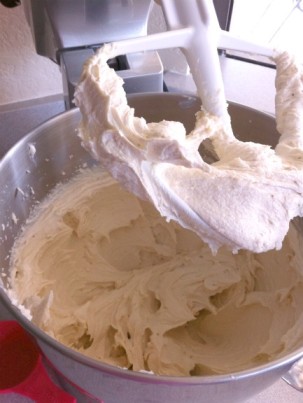
Combine butter and sugars in the bowl of a stand mixer fitted with the paddle attachment and cream together on medium-high for 3 minutes. Scrape down the sides of the bowl, add the egg and vanilla, and beat on high for 7-8 minutes. (I know it seems weird, almost wrong even… just do it. Don’t think about it. Just do it….) Have you ever seen anything so fluffy in all your life?

Reduce mixer speed to low and add flour, baking powder, baking soda, and salt. Mix just until the dough comes together, no longer than one minute. Do not overmix.
Still on low speed, mix in the cornflake crunch and chocolate chips just until incorporated, no more than 30 seconds or so. Add the marshmallows and mix again on low just until incorporated, about 30 seconds. If you feel like it’s uneven, use a spatula or large spoon and sort of fold them in the rest of the way.
Portion out the dough in ⅓-cup size scoops onto your prepared sheet pan.**(NOTE: I suggest ¼ cup size, but it means you will have to reduce the baking time).
Gently flatten the very top of the cookie – we just don’t want it to be a ball. Remember my picture?
Wrap entire sheet in plastic wrap and refrigerate for at least one hour (I did 2 hours – per Shannon’s directions) or up to one week.
Bake the cookies
When you’re ready, preheat oven to 375˚F (or 350 if you want to follow Shannon: if you’re unsure, here’s her chart for the bajillionth time)
Arrange the chilled dough a minimum of 4 inches apart on a parchment-lined sheet pan. They are big, and they’re only getting bigger in the oven. I baked mine 4 at a time, and got tired after 2 batches so I froze the rest of the dough until my next cornflake cookie craving.
Bake cookies for 10 – 18 minutes (sorry on the time variance, guys, if you read the story, you know why). Start checking around 10 minutes. When the cookies are done they should be nice and golden.
Remove the cookies from the oven and cool cookies completely on the pan, since we are cooling them on the pan, you can pull them out a little shy of done (I prefer my cookies on the medium-rare side, these I consider “medium”)
[ Adapted from the Momofuku Milk Bar Cookbook & A Periodic Table ]


