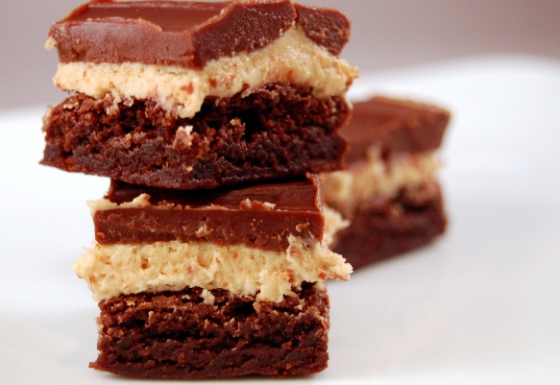
peanut butter truffle brownies

peanut butter truffle brownie main

“I bet this is what heaven tastes like.”

Well, that’s what one of my official taste testers said at least. I’m bound to be biased where chocolate and peanut butter are involved, but I received nothing but praise over these babies, so I’m pretty sure they’re a solid bet.

I was initially worried that the peanut butter layer was too sweet and not peanut buttery enough, but was reassured that it was the perfect amount of peanut butter flavor. I’m a huge fan of peanut butter though, like, left unattended I will work my way to the bottom of a jar huge. So yeah, I’m always going to think something needs more peanut butter. It’s just my nature.

I did alter the filling a bit from the original recipe, and resorted to a box mix (gasp!) since I was short on time and had a work potluck to make these for. So if you’re short on time and need to cheat, who am I to judge? Otherwise, given how good these were with boxed brownies, I’m sure using your favorite go-to brownie recipe as a base will only make them more spectacular.

I cut mine into 1-inch squares (and then promptly consumed three of them), but these babies are RICH. I’m sure a regular person would be content with just one square. Enjoy 🙂 Another win for Pinterest (and another loss for my waistline). Oops.

Thank goodness it’s Mardi Gras and calories don’t count today. 🙂

Peanut Butter Truffle Brownies

[ Printable Recipe ]

Brownie Layer:

1 batch of your favorite brownies (13×9-in pan)

Peanut Butter Layer:

1/2 Cup of butter, softened
3/4 Cup of creamy peanut butter
2 Cups of powdered sugar
2-3 Teaspoons of milk (if needed, I didn’t need it)

Ganache Layer:

1/4 Cup of creamy peanut butter
2 Cups of semisweet chocolate chips
1/4 Cup of butter
2 Tbsp of heavy whipping cream

1. Preheat oven to 350 degrees. Butter the bottom and sides of a 9Ă—13 metal baking pan. Put a long piece of parchment or foil in the bottom, letting the ends extend slightly over the sides. Butter the parchment paper.

2. Make your brownies according to recipe directions. Remove pan and let cool completely on a rack.

3. While the brownies cool, make the peanut butter filling; fix a stand mixer with paddle attachment or use an electric mixer. Combine the peanut butter and remaining filling ingredients in a bowl and beat until smooth and creamy and spreadable (add a few teaspoons of milk, one at a time, If it’s not spreadable).

4. Take the cooled brownies and spread an even layer of peanut butter. Place in the refrigerator until filling is set, about 30 minutes.

5. While the filling sets, make the ganache; take a small saucepan and a glass or heatproof bowl. Simmer water and place the bowl over the saucepan. Melt the ganache ingredients together and stir to combine.

6. Take the chilled brownies and pour the ganache over the top. Spread gently. Chill until set.

7. When ready to serve, lift the brownies out of the pan using the ends of the parchment paper. Slice into 1-inch squares with a sharp knife, wiping with a warm damp towel between cuts.

[ Adapted from somekitchenstories ]

gooey butter cake

gooey-butter-cake

WARNING: THIS STUFF IS RICH.

I mean, really rich. And it takes a lot for me to say something is “rich”. Of course, what else could you expect from something out of the Momofuku recipe collection?

WARNING: NOT FOR THE FAINT OF HEART

Don’t believe me? Ingredients include: A stick of butter. A package of cream cheese. Oh, and  pound of powdered sugar. No big deal.

WARNING: ADDICTIVE

Baked in an 8 x 8 pan, this recipe claims to make 64 servings. 64 1-inch squares. Trust me, you’ll only need one square… but you’ll probably be back for more.

gooey butter cake

Yield: 64 1-inch squares

Ingredients

  • 'For the base:
  • 1 pound yellow cake mix (usually one box)
  • 4 ounces butter, melted
  • 1 egg
  • 'For the gooey butter topping:
  • 8 ounces cream cheese, softened
  • 2 eggs
  • 1 pound powdered sugar
  • 1 teaspoon vanilla extract

Instructions

  1. 1. Preheat the oven to 350°F. Meanwhile, make the base by mixing together the dry cake mix, butter and 1 egg. Pat it into a parchment-lined 8-by-8-inch pan.
  2. 2. Make the gooey butter topping by creaming together the cream cheese, remaining 2 eggs, sugar and vanilla. Pour it over the base cake mixture, spreading all the way to the edges. Bake for 30-45 minutes, or until the edges are a light golden brown, and the center still tender, but cooked. (think: cheesecake)
  3. 3. Allow to cool completely in pan. Turn out onto a cutting board and cut into 1-inch-squares.

Notes

* For easier slicing, place in the freezer until firm, cut while cold, and transfer to mini-muffin papers.

*It is also helpful to have a warm, damp, clean rag to wipe your knife on in between slicing.

https://wee-eats.com/2012/01/01/gooey-butter-cake/

[ recipe courtesy of Momofuku Milk Bar ]

You may also like…


red velvet rice krispy treats

red velvet krispy

I hope everyone had a wonderful Christmas, I know I did! BF and I opened our gifts first thing in the morning, then his family came over for Christmas brunch so we could exchange our gifts and spend time together.

The one benefit to opening gifts at our house – a ton of gifts under the tree!

The downfall? Most of them aren’t for us…

They came, they ate, they conquered… their presents at least. ^_^

BF got me some really great cookbooks and a light box, which will (hopefully) improve the quality of my photos. (Remember my last post where I was complaining about trying to photograph in poor light??) Isn’t he just the greatest?

( Yes, these rice krispy treats were photographed in that very box ) Don’t they look gorgeous?! I think the light box will improve the pictures a bit, until I save up enough for a better lens, at least. 🙂

Oh, yes, the recipe. That’s what you’re here for right? Delicious red velvet rice krispy treats?? Well, I made these for Christmas and then realized they would be even better for Halloween. These blood-red treats are a twist on the “birthday cake” rice krispy treats, just replacing the cake mix in those with red velvet cake mix, and the standard rice krispies with chocolate (since cocoa cake is the base of red velvet cake).

Just like the birthday cake rice krispies, you can use however much cake mix you like depending on how strong you want the cake flavor to be.

I finished mine with a drizzle of vanilla candy coating, but I’m sure white chocolate or even icing would do in a pinch.

Red Velvet Rice Krispy Treats

[ Printable Recipe ]

  • 3 tablespoons butter
  • 1 (10.5 ounce) bag mini marshmallows
  • 1 teaspoon vanilla extract
  • 1/2 cup red velvet cake mix (you can decrease to 1/4 for milder flavor, or increase to 3/4 for more cake flavor)
  • 6 cups Cocoa Rice Krispies cereal
  • Vanilla candy coating or white chocolate chips

1. Line a 9Ă—13-inch pan with parchment paper and coat well with cooking spray. Set aside.

2. In a large saucepan, melt the butter over low heat. Add marshmallows, cake mix, and vanilla, stirring until smooth. Fold in the cereal until well coated.

3. Transfer sticky cereal mixture to the prepared pan, pressing down until the top is level.

4. Once cooled, drizzle with melted candy coating or chocolate top. Once set, cut into bars and serve.

Peppermint Crack

peppermint crack 1

This wonderful little concoction is called, simply, “crack”. And, if you sprinkle peppermint on top, it becomes immediately festive “holiday crack” or “peppermint crack” or… something equally addictive but slightly more festive, it doesn’t really matter what you call it.

Sorry it’s too late for Christmas, but I’m sure you can make it for your New Year’s party as well. Or maybe for someone you fought with over the holidays and need to make up with? One bite of this and they won’t be able to stay mad… It’s so simple, and you wouldn’t believe what the actual ingredients are… the flavors, though, my god… salty, crunchy, chewy, sweet…. addictive. I guess that’s why they call it “crack”.

“Crack”

[ Printable Recipe ]

  • 51 saltine crackers (or less, if you want to use the larger matzo crackers)
  • 1 cup unsalted butter
  • 1 cup dark brown sugar
  • 1 teaspoon vanilla extract
  • 12 ounces high quality dark chocolate (70% or greater)
  • 2/3 cup crushed candy canes or peppermints (optional)


  1. Preheat oven to 350°F. Line a 12 x 17 inch jelly roll pan with foil. Place saltine crackers salt side up and side-by-side in the pan as tightly as possible without overlapping. Use saltine pieces to fill any gaps at the bottom of the pan. Set aside. Chop chocolate so pieces are about the size of standard chocolate chips and set aside.
  2. In a medium saucepan melt butter over medium heat stirring frequently with a spatula. Once butter has melted, add brown sugar and vanilla stirring to combine. Cook for about 5 minutes or until mixture is an even dark brown color and has begun to bubble. Remove from heat and pour over saltines using spatula to spread sauce.
  3. Bake crackers for 5 minutes or until butter mixture begins to bubble. Remove from oven and sprinkle evenly with chocolate allowing the heat to melt the chocolate. Spread chocolate evenly with the spatula so all of the crackers are completely covered. (I had to pop mine back into the oven for a minute to encourage my chocolate to melt)
  4. Let the chocolate cool to the touch, but not harden. Sprinkle crushed candy canes or peppermints (if using) evenly on top and refrigerate until chocolate sets and hardens. Break apart and serve..


[ adapted from serious eats ]

Pumpkin Spice Rice Krispy Treats

dsc_4532-2

So I’m on a little bit of a pumpkin kick, so sue me. Get off my back, it’s fall and, honestly, this isn’t the last pumpkin recipe you’re going to see up here…

I was having a really off day in the kitchen this Sunday, so I decided it was probably in my best interest to stick to “simple” recipes. Isn’t it weird how that happens? Some days it’s just like no matter what you make, even if it’s a recipe you’ve made 100 times before, something is just… off. Like I had kitchen amnesia or something… it was really annoying. Eventually I just gave up and sat on the couch for the rest of the day. Upsetting.

Once I saw this autumn twist on a classic treat I just had to try it. It looks easy enough, relatively difficult to mess up, I mean… it is a rice krispy treat, after all. Given my list of other krispy treat creations, how could I pass it up? Plus, um hello – PUMPKIN!

If you want an easy treat to take to a work potluck or just want a creative way to use up the rest of your crisp rice cereal (or leftover pumpkin puree), go ahead and give these bars a whirl.

Pumpkin Spice Rice Krispies

[ Printable Recipe ]

  • 3 tablespoons unsalted butter
  • 1/4 cup canned pumpkin puree
  • 1 (10 ounce) bag mini marshmallows plus one cup
  • 1/4 teaspoon pure vanilla extract
  • 1/4 teaspoon ground cinnamon
  • Pinch of allspice
  • Pinch of freshly grated nutmeg
  • Pinch of kosher salt
  • 6 cups puffed rice cereal

Butter a 9×13-inch baking dish (I like to line mine in plastic wrap – no mess to clean up!)

Melt butter over medium-low heat. Add the pumpkin puree and continue to cook until it is warmed through. Fold in 10 ounces of the marshmallows, stirring frequently until almost completely melted. Stir in vanilla, cinnamon, allspice, nutmeg, and salt, and remove from heat.

THIS NEXT PART IS IMPORTANT…

Allow the marshmallow mixture to cool 10 minutes; fold in the remaining cup of marshmallows. Continue to cool the mixture for another 20 to 25 minutes until it is room temperature (failure to cool the mixture will result in soggy rice crispy treats.)

Add the puffed rice cereal and stir, using a silicone spatula, until combined.

Press the mixture into the greased rectangular baking dish. Let set for 30 minutes before cutting and serving.

* I suspect the world will not come to a screeching halt if you use pumpkin pie filling, just reduce or omit the other spices (except vanilla)