kitchen update (and a chicken recipe)

spatchcock

I’m not going to pretend this post is about the delicious roast chicken I made. This post is about the kitchen. I took some new pictures from more angles, and yes I know I’m like some moron who went on vacation and comes back yammering on about how much fun they had and waving around pictures that you couldn’t care less about. I do promise this will be the last post filled with kitchen pictures until something significant changes. I’m looking for a new wall color or a backsplash for the kitchen area FYI, if anyone has suggestions…

Our tired, old kitchen…

Our sparkly, new kitchen can be seen below!

The cabinets are Ikea’s Adel Medium Brown, the counters are Silestone’s Silve Nube. The stools – super cheap Target stools. Not bad for like $25 a piece or something like that. Those canister lights have really gotta go, though…

not the best light, I know

The sink is some overpriced stainless steel sink from the company “Blanco”, BF says it’s “a really good sink”, and that we got a great deal on it though. I’m no sink expert, so I’ll have to take his word for it. The faucet is one of Ikea’s stock faucets, it has a weight at the bottom so it can never wear out like some extendable faucets tend to do.

Sofa will be changed out, eventually… walls will be painted, floor will be re-done (possibly hard wood? or possibly stone). All of these things are in the future… for now, I don’t want to do anything else that would keep me out of the kitchen.

Since it is a food blog after all, I give you simple roast chicken. Although you might not think it’s as glorious as pulling a whole bird in-tact bird out of the oven, butterflying your chicken is a great way to prepare your roasted chicken. Lying it flat keeps it all at one level for even cooking and air circulation, which means all the skin gets nice and crispy. You can serve it whole (as pictured here) or even cut it into pieces on a smaller platter. I actually like the way it looks once it’s all cut up, but you could leave it whole like this.

Butterflied Roast Chicken

Printer-Friendly

  • 1 whole roasting chicken (appx 4 pounds), butterflied (if you have a butcher, they will do that for you. If not, here’s a helpful video)
  • Salt & Pepper
  • Garlic and Onions (optional)
  • Whatever veggies you desire for roasting (notice I chose broccoli and cauliflower, because they come together in one pack at Trader Joe’s :-))

*Preheat your oven to 450F

1. If using garlic and onion- cut your garlic bulb in half cross-wise, and quarter your onion. Place these on the sheet under where your chicken will sit.

2. Pat your chicken DRY… really dry. You don’t want any moisture on there! Set on a baking sheet lined with aluminum foil.

3. Generously salt and pepper both sides of your chicken – rub it in nice and good. Wear gloves if touching the chicken grosses you out- you must rub the seasonings in! Once you’ve given it a nice massage, set it on top of the onions and garlic, skin side up.

4. Roast in the oven for 45 min to an hour, until cooked through (breast should read about 150, carryover cooking will finish it while it’s resting). If the skin browns to quickly, tent with aluminum foil.

5. Once done, remove to separate plate or cutting board, and let it rest. While the  chicken is resting, toss your chosen veggies on the baking sheet with the chicken drippings. Use the drippings – trust me. Sprinkle a little salt and pepper on them and roast for 10 – 15 minutes until browned. (More brown than this cauliflower – I can’t help that I got hungry)

Pasta al Pomodoro

pasta pomodoro

I don’t know if anyone subscribes to Bon Appetit, but May’s issue had a KILLER cover picture. It was just a simple pasta pomodoro, but it looked A-MAY-ZING. After wiping the drool from my chin, I decided I had to make it. I really think I’m the only person who loves a simple spaghetti with red sauce… However, since my kitchen was in pieces at that time, I marked the recipe page and went along with my life. A couple of days ago, I was cleaning and was elated to stumble upon that magazine again. Realizing I already had all of the ingredients it called for, I immediately got to work.

The May issue was packed with all kinds of “secrets” to making perfect pasta. Things most people know, like adding salt to your pasta water, reserving some of the pasta’s cooking water for your sauce, and adding cheese to your sauce (not just on top of it). It also had some new tips, like using a skillet instead of a large pan, adding butter when you toss the pasta, and finishing the pasta for the last couple minutes in the sauce, so that it absorbs the flavor of the sauce while it finishes cooking.


The recipe isn’t anything mind-blowing, just another simple (but enjoyable) pasta sauce recipe. It actually doesn’t vary a whole lot from my current pasta sauce recipe, but I just couldn’t help myself.

We used bowtie pasta (per BF’s request) instead of spaghetti or bucatini. I also feel bad whenever I eat an entree that is void of protein, so I seared some chicken breasts, chopped them up, and added them to the sauce while it simmered. Topped with freshly-grated parmesan and pecorino, this pasta was easy to make and a delight to eat.

Pasta al Pomodoro – from Bon Appetit

 Printer-Friendly

  • 1/4 cup extra-virgin olive oil
  • 1 medium onion, minced
  • 4 garlic cloves, minced
  • 1 pinch crushed red pepper flakes
  • 1 28 oz. can peeled tomatoes, puréed
  • Kosher salt
  • 3 large fresh basil sprigs
  • 12 oz. pasta
  • 2 Tbsp. cubed unsalted butter
  • 1/4 cup finely grated Parmesan or Pecorino (I used both)
  • 1 – 2 cooked chicken breasts, cubed or shredded* (optional)
  1. Heat extra-virgin olive oil in a 12″ skillet over medium-low heat. Add minced onion and cook, stirring, until soft, about 12 minutes. Add garlic and cook, stirring, for 2-4 minutes. (Make sure it doesn’t burn- burned garlic is bitter!!) Add crushed red pepper flakes and continue to cook another minute.
  2. Increase heat to medium and add puréed tomatoes and season lightly with kosher salt; cook, stirring occasionally, until sauce thickens slightly and the flavors meld, about 20 minutes.** (see tips) Remove pan from heat, stir in basil sprigs, and set aside.
  3. Meanwhile, cook your pasta! Bring water to a boil in a 5-qt. pot. Season with salt; add pasta and cook. Remove 2 minutes before tender and drain, reserving 1/2 cup pasta cooking water.
  4. Discard basil and heat skillet over high heat. Stir in reserved pasta water to loosen sauce and bring it to a boil. Add pasta and cook, stirring, until sauce coats pasta and pasta is al dente, about 2 minutes. Remove pan from heat; add butter and cheese; toss until cheese melts

*Tips

*Purchase canned, whole tomatoes and puree them before adding them to your sauce. You can puree your tomatoes in the food processor, with a food mill, or an immersion blender.

*You can add your chicken at step 2 (while it simmers) or step 3 (when you add the pasta). Adding it earlier will result in it absorbing more of the flavor from the sauce, though.

*While my pasta simmers, I cover it with aluminum foil or parchment with a hole cut out- allowing the sauce to be able to reduce without making a huge tomato-y mess on my stove and counter.

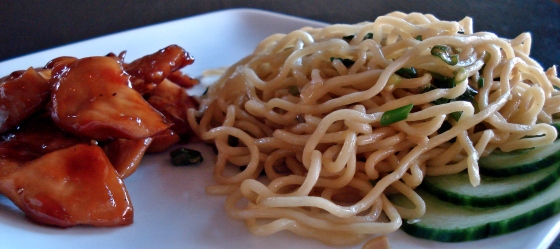
Teriyaki Chicken with Momofuku’s Ginger-Scallion Noodles

teriyaki chicken noodles

“Teriyaki” hails from Japan and is just a general term that applies to pretty much any type of sweetened soy sauce mixture. The sweetener can be anything from honey, to pineapple juice, to plain old sugar (which is what this recipe uses). Feel free to experiment and find what you like.

While teriyaki is extremely popular in the US, I’m not sure how “authentic” it is to asian cuisine. Nevertheless, it shows up on menus nationwide for us to enjoy at asian and non-asian restaurants alike (even ‘Jack in the Box’ has a teriyaki bowl). Once you see how simple it is to make, you’ll understand why.

I made Momofuku’s ginger-scallion noodles with quick-pickled cucumbers to accompany our chicken tonight, which I was fortunate enough to experience in person on my NYC trip last year at Momofuku Noodle Bar. I received the cookbook from mom this past Christmas and had yet to actually make anything from it.

Despite sounding fancy, the sauce comes together rather quickly, and ends up looking like a pile of wet scallions. The noodles are very ginger-y, so if you’re not big on ginger, you may want to scale it back a bit. You could also use Megkat’s noodle recipe (at the end of this post), which is super tasty as well.

Teriyaki Chicken Adapted from Megkat

Printer-Friendly

  • 2 large boneless skinless chicken breasts, cut into thin strips
  • 1 Tbsp cornstarch
  • 1 Tbsp water
  • 1/3 C soy sauce
  • 1/3 C sugar (I’m sure you could substitute honey, agave nectar, or pineapple juice to taste)
  • ¼  C cider vinegar
  • ½  tsp garlic powder
  • ½  tsp powdered ginger (There was plenty of ginger in the noodles, so I left it out of the sauce this time)
  • ¼ tsp ground pepper (couple grinds)
  • ¼ – ½ tsp red pepper flakes (optional)
  1. Preheat oven to 425F and line a 9×13 baking pan with aluminum foil (this will make clean up much easier). Place chicken strips in pan.
  2. Mix water and cornstarch into slurry and add to saucepan over medium heat. Whisk in remaining ingredients and simmer until thickened, whisking to avoid burning.
  3. Once sauce is thick and syrup-y, pour over chicken and toss to coat. Bake in preheated oven 20-25 minutes, stirring about halfway through.

*Alternatively, I think it might taste even better if you saute the chicken in a pan and pour the thickened sauce over it, toss and serve, since baking the chicken results in a different texture than sauteeing does. Just be sure not to over-crowd the pan, saute in batches if you have to.

Ginger-Scallion Noodles From Momofuku Cookbook

Printer Friendly

  • 6 oz cooked noodles (ramen, yakisoba, or in a pinch- thin spaghetti)
  • 6 Tbs ginger scallion sauce (recipe follows)
     

ginger-scallion noodles with quick-pickled cucumbers

Ginger Scallion Sauce –Makes about 3 cups

  • 2 1/2 C thinly sliced scallions, greens and whites (1 to 2 bunches)
  • 1/2 C finely minced peeled fresh ginger
  • 1/4 C grapeseed or other neutral oil
  • 1 1/2 tsp usukuchi (light soy sauce)
  • 3/4 tsp sherry vinegar
  • 3/4 tsp kosher salt, or more to taste

Mix together. Good from the time its made for 2 days. (It will look like a bowl of wet scallions)

Quick-Pickled Cucumbers

  • 1 large seedless (“English”) cucumber
  • 1 Tbsp Sugar
  • 1 tsp salt

Slice cucumber thinly (I used my mandolin), toss with sugar/salt and let sit for 20 minutes. Serve with ginger-scallion noodles

Garlic NoodlesAdapted from Megkat

Printer-Friendly

1 lb cooked noodles
4 TBS butter
6 garlic cloves, minced
1 1/2 C green onions, chopped (more for garnish, if desired)
2 1/2 tsp fish sauce (her’s calls for Tbsp, but that seems a bit much)
2 Tbs soy sauce
1 Tbs brown sugar

1. Melt 2 Tbs butter in large skillet. In small bowl, mix fish sauce, soy sauce, and brown sugar.

2. Add garlic and green onions, saute until fragrant. Add soy sauce mixture to pan, along with 2 more Tbs butter, melt while stirring. Once sugar is dissolved and butter is melted, toss with pasta & serve.

Penne alla Vodka

penne vodka

I think the thing that appeals to me most about this recipe is that I can cook it in the oven instead of having to keep a watchful eye over the stove. If you’ve ever tried to make a home-made tomato sauce, you’re probably familiar with simmer, stir, simmer, stir, simmer, simmer, stir, stir. Not this one! You simply start it on the stove top and then transfer it to a nice, hot oven for 1 ½ hours while you get to sit back and relax (or unload the dishes, maybe play a little Wii, whatever floats your boat). After that, you puree it with an immersion blender and stir in some cream- Done!

I  like to stir in some shredded chicken, either leftovers from roasted chicken breast, or from a store-bought rotisserie chicken (cheater, cheater- I know). That way it adds some protein, and relieves some of the guilt that I feel about eating a creamy pasta sauce.

The sauce is also really good without any cream added (although it’s no longer a traditional vodka sauce if you do that), but I would definitely tone down the spice if you’re not cutting it with any cream. I also made some little baguettes with dinner, but forgot to take pictures of them, so that recipe will have to wait for another day…

Penne alla Vodka (+ Chicken) – Adapted from Barefoot Contessa

Printer-Friendly Version

Special Equipment – Immersion blender or food processor

  • 1-2 Tbsp olive oil (enough to saute an onion with)
  • 1 medium onion, chopped
  • 3 cloves garlic, diced
  • 1/2 teaspoon crushed red pepper flakes* (see notes)
  • 1 1/2 teaspoons dried oregano
  • 1 cup vodka
  • 2 (28-ounce) cans peeled plum tomatoes
  • Freshly ground black pepper
  • 3/4 pound penne pasta
  • 4 tablespoons fresh oregano (optional)
  • Up to 1 cup heavy cream
  • 1/2 c grated Parmesan Cheese, plus extra for topping your pasta
  • 1 to 2 chicken breasts, cooked and shredded (optional)

1. Heat oil over medium/med-high heat in a large oven-safe pot, swirl around to cover the bottom of your pan. Add onion and sauté until translucent, but not brown (about 5 minutes) . Add garlic and cook stirring until fragrant (about a minute).

2. Add red pepper flakes and dried oregano, cook while stirring for another minute. Add the vodka and cook until it is reduced by half.

3. While the vodka is cooking (or before you start at all), drain your tomatoes. Once the vodka is reduced by half, add tomatoes to the pan. Using a spoon, smash/break them up so they are no longer whole. (Be careful- they squirt!) Add 2 tsp salt and a few grinds of black pepper, then cover and put the pan in the oven for 1 ½ hours.

4. When there is about 30 minutes left, bring salted water to a boil; cook & drain your pasta.

5. After your 1 ½ hours has passed, carefully remove the pan from the oven (remember that it’s hot you will need oven mits!) and let sit for about 15 minutes to cool. It might look like it has dried out, but don’t worry! Once you puree the sauce it’ll look normal 🙂

6. Puree the sauce either with an immersion blender or very carefully in a blender or food processor (in batches). *see tips below

7. Reheat the sauce over low. Once warm, add enough cream to make the sauce “creamy” (I am usually skimpy with the cream, for my waist’s sake, adding just enough to bring it to a pretty pink color) and fresh oregano. This is where I would also stir in warmed, shredded chicken. Let cook for a couple minutes, then stir in ½ cup of grated parmesan cheese. Taste & adjust seasoning as necessary.

Tips

*To keep this dish vegetarian-friendly – just leave the chicken out!

*The ½ tsp of red pepper flakes doesn’t seem like much, but it really does spice up the sauce quite a bit, so if you aren’t a fan of spicy food you may want to put in less or just omit it altogether. 

*While an immersion blender is easiest, (because you can do it right in the pot), you may also use a regular blender or food processor. I don’t recommend using a blender, since the steam/heat can mess with the vacuum it creates, but if it’s all you’ve got then go for it. Just be careful! After pureeing, return the sauce to the pan and continue to the next step.

*If you want a chunkier sauce, just puree half of the sauce and stir it into the rest of the sauce.

*If you know you’re going to end up with a ton of extra sauce, before you add the cream, pour some into a container and put it in the fridge. Once cool, transfer to a labeled freezer-safe plastic bag and throw it in the freezer. You can just reheat it when you’re ready! Remember to adjust remaining ingredients as necessary.

*If the sauce tastes a little flat, try adding a couple teaspoons of balsamic vinegar or sugar.

*If you don’t have any fresh oregano (which I never do, unless I plan ahead of time to make this), you can either substitute 3-4 tsp of dried oregano for the 4 Tbsp fresh, or just skip it altogether.

*If you’re preparing this in advance, stop just after pureeing (before adding the cream) and refrigerate. When you’re ready to serve, reheat over low/medium-low (with chicken, if using) in a covered pot. Once warm, add the cream and cheese.

Easy Weeknight Dinner

roast-chicken-2

You know those days when there’s nothing you want more than to just sit on the couch under a blanket in your PJs? Who cares if it’s only 4 or 5:00? You just want to get home and RELAX- Those days used to mean a frozen dinner or carryout were the only options.

Imagine, now, that you could have a delicious home-cooked meal for dinner on those days… without all the time and effort of laboring over the stove. Amazing, right?  This dinner allows you (after a little bit of prep) to change straight into your pajamas and sit on the sofa relaxing while you let dinner cook itself. You just need a couple ingredients, a nice, hot oven, and patience.

Patience to not rip open the oven door when your mouth starts watering from the smell of garlicky roasting chicken. Patience to not start eating everything within reach because the smell makes you so hungry you don’t think you can take any longer. Patience to let the chicken rest to redistribute its juices (that’s the hardest part for me) and cool to a palatable temperature.

I had had originally planned to make mashed potatoes, but it would have interfered with my sitting-around time, so I opted to roast them alongside my chicken instead. Much easier. If you choose to roast a veggie, any vegetable you would use with a regular roast chicken you could use with this. Think “root veggies”- potatoes, sweet potatoes, carrots, onions, parsnips, etc… You could use broccoli, cauliflower, or other faster-cooking veggies as well. Just add them later in the cooking process.

roasted red skin potatoes

This almost always yields enough leftover chicken to use the next day in another dish. You could always roast additional as well, though, to ensure extra chicken for another dish. (Cook the meat for two dinner in one night, all while sitting on the couch? That’s what I’m talkin’ about…) You can chop or shred the chicken for tacos, pasta, salad, or any other dish that calls for chicken.

how tasty does that look? seriously!?

You’d be amazed how much flavor you get from roasting the breast with bone/skin attached! And while this preparation will yield a skin that is crispy and delicious, you may remove to save yourself the added fat and calories. DO NOT, however,  substitute boneless/skinless chicken breast. Don’t even think about it. Bad idea.

Roast Chicken Breast & Root Vegetables

Printer-Friendly

  • 2 bone-in, skin-on chicken breasts (mine were just under a pound each)
  • 2 large potatoes
  • ½ tsp each: garlic powder, onion powder
  • 1 tsp each: minced fresh rosemary, fresh thyme, and kosher salt
  • Pepper

1. Preheat the oven to 425F. Remove chicken from refrigerator while the oven is preheating to bring it up to room temperature. Mix together the spices, herbs, salt, and pepper in a separate small dish. Wash & dry the potatoes. I have a handy scrubber that does all the hard work for me!

2. Chop potatoes into even wedges and put into a bowl. Drizzle with a little oil (1 – 2 tsp should do) and sprinkle with about 1/3 of the spice mixture.

3. Place chicken breasts on a sheet pan. Drizzle olive oil (again, 1 – 2 tsp) over the chicken breasts and sprinkle with half of the remaining herb mixture.

4. This is the gross part- Rub half of the spices into the top and bottom of the chicken breasts (I use gloves if I have them- I’m weird like that).  Using your fingers, separate the skin from the breast meat. Sprinkle the other half of the spices under the skin of the breasts and rub it in using your fingers.

5. Sprinkle the potatoes (or vegetable of your choosing) around the chicken. Sprinkle one last bit of salt and pepper over everything and place it in the oven.  Go sit down and relax, you’ve had a hard day.

6. After about 30 min take the sheet pan out of the oven & brush some of the chicken juices onto the chicken breasts. Flip the potatoes to brown the other sides. Try to do this quickly—it’s better to take it out of the oven to do so that you don’t lose a lot of heat having the oven door open while you fiddle around with the potatoes. If you’re not so worried about your potatoes browning on all sides, you can just brush the juices onto the chicken skin, or skip this part altogether.

7. Cooking time will vary depending on the size of your chicken breasts. Once the chicken has been cooking a total of about 50-60 minutes, it should be done. If you have a meat thermometer, check that the chicken has reached around 160F. If you don’t, just make sure the skin is browned and the juices run clear. Tent the chicken and let it rest for about 10 minutes to allow the juices to redistribute. Serve with potatoes.

Tips:

*If you ever don’t have one of the seasonings (rosemary, thyme, garlic, etc), using just salt and pepper will still make a fine dinner option!