in the kitchen with zoe

cake krispy treats

My family is by no means a small one – from my one sister alone I have 2 nieces and 2 nephews. However, they are all 2,000 miles away. Despite my best efforts, it’s hard to be a good aunt from the opposite side of the continent. I miss the times when I used to spend hours or even days with my nieces and nephews. So, naturally, I was really excited when the BF’s niece, Zoe, asked when she could come over and bake with me.

Of course I told her that she was welcome to come over any time, and since Saturdays are my usual baking day anyway, we set a date for that Saturday. Zoe is an amazingly energetic, beautiful, smart, and quirky 10 year old. She talks a million miles a minute and is super excited about pretty much everything in the whole world. 

When Saturday morning finally arrived, Zoe showed up at 10:45 am with a candy-striped apron and a big smile. I set up a couple quick and easy things to make, as well as stuff for snickerdoodles (per her request) and we got straight to work, stopping only for a short break to refuel with some lunch.

It was actually really nice to have someone else in the kitchen with me, since usually I’m just toiling away in the kitchen alone on the weekends. It’s nice to have someone else around – both to chat with and to do a good amount of the work (she even offered to help clean up!). It was like having a really excited, mini sous chef around. We had some good chats, too – about school, movies, and her birthday (she wants a pet rat – I’m sure her parents are thrilled).

When all was said and done we had made snickerdoodle blondies, Puppy Chow (aka “muddy buddies”), and birthday cake rice krispy treats . The krispies must have been really good, because they prompted her to have the genius idea of having a “rice krispy birthday cake”. I had a blast and I can only assume she did too, since she asked to if we could do it again next weekend. 🙂

Birthday Cake Rice Krispy Treats

Printable Recipe

  • 3 Tbsp butter
  • 1 10-ounce(ish) bag of mini marshmallows
  • 1/4 cup yellow cake mix
  • 6 C rice krispies cereal
  • 1 1.75-ounce container of sprinkles
  1. Melt butter in a large saucepan over low heat and add marshmallows. Stir until they begin to melt, adding in cake mix one spoonful at a time so its combined.
  2. Stir in cereal so it is completely coated with marshmallow mixture. Sprinkle in half of the sprinkles and mix.
  3. Press into a greased baking dish (9 x 13 for thinner treats, smaller for thicker) and top with remaining sprinkles. Let sit for about 30 minutes before cutting.

Tips

* The ¼ C cake mix lends a subtle birthday cake flavor, I’ve seen recipes for this that go up to ¾ C cake mix, but this recipe is the “original” one from the rice krispies box.

* Sometimes I find using the whole 6 cups of krispies make them dryer than I’d like, so we filled up my 4 C measuring cup almost to the top (making it close to 5 cups total) and called it a day.

* If you add the sprinkles too soon (like I may have), they will get a bit melty and not look as pretty.

Puppy Chow (aka Muddy Buddies)

Printable Recipe

  • 9 C Chex cereal
  • 1 C semi-sweet chocolate chips
  • ½ C peanut butter
  • ¼ C butter
  • 1 tsp vanilla
  • 1 ½ – 2 C powdered sugar1. Measure cereal and set aside
    2. Melt chocolate, peanut butter, butter, and vanilla in the microwave or in a pan over low/medium low heat.
    3. Add chex and stir until completely coated.
    4. Pour ½ of powdered sugar into a bag, add cereal mix, and top with remaining powdered sugar. Seal bag and shake shake shake until it’s thoroughly coated. Spread on baking sheet to cool.

Tips

* I’ve made this with rice chex, corn chex, and even chocolate chex – all are delicious.

* Just like rice krispies – I feel like they end up a little dry if you use all of the cereal called for in the recipe, so I usually cut back by about a cup.

* The best way that I’ve found to shake these (maybe it’s because it’s how I’ve been doing it since junior high) is to dump it all in a paper bag, fold over the top, and go outside to give it a good shake. You may end up covered in a bit of powdered sugar yourself, though. 🙂

[Original recipes available here & here ]

chocolate therapy

dsc_2055-2

Today was a big day for me – BF and I went to go buy my first new car. My last car died on me, and I only had a couple weeks left before I had to give his big brother’s car back. So off we went car shopping. I wasn’t planning to buy today, but it happened no less. Afterward? Shock, panic, and disbelief at how much money I’d just spent.

The only solution? Stress eating, obviously. Few things are as comforting to me as a full belly and a sugar buzz. Enter – Boyfriend to the rescue! He actually made these all on his own! What a lucky girl I am to have a boy who is so handy in the (counter- and sink-less) kitchen. 🙂 After scarfing a couple of these babies down, I was much more calm and level-headed than I was when I had first arrived back home.

BF hard at work

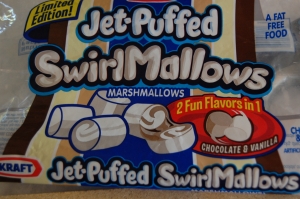
This recipe doesn’t vary much from your classic rice krispy treat recipe (just a couple twists). BF used cocoa krispies instead of regular krispies, and swirl marshmallows in place of the plain ones. Also, I find that using the full 6 cups of cereal called for in the traditional recipe yields a very dry result, so we scaled back to closer to 5 C (between 4 and 5 cups) of cereal. The result? Pure, chocolatey bliss. Next time you plan to make krispy treats, definitely give this combo a try!

oh, good. they’re fat free! haha

Cocoa Rice Krispy Treats  

  • 3 Tbsp butter
  • 10 oz large marshmallows
  • 4 1/2 -5 C cocoa rice krispies
  1. Melt butter & marshmallows together. Once melted, add cereal.
  2. Spread into greased pan.
  3. Once cooled, cut into squares and store in an air-tight container.

*Tip: Cover with parchment paper and smoosh down to help you spread them more easily.

Chocolate Peanut Butter Krispies

choco pb krispies

I promise not to make every single dessert in here peanut butter and chocolate. No matter how much I love the sweet-salty combination…. I really do know how to make other things, honest.  But when I saw this recipe in my “Baked” cookbook, I couldn’t resist. I mean, just wait til you see how easy they are!!!

These (like most of the desserts I make) are “rich”. Again, I’m not the type of person who can find something to be “too rich”, “too sweet”, or “too” anything that will impede me from eating it… the only thing that is going to stop me from eating something is if it is “too repulsive”… which these aren’t. I promise.

I was surprised at how little “krispy” there was in the bottom layer. If I were to make these again, I may double the “krispy” layer… which would serve me well in two ways, since it’s near impossible to get my candy thermometer to accurately measure ¼ cup of water, even in my tiniest pan.

BAKED’s Krispies

Printer-Friendly

For the krispies

1 3/4 c crisped rice cereal (I used the cheap stuff)
1/4 c sugar
3 Tbs light corn syrup
3 Tbs unsalted butter, melted

For the peanut butter layer
5 oz milk chocolate, coarsely chopped (I used chips, and they did just fine)
1 cup creamy peanut butter, though I don’t think crunchy would ruin it.

For the chocolate layer
3 oz dark chocolate (60 to 72 percent cocoa), coarsely chopped (I used leftover mini semi-sweet chips from my peanut butter pie)
1/2 tsp light corn syrup
4 Tbs unsalted butter

Krispy Layer:

Lightly grease the bottom and sides of an 8-inch square baking pan. (I put a parchment square in the bottom and it served very useful)

Put the cereal in a bowl and set aside. The recipe calls for a “large” bowl, but it’s really less than 2 cups of cereal… a medium-size bowl will do just fine.

Pour 1/4 cup water into a small saucepan. Gently add the sugar and corn syrup without letting any sugar or syrup get on the sides of the pan. Using wooden (or silicone) spoon, stir the mixture until just combined. Put a candy thermometer in the saucepan and cook over medium-high heat and bring to a boil cooking until the mixture reaches the soft-ball stage (235 F)

Remove from heat, stir in butter, and pour the mixture over the cereal. Quickly stir until the cereal is coated and then pour it into the prepared pan. Using your hands (or I used the silicone spatula I used for stirring), press the mixture into the bottom of the pan. Let the crust cool.

*I was surprised at how easy this part was, much easier than those sticky, marshmallowy krispie treats

melty melty

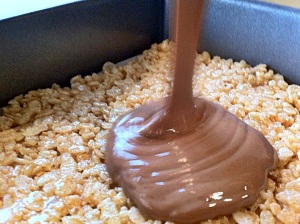
PB Layer: In a nonreactive bowl (I used glass), stir together the chocolate and the peanut butter. Set the bowl over a saucepan of simmering water and cook, stirring until smooth. Once smooth, remove from heat & pour the mixture over the cooled crust. (CAREFUL: THE BOWL WILL BE HOT—you may let it cool just a bit if you like). You can spread it with a spatula or I just tilted the pan until everything was evenly covered. Put the pan in the fridge to cool.

pourin time


Chocolate Layer: In a nonreactive bowl, combine the chocolate, corn syrup, and butter.

Do the same as before, stirring with a rubber spatula over simmering water until the mixture is completely smooth. Remove once smooth and cool slightly so you don’t burn yourself while pouring. Pour the mixture over the chilled milk chocolate peanut butter layer and spread (or tilt) into an even layer. Put the pan into the refrigerator for 1 hour, or however long it takes you to go out for Thai and come back home… ya know, til the chocolate hardens.

Cut into squares and serve. Store in an airtight container in the fridge up to 4 days (according to the book). Since there’s nothing particularly prone to spoiling I don’t see why they wouldn’t last longer… I have no experience, though, since nothing this yummy lasts that long in my fridge.

[Adapted from Baked: New Frontiers in Baking]