DIY roasted peppers

dsc_5302-e1326737962210Ah yes, ye olde bell pepper. This post may seem a little random at the moment, but this skill is necessary to complete my next post. So today, I give you a tutorial on how to roast red peppers. Don’t worry, it’s easy 🙂

Preheat your broiler or grill to high heat. If you’re using your oven, place a sheet of foil on the rack below the one you’ll be placing your pepper on. If you want the process to be faster, place it closer to the broiler. My short attention span tends to favor having the rack lower in the oven, so that my pepper doesn’t just turn into flames and smoke.
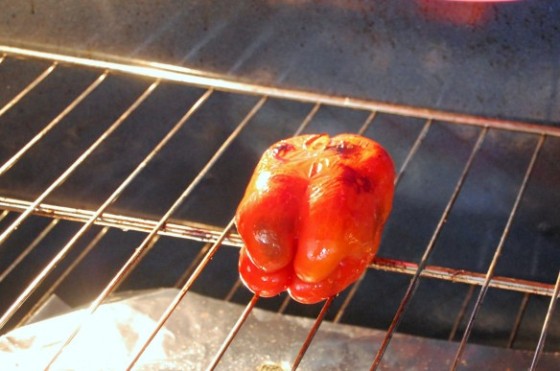
Take one (or more) beautiful red pepper(s) (or whatever kind of pepper you wish to use). Washed and patted dry. Then, rub said pepper with oil. I used olive oil. Place this now oiled pepper into your oven or onto your grill and cook until the skin starts to blister and char, rotating as necessary until all sides are done.

Remove the pepper and place in a bowl. Cover with plastic wrap and allow to rest 15 minutes or until cool enough to handle. Once cooled, uncover and peel the skin off. Don’t worry, it’ll come right off. Slice or dice into desired pieces and,  Voila – you now have roasted peppers!

Too lazy? Of course you could always purchase the pre-roasted peppers in a jar, but where’s the fun in that?

“BUT WHAT WILL I USE THEM ON????”

Um, everything? Inside sandwiches, atop pizzas, blended into soups, added to pasta or tacos or as part of an antipasti… the possibilities are pretty much endless here. You can even use any kind of pepper you want, here I used red peppers, but I’ve used poblanos in the past, hatch chiles, etc…

how to caramelize onions

dsc_2984Caramelized onions are an easy way to add flavor to anything you make – like sandwiches, pizza, or even bruschetta. They are simple to make, and everyone will tell you that the key is to cook them low and slow over a lllllong period of time.

If you’re like me, you’re already ahead of the game because you only need a small amount of onions. See? You’re already winning. Five cups of onions will yield about 2 cups of caramelized onions – so my 2  medium-ish onions made about 1/2 C of caramelized onions (which is all I really needed for BF and I). If you want more, by all means throw ’em in – it will take a bit longer for them to caramelize, though.

you’re missing the full cuteness – they can see me at the window and then they all run and hide in the bush

While simple in theory, these can cause problems for someone like me who is short on both patience and attention (so what if some of us get distracted by the cute little quail chicks in the back yard).

Solution? Start them around medium to medium-high to begin the cooking process, and then turn them to low/med-low once they’ve already begun to brown, so that you can avoid burning them.  If you have a view of the back yard through your window, maybe you can watch the little critters play while your onions caramelize. Caramelized onions will make your house smell amazing and add a delightful bit of sweet to your savory dishes.

How to Caramelize Onions

What you need:

  • Onions
  • Oil & butter
  • Salt
  • dash of sugar
  1. Heat pan on medium/medium-high and add a drizzle of olive oil (enough to coat your onions with). It’s better to use stainless steel than nonstick, to encourage browning.
  2. If you like, you can add a bit of butter as well…
  3. Once the butter is melted and the oil is shimmering, add your onions. Stir frequently to coat them in the oil. Let the onions sweat (release their liquid) stirring occasionally.
  4. As soon as they start to brown a little bit, turn the heat to low/medium-low and continue cooking. (Patience is your best friend here) Add a sprinkle of salt over them and stir to incorporate.  If you want some additional sweetness, you may sprinkle a tiny bit of sugar over them as well. Sometimes I add a dash of balsamic vinegar as well.
  5. Whatever you do, don’t leave the kitchen, stand by their side faithfully stirring every few minutes making sure they don’t burn.
  6. If you build a good layer of caramelization on the bottom of your pan, feel free to add a few tablespoons of water, or even a dash of white wine, to deglaze the pan. That will take all that delicious brown color and flavor from the bottom of your pan and put it right into your onions, where it belongs.
  7. After about 30 minutes, depending on how many onions you’re using, you may be done! If not, just continue stirring and deglazing until your onions are fully caramelized, an additional 30 minutes, more or less.

pesto

dsc_26391

My love affair with pesto and all things basil started at an early age. I remember the first time I had pesto – my dad took me to dinner at Avenue Bistro in Toledo, OH. I was a nasty hybrid of vegetarian + picky-teen-eater at the time so my dinner was essentially a house salad and this mystery green concoction on the table. I probably ate at least two loaves of bread covered in pesto. My dad must have been horrified at the amount of food I consumed, since he was the type who ran five miles a day and lived off of iceberg lettuce alone. But oh man that stuff was good.

Now that I’m a “grown up” I can make my own pesto. Honestly, it’s so easy I’m sure I could have made it back then, too. The bright flavor of basil with the salty parmesan cheese, plus the subtle depth added by the toasted pine nuts (mmm, pine nuts)… pesto is just divine on all accounts. It’s a perfect, refreshing snack in the summer – just buy a loaf of crusty bread at the store, rip off a piece, and dunk it on in! Don’t want the guilt that accompanies realizing you’ve eaten a whole loaf of bread in one sitting? Try using it as a pasta sauce – just toss it with pasta. Maybe add a splash of cream if you feel so inclined… I think I like where this is going….

[[PS – I’m entered in a kitchen contest – VOTE FOR ME HERE!]]

Pesto

Printer-Friendly

  • 1 C basil leaves
  • 1/2 C freshly-grated parmesan
  • 2 – 3 Tbsp pine nuts, toasted (some stores will sell them pre-toasted if you’re not a fan of toasting them yourself)
  • 2-3 cloves garlic, minced
  • Splash of fresh lemon juice (optional)
  • salt and pepper
  • 1/4 – 1/2 C olive oil

1. Whir everything except the oil in a food processor until it forms a paste.

2. Pour oil in, a few tablespoons at a time, while the food processor is running until the pesto reaches your desired consistency. (Some people like theirs with less oil, ideal for spreading, while others like it with more oil, which makes it more dip-able)

3. Taste and adjust salt and pepper

*Tips

*This recipe can easily be doubled or tripled for company

*It’s not baking – so don’t worry about exact amounts. Adjust the taste to your liking – you can even add a different kind of cheese or different leafy greens – spinach & feta perhaps?

*A splash of lemon juice is always a welcome addition to pesto

*Extra pesto can be frozen in ice cube trays – it makes a great addition to pasta sauces. I like to add a pesto cube to red sauce for an extra boost of flavor.

in honor of summer fiestas – salsa

salsa main

I’ve been hiding this recipe for some time now from my friend, Rob. All that he wanted ever since I started blogging (and really, before I started blogging) was a good salsa recipe. I tried to blackmail him in exchange for him learning wp code and making me a beautiful, glorious webpage… but he held out. What a little turd, right? Oh well, I will give you this delicious salsa recipe anyway. Know why? Because I like you that much. (Close your eyes, Rob!)

I don’t blame him for needing a salsa recipe – I struggled with finding a good one for a long time. No matter what I did, I just couldn’t achieve that restaurant-y salsa that I so badly wanted. I finally just gave up, I could still make pico- and if I must resolve myself to a lifetime of fresh pico – so be it! Never in a thousand years would I have imagined the key to unlocking great tasting restaurant style salsa was in a can.

Crazy, right? All this time I thought it was the fresh ingredients, maybe some secret black market spices, I wasn’t quite sure. I was positive fresh ingredients were an important part… then I saw PW’s recipe. The only recipe that was different from all the ones I’d tried before – using canned tomatoes. Canned?!? I can honestly say that I never in my life thought I would put a can of “Ro-Tel” in my shopping cart, let alone two… I guess there’s a first time for everything… Now that I know the secret of the can, I can adapt this salsa recipe into pretty much endless variations (and now, so can you).

It makes a lot though – so invite some friends over to share. You need them or else you will eat it… all of it. You will just black out and wake up with an empty salsa container and no chips… you poor thing, you. You don’t even know what you’re in for… Congratulations on your new crack salsa addiction. 🙂

Restaurant-Style Salsa – Adapted from PW

Printer-Friendly

  • 1 can (28 Ounce) Whole Tomatoes With Juice
  • 1-2 cans (10 Ounce) Rotel (diced Tomatoes And Green Chilies) OR if you are like my sister and are afraid of heat – you can just add 2 cans of diced tomatoes – no chiles!
  • 1 small onion, roughly chopped
  • 2 cloves Garlic, Minced
  • 1/2 jalapeno, chopped (optional)
  • 1/4 tsp Sugar
  • 1/4 tsp Salt
  • 1/4 tsp ground cumin (I used a little less)
  • 1/2 C cilantro
  • 1/2 lime, juiced

1. Throw everything in the blender, then process to desired consistency. Done-zo!

2. Salt & Pepper to taste, if you think it needs it.

Ok, that’s basically it, but since I like to make life more difficult and am maybe medium control-freak, I put the tomatoes only from the can of whole tomatoes, and reserved the liquid so that I could adjust the salsa to be as thick (or thin) as I wanted. Process without the liquid – then add the liquid in as you see fit (if you think it needs it)

Also, if you do ONLY canned tomatoes, you can use fresh peppers of any kind to your liking – which is better to control taste and heat than using Rotel

dinner rolls

pull apart dinner rollsFor our first official dinner in the new kitchen, BF had a simple menu request: Rolls. Steak, potatoes, and rolls to be exact. Easy peasy, right? So you can imagine how sad I was when I miscalculated a measurement in my roll recipe with my LAST PACKET of yeast and had to throw the batch out. I walked into the other room defeated with my head down, “Sorry babe, no rolls tonight.”

He didn’t seem to mind much, but I felt so bad. I wanted tonight’s dinner to be perfect, but even more than that I wanted to not go to the store. So I tore through the pantry, the cupboards, and the drawers looking for anything I could use to make rolls. Then I saw it- in the back of a refrigerator drawer- one packet of rapid rise yeast. I swear I heard angels singing… but I haven’t ever made rolls with rapid rise yeast. Road block.


I was certain there had to be a simple way to modify my recipe into a “rapid rise” compatible version. I stood there, packet in hand, thinking… then it hit me. This is Fleischmann’s yeast. Surely they didn’t become a national yeast brand without at least some failproof bread recipes. Internet to the rescue! With a website named “breadworld”, I felt pretty confident this recipe would work.

These rolls baked up beautifully. Not only did they taste great, have a perfect “dinner roll” texture, and take half the time of regular rolls – they saved dinner. Boyfriend emerged for dinner to a pleasant surprise, “I thought we weren’t having rolls for dinner tonight.” Neither did I … 😉

Save-the-Day Dinner RollsFrom Fleishchmann’s

Printer-Friendly

  • 2 to 2-1/4 C  AP flour, divided
  • 2 Tbs sugar
  • 1 packet RapidRise Yeast
  • 1/2 tsp salt
  • 1/2 C milk
  • 1/4 C water
  • 2 Tbs butter (or a spray of “Pam for Baking”)
  1. Combine 3/4 cup flour, sugar, undissolved yeast and salt in a large bowl.
  2. Heat milk, water and butter until very warm (120º to 130ºF), then add to flour mixture.
  3. Beat 2 minutes with dough hook at medium speed, scraping bowl occasionally. Make sure to scrape up any sneaky flour hiding at the bottom.
  4. Add 1/4 cup flour; beat 2 minutes at high speed. Stir in enough remaining flour to make soft dough.
  5. Knead on lightly floured surface until smooth and elastic, about 8 to 10 minutes (this actually took me like 2 minutes).
  6. Let rest, covered, about 10 minutes.
  7. Divide dough into 12 equal pieces and shape into balls. Place into greased 8-inch round pan. Cover and let rise in warm place until doubled in size, about 30 minutes.
  8. Bake at 375ºF for 20 minutes or until done. Remove from pan; brush with additional melted butter, if desired. Serve warm.

Tips

*These rolls are very forgiving, I was having issues following directions this day and dumped all 2 cups of flour into the bowl with the yeast and they still came out great. (hence putting the “3/4C flour” in bold)

*Takes about 90 minutes start to finish – 20 min active, 10 minute rest, 30 minute rise, and 20-30 minute bake