Fresh Orzo Salad

orzo salad arugula 9934

orzo with arugula, cherries, feta, and pine nuts

Side dishes are something I always struggle with. I don’t know why, I just find them unnecessary about 98% of the time. I don’t need rice and beans with my tacos, nor do I need bread with my pasta.  I’m happy to j just eat my entrée and be on my way, maybe a small salad. No real ‘side dish’ necessary.

BF on the other hand, well, he needs his side dishes. “Where’s the side?”, “No salad?” he’ll ask. I usually reply with a sheepish shrug or some half-baked excuse- “Well, since there’s veggies in the taco, and the tortilla is bread…”

One of BF’s favorite sides is pasta salad. Poor guy probably didn’t eat a bite of it the whole first year we were together, not in my presence at least. I was never one for mayo (since then it’s grown on me, which isn’t necessarily a good thing). I tend to like things a bit more on the “fresh” side, as in not cold and drowning in mayo.

So, as is necessary in all relationships, we compromised- I created a fresh, healthy alternative to your typical pasta salad using orzo, and he agreed to eat it and pretend it was pasta salad. On second thought, maybe that wasn’t such a great job of compromising…

grilled red onions & red peppers, feta cheese, basil, and arugula

Tonight’s supporting cast was charred red onions, roasted bell peppers, feta, arugula (because I had some left over), and basil (because I love it so much).

You can use any mix-ins you like, and even serve it warm or cold (usually I chill it, but tonight there was no time). This makes it a great candidate for potlucks and busy weeknight dinners alike. I also make the same dish with israeli couscous, or I’m sure you could sub in any pasta shape you like!

Orzo “Pasta Salad”

Printer-Friendly Version

  • Salted boiling water (or chicken stock for extra flavor)
  • ½  package orzo
  • ½ small red onion, sliced
  • 1 – 2 red peppers, sliced
  • Feta cheese to taste (couple tablespoons)
  • Couple tablespoons each arugula & fresh basil, sliced
  • Salt, Pepper, Olive oil

1. Cook & drain orzo according to package directions. Spread out onto a baking sheet covered with foil or plastic wrap; drizzle with oil and sprinkle salt and pepper to taste. Allow to cool (if you want to serve it cooled).

2. We cooked our red pepper and onion on the grill, as they were leftover from fajitas the other night. You could use the pre-roasted ones that come in the jar, saute fresh peppers on the stove, or use raw (if that’s what you’re into).

3. Toss orzo with chopped veggies, herbs, and cheese; mix and put into a bowl. Cover and refrigerate until needed or serve immediately.

The great thing about using orzo is that it’s neutral in flavor, so you can make combos to suit your taste.

Veggies (sliced):

  • Green onions
  • White onions
  • Red onion
  • Shallots (milder than red onions)
  • Cherry tomatoes, sliced or quartered
  • Red peppers –from a jar, sautéed, grilled, or fresh

*If adding raw onion, I recommend soaking them in cool water for several minutes to take the edge off

Leafies (arugula, basil, cilantro, parsley)

Cheese (feta, parmesan, pecorino)

Dried fruit, chopped (cherries, cranberries, apricots)

Toasted nuts (pine nuts, walnuts, pistachios)

*Try adding a tsp or two of any acid to brighten the dish – lemon juice, lime juice, or a vinegar (red wine, balsamic, rice wine, or sherry vinegars- depending on what your mix-ins are)

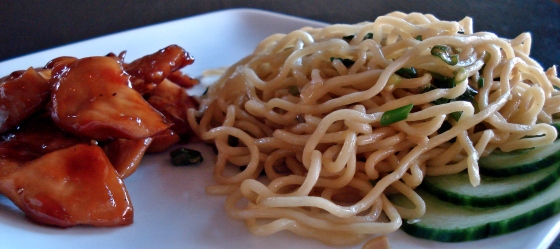
Teriyaki Chicken with Momofuku’s Ginger-Scallion Noodles

teriyaki chicken noodles

“Teriyaki” hails from Japan and is just a general term that applies to pretty much any type of sweetened soy sauce mixture. The sweetener can be anything from honey, to pineapple juice, to plain old sugar (which is what this recipe uses). Feel free to experiment and find what you like.

While teriyaki is extremely popular in the US, I’m not sure how “authentic” it is to asian cuisine. Nevertheless, it shows up on menus nationwide for us to enjoy at asian and non-asian restaurants alike (even ‘Jack in the Box’ has a teriyaki bowl). Once you see how simple it is to make, you’ll understand why.

I made Momofuku’s ginger-scallion noodles with quick-pickled cucumbers to accompany our chicken tonight, which I was fortunate enough to experience in person on my NYC trip last year at Momofuku Noodle Bar. I received the cookbook from mom this past Christmas and had yet to actually make anything from it.

Despite sounding fancy, the sauce comes together rather quickly, and ends up looking like a pile of wet scallions. The noodles are very ginger-y, so if you’re not big on ginger, you may want to scale it back a bit. You could also use Megkat’s noodle recipe (at the end of this post), which is super tasty as well.

Teriyaki Chicken Adapted from Megkat

Printer-Friendly

  • 2 large boneless skinless chicken breasts, cut into thin strips
  • 1 Tbsp cornstarch
  • 1 Tbsp water
  • 1/3 C soy sauce
  • 1/3 C sugar (I’m sure you could substitute honey, agave nectar, or pineapple juice to taste)
  • ¼  C cider vinegar
  • ½  tsp garlic powder
  • ½  tsp powdered ginger (There was plenty of ginger in the noodles, so I left it out of the sauce this time)
  • ¼ tsp ground pepper (couple grinds)
  • ¼ – ½ tsp red pepper flakes (optional)
  1. Preheat oven to 425F and line a 9×13 baking pan with aluminum foil (this will make clean up much easier). Place chicken strips in pan.
  2. Mix water and cornstarch into slurry and add to saucepan over medium heat. Whisk in remaining ingredients and simmer until thickened, whisking to avoid burning.
  3. Once sauce is thick and syrup-y, pour over chicken and toss to coat. Bake in preheated oven 20-25 minutes, stirring about halfway through.

*Alternatively, I think it might taste even better if you saute the chicken in a pan and pour the thickened sauce over it, toss and serve, since baking the chicken results in a different texture than sauteeing does. Just be sure not to over-crowd the pan, saute in batches if you have to.

Ginger-Scallion Noodles From Momofuku Cookbook

Printer Friendly

  • 6 oz cooked noodles (ramen, yakisoba, or in a pinch- thin spaghetti)
  • 6 Tbs ginger scallion sauce (recipe follows)
     

ginger-scallion noodles with quick-pickled cucumbers

Ginger Scallion Sauce –Makes about 3 cups

  • 2 1/2 C thinly sliced scallions, greens and whites (1 to 2 bunches)
  • 1/2 C finely minced peeled fresh ginger
  • 1/4 C grapeseed or other neutral oil
  • 1 1/2 tsp usukuchi (light soy sauce)
  • 3/4 tsp sherry vinegar
  • 3/4 tsp kosher salt, or more to taste

Mix together. Good from the time its made for 2 days. (It will look like a bowl of wet scallions)

Quick-Pickled Cucumbers

  • 1 large seedless (“English”) cucumber
  • 1 Tbsp Sugar
  • 1 tsp salt

Slice cucumber thinly (I used my mandolin), toss with sugar/salt and let sit for 20 minutes. Serve with ginger-scallion noodles

Garlic NoodlesAdapted from Megkat

Printer-Friendly

1 lb cooked noodles
4 TBS butter
6 garlic cloves, minced
1 1/2 C green onions, chopped (more for garnish, if desired)
2 1/2 tsp fish sauce (her’s calls for Tbsp, but that seems a bit much)
2 Tbs soy sauce
1 Tbs brown sugar

1. Melt 2 Tbs butter in large skillet. In small bowl, mix fish sauce, soy sauce, and brown sugar.

2. Add garlic and green onions, saute until fragrant. Add soy sauce mixture to pan, along with 2 more Tbs butter, melt while stirring. Once sugar is dissolved and butter is melted, toss with pasta & serve.

Pico de Gallo

pico2

The thing I’m struggling with the most with for this blog is measurements. Do you know how hard it is to measure things when you are accustomed to just throwing it together? It’s the little things, like how much salt really ends up in a bowl of pico? I tried so hard to measure the salt for this recipe. I use a salt grinder, which already complicates things for recipes. How much comes out in 1 grind? I have no idea… What I ended up doing was grinding the salt over a piece of paper as though I were grinding it over the pico, and then poured it from that paper into a measuring spoon. I still don’t know if I got it right. Thank you for making me feel extra crazy. Now, to the recipe…

Pico de gallo is one of those little things that can take your taco night from ‘average’ to ‘great’! It’s so simple and takes almost no time to prepare.  The fresh mix of tomato, onion, and cilantro can brighten up just about any dish.
I’ve been known to use pico not only to adorn my chips & tacos, but also as a welcome addition to my scrambled eggs. Throw in some ham and make a tasty omelet, or try stirring some fresh pico into your next batch of guacamole for added texture and flavor.

try adding some pico to your tacos on taco night!

Plus, it’s completely customizable (I’m noticing that I say that a lot… ) I know it sounds weird but try leaving out the garlic & substituting diced, fresh watermelon for the tomatoes. Fruit can give your salsa an interesting, sweet twist (mango would work, too).  Corn is another way to make your traditional pico a little sweeter (think of Chipotle). Want it spicier? Add more jalapeno, or switch to a spicier pepper. Less spice? Leave them out entirely! If you don’t like the chunky texture of pico, just throw it in a blender and puree away to your desired consistency!

Pico de Gallo

Printer-Friendly

  • 2 tomatoes (I used Roma), chopped
  • ½ medium onion (red or white), chopped
  • 1 large clove garlic, minced (I actually grate mine) OR a sprinkle of garlic powder
  • 1 Tbsp fresh cilantro, minced
  • ½ lime – just the juice!
  • 1/8 tsp salt (Remember – it’s much easier to add salt than to take it out!)
  • Drizzle of olive oil

1. Mix it all together, cover and refrigerate for at least 30 minutes. (Well that was easy…)

Tips

*Remember, I’m usually cooking for only 2 people. If you have a crowd coming over, double or triple the recipe.

*If you like a different ratio of tomato to onion, add more of one or the other. If you don’t like cilantro – leave it out! If you want more salt, add it. Don’t be a slave to recipes- CUSTOMIZE!!!

*If you replace the cilantro with basil, and leave out the lime, you will have bruschetta! Use it to top some fresh crostini! YUM!

*If you don’t like seeds, or prefer a less runny salsa, slice AROUND the core. You get all the flesh while avoiding the gooey insides. This works great for peppers, too!