reeses cup bundt cake

DSC_7806


By the time you read this, I should be on my way to California… on VACATIONNNNN!!!

So, since this will be the last post for awhile, and the last March (cake) Madness post, it is only fitting that I would combine two of my favorite things: chocolate and peanut butter.  And Reese’s cups, to make it more redundant.  And more delicious.

This cake was arguably the first “recipe” I ever made.  Once upon a time ago, when I was a little girl baking with my momma, we needed to make a dessert for our neighborhood block party (remember those?).  Mom asked what we should bring and of course my brain immediately went to my then (and still) favorite candy, Reese’s Cups.  In cake form.

reeses-cake-8545-large

Of course back then it was just a box cake mix and a bajillion chopped up Reese’s cups.  Mixed into the cake, adorning the top, dumped into the hole in the middle… I even halved them and made a little Reese’s border along the outside of the cake.

I didn’t have enough mini Reese’s to do that this time.

reeses cake 1-1

I didn’t really miss them.  (Ok, maybe I missed them a little bit)

This cake was so good, as soon as I took a bite I was immediately upset, because I knew that it was suddenly a choice between cake and dinner… No one should ever need to make that choice.

Especially when ganache and Reese’s are involved.

It was even better the next day, in case yours lasts that long.


Reese’s Cup Bundt Cake

Makes 1 bundt cake

Printable Recipe

For the cake:

  • 1 cup unsalted butter

  • ⅓ cup dutch processed cocoa powder

  • ½ teaspoon kosher salt (unless your peanut butter is really salty)

  • ⅓  cup creamy peanut butter (I always use Jif)

  • 1 cup water

  • 2 cups all-purpose flour, plus more for the pan

  • 1 ¾ cups granulated sugar

  • 1 ½ teaspoons baking soda

  • 2 large room temperature eggs, lightly beaten

  • ½ cup sour cream; room temperature

  • 1 teaspoon vanilla extract

  • 10 reeses cups, roughly chopped (usually easier to chop if they’re chilled)

  • Mini reeses, for decorating (optional)

For the chocolate glaze:

  • ½ cup chocolate chips (or 4 ounces chopped chocolate)

  • ½ cup heavy cream

  • 2 Tablespoons light corn syrup

1.  Heat butter, peanut butter, and water over medium heat in a small saucepan until butter and peanut butter are just melted.  Stir in cocoa powder and set aside to cool to room temperature.  To ensure my impatience didn’t get in my way, I decided to wait to preheat the oven until this point and didn’t let myself mix anything until the oven beeped.

2.  Preheat oven to 350˚F and prep a bundt pan with butter and flour or with Pam for Baking

3.  In a large bowl, sift or whisk together flour, salt, sugar, and baking soda until well mixed.

4.  Slowly whisk or beat in the melted butter mixture until combined, making sure to scrape down the sides and bottom of the bowl.  Add eggs and vanilla and whisk to incorporate.  Stir in sour cream until combined.

5.  Option 1: Pour half of batter into prepared pan, sprinkle with chopped peanut butter cups, and pour remaining half of batter over the Reese’s.

 Option 2:  Stir peanut butter cups  into batter and pour into prepared pan.

6.  Bake 40 to 45 minutes until done.  Cool 15 minutes in the pan, then invert onto a wire rack and remove pan to finish cooling completely.

7.  Once your cake is cooled, make your ganache by heating your cream just until it starts to bubble.  I usually do that by heating it in a 2-cup measuring cup in the microwave, but you can use a saucepan on the stove if you like.

Add chocolate and corn syrup and whisk to combine (if you used a pan for your cream, pour the cream over the chocolate instead).  At first it will look like it’s going well, then it will look like it’s going very poorly, then if you just keep whisking you’ll be relieved when it all comes back together again.


Oreo Overload Cupcakes

oreo cupcake 8496

This weekend was filled to the top with Oreos.  I made these Oreo cheesecake cupcakes for the BF’s co-workers, and then I made these cupcakes for the BF.   Well, in his honor, at least.

You see, he sent me the original inspiration for this recipe.  Oreos, in my opinion, are pretty much the most perfect cookie in existence.  The quintessential cookie.  Crisp cookie, creamy filling, and once dunked in milk it will lead your tastebuds to immediate bliss.

Immediate.

The only way to make Oreos better?  Mix them with more chocolate, more cream, and even more Oreos, for maximum Oreo consumpion.  These cupcakes have an Oreo cookie base, then chopped Oreo cookies mixed into the cake batter, Oreo crumb frosting, and the tiniest cutest little Oreo right on top.

That’s right, we have four layers of Oreo here, people.  Four!

oreo cupcake 8511

The only problem I had was the frosting.  This is probably the only frosting I have ever made that I would recommend chilling just a bit before using (although my kitchen tends to be a bit warmer than the average kitchen anyway).  I had much better success using a spatula to spread the frosting than I did attempting to pipe it.  This may be partly because I hand-crushed the Oreos for the frosting instead of using a food processor, so they weren’t uniformly-sized and therefor didn’t come out of my piping bag evenly.  So, using a food processor to make your crumbs may help, but the easiest fix for me was just to spread the frosting with a spatula instead.

Oreo Overload Cupcakes

Yield: 24 Cupcakes

Ingredients

    For the Cake:
  • 24 Oreo cookies, whole (I used birthday cake Oreos)
  • 12 Oreo cookies, coarsely chopped (I used regular)
  • 1 recipe your favorite chocolate cake - I used this one (halved), but even a box mix will do
  • For the Frosting:
  • 1 (8-ounce) package cream cheese, softened to room temp
  • 1 (4-ounce) stick unsalted butter, softened to room temp
  • 3 cups powdered sugar
  • 1 teaspoon vanilla extract
  • 12 Oreo cookies, finely crushed*
  • 24 mini Oreos

Instructions

    Make your cake
  1. Preheat oven and line 24 cupcake wells with liners. Place 1 whole Oreo in the bottom of each cupcake liner.
  2. Make your cake according to directions, stirring chopped Oreos in at the end. Fill each well 2/3 full with batter and bake until done. My cake recipe took 24 minutes to bake as cupcakes. Once baked, remove from cupcake tins and cool completely on a wire rack.
  3. Make your frosting
  4. Whip butter and cream cheese together with an electric mixer until light and fluffy. Scrape down sides and add vanilla extract, beating again to incorporate.
  5. Add powdered sugar 1/2 cup at a time, beating carefully after each addition to avoid exploding powdered sugar all over your kitchen. After the last bit is mixed in, scrape down the sides and beat on medium-high until light and fluffy.
  6. Scrape down the sides of the bowl and add in the Oreo crumbs, beat again until well mixed. Allow to chill just slightly so it is easier to handle and spread on cupcakes, topping with a tiny Oreo cookie, if desired.

Notes

Using a food processor for your frosting crumbs will help to ensure you end up with a smoother, more uniform frosting. I ended up spreading my frosting with an offset spatula, glopping some on top of each cupcake and then letting it set for a bit and then came back to actually spread the frosting a later. Of course I didn't find this out until the last couple of cupcakes (that had been sitting with glopped frosting on top)...

https://wee-eats.com/2013/03/24/oreo-overload-cupcakes/

happy birthday to me [ and the momofuku confetti cake ]

confetti cake crop 8477

It’s Saturday, March 16th.  Today is my birthday, but you won’t be reading this until tomorrow.  I spent the whole morning at the spa getting a full body massage thanks to my wonderful, loving boyfriend.  It was, without a doubt, the perfect way to start my birthday.

momo confetti cake top

The best way to continue my birthday?  By eating my birthday cake for lunch, obviously.

confetti cake 8478

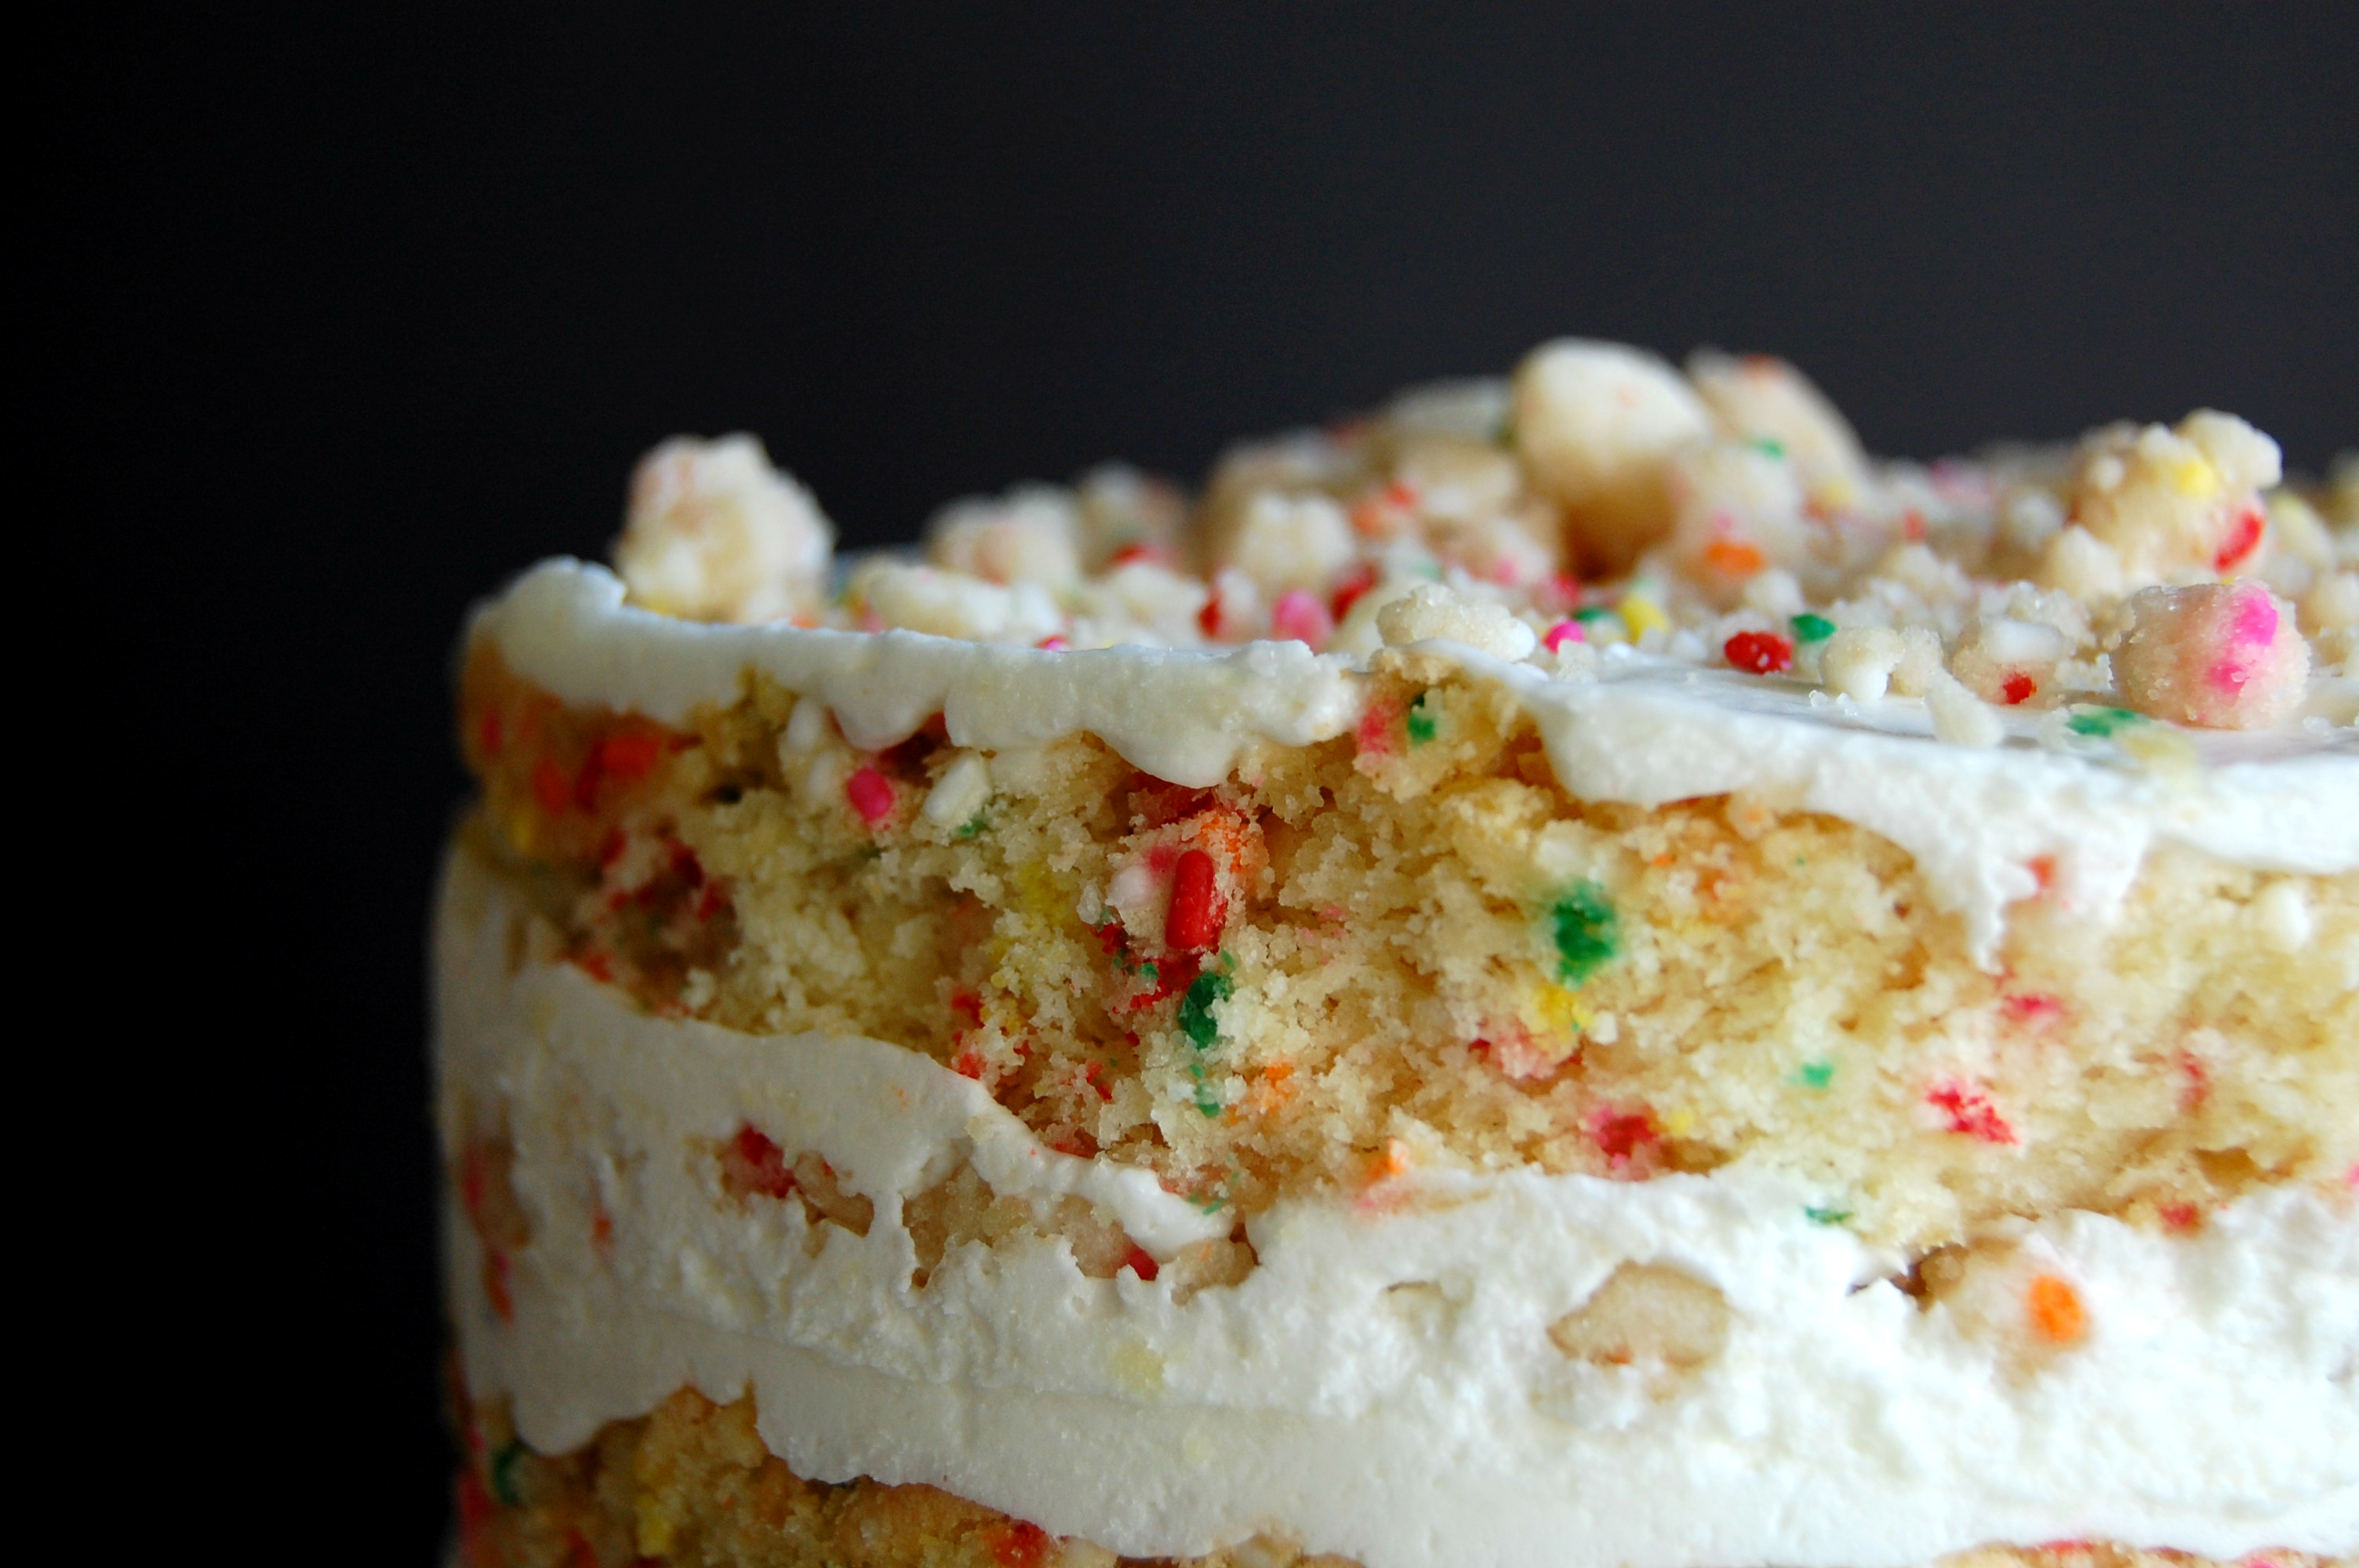
I made this cake last weekend and it’s been quietly stashed away in my freezer since then.  Waiting, haunting me in the back of my brain.  For the last week, like a mobius strip in my brain, “confetti cake, confetti cake, confetti cake…”

confetti cake 8471

And even lazy me, despite saying that reading the recipes in the Momofuku Milk Bar Cookbook makes me tired, even I could do it.  And it wasn’t that hard.  Day 1 I made the crumb and cake.  Day 2 I made the frosting, soak, and assembled everything.  Day 3 (which was actually 1 week later) I consumed everything.  Well, ahem, not everything.

instagram confetti cake

Not that I would have any issue taking down a whole cake, but I had plenty of other eating to do and therefor decided to save my tummy’s valuable real estate for dinner with the BF at one of my favorite restaurants.  After slicing my cake, I very carefully laid each piece on a plastic-wrap-lined baking sheet and put it in the freezer to chill for a few hours.  Once hardened, I wrapped each piece individually in plastic wrap and then foil, and placed them in a freezer-safe gallon-sized bag for future consumption.  God bless whoever invented the freezer.

[ UPDATE: Our friends at Bon Apetit have since posted a video showing how to assemble the cake that is infinitely helpful. I recommend you check it out if you are at all intimidated or confused by the assembly instructions! ]

Momofuku Milk Bar Confetti Cake

Makes 1 6-inch round cake

Printable Recipe

For the Crumb:

  • ½ cup granulated sugar
  • 1 ½ Tablespoons brown sugar, packed
  • ¾ cup cake flour
  • ½ teaspoon baking powder
  • ½ teaspoon kosher salt
  • 2 Tablespoons sprinkles
  • ¼ cup grapeseed oil
  • 1 Tablespoon clear vanilla extract


For the cake:

  • ¼ cup (½ stick) unsalted butter, room temperature
  • ⅓ cup vegetable shortening, room temperature
  • 1 ¼ cups granulated sugar
  • 3 Tablespoons brown sugar, packed
  • 3 eggs
  • ½ cup buttermilk
  • ⅓ cup grapeseed oil
  • 2 teaspoons clear vanilla extract
  • 2 cups cake flour
  • 1 ½ teaspoons baking powder
  • ¾ teaspoon kosher salt
  • ⅓ cup + 4 Tablespoons sprinkles, separated


For the soak:

  • ¼ cup milk
  • 1 teaspoon clear vanilla extract


For the frosting:

  • ½ cup (1 stick) unsalted butter, softened to room temperature
  • ¼ cup vegetable shortening, softened to room temperature
  • 2 ounces cream cheese, softened to room temperature
  • 1 Tablespoon + 2 teaspoons light corn syrup
  • 1 Tablespoon clear vanilla extract
  • 1 ¼ cups confectioners’ sugar
  • ½ teaspoon kosher salt
  • ⅛ teaspoon baking powder


Step 1: Make the crumbs
1.  Preheat the oven to 300˚F and line a baking sheet with parchment paper.
2.  Combine the dry ingredients in a mixer until well-mixed.  Add oil and vanilla and continue mixing until they form into clumps.
3.  Spread into a single layer on a baking sheet and bake for approximately 17 minutes, until done.  Err towards under-done rather than over-done, the crumbs will harden a bit once cooled.  Allow to cool on the pan, then transfer to an airtight container for storage.
*Crumbs can be stored up to 1 week in the fridge, or a couple of days at room temperature.

Step 2: Make the cake
1.  Preheat oven to 350˚F and line a quarter-sheet pan (9- or 10-inches by 13-inches) with foil and parchment, greasing if desired (I sprayed with Pam for Baking)
2.   In a medium bowl, whisk together your cake flour, baking powder, salt and sprinkles; set aside.
3.  In the bowl of a stand mixer fitted with a paddle attachment, whip the butter and shortening until combined.  Add both sugars to the butter mixture and cream together on medium-high speed for 2-3 minutes, then scrape down the sides of the bowl.
Add the eggs 1 at a time, beating for about 10 seconds after each one, scraping the bowl after each addition.  Continue to mix on medium-high speed for 2-3 minutes, scraping the bowl at the end of the 3 minutes.
4.  On low speed, stream in the buttermilk, oil, and vanilla.  Beat for 4-6 minutes on medium-high until the mixture is white, has grown to about twice its original size, and is completely homogenous with no streaks running through it, scraping the bowl as necessary.  Don’t worry if it takes a while for everything to get incorporated.
5.  Add the flour/sprinkle mixture and pulse until moistened, then mix just until the flour is incorporated.  Scrape down the bowl one last time to check for any hidden flour bombs.
6.  Pour the batter into the prepared pan and spread it with a spatula to ensure it’s even(ish).  Sprinkle with remaining ¼ cup of sprinkles and bake 25 to 30 minutes until done.  When done, the cake should have a golden top and spring back when gently touched.  If  you’re still not sure you can stick a toothpick into the center and see if it comes out clean – it should be mostly clean with a few crumbs sticking to the toothpick.
7.  Let cake cool in the pan for 10 minutes, then remove from the pan and allow the cake to finish cooling on a wire rack.
*The cooled cake can be, wrapped in plastic wrap and stored at room temperature for one day, in the fridge for up to 5 days, or frozen for one month.

Step 3: Make the frosting
1.  In the bowl of a stand mixer fitted with a paddle attachment, combine the butter, shortening, and cream cheese on high speed for 2-3 minutes until light and fluffy.
2.  Scrape down the bowl, then with the mixer on low speed, stream in the corn syrup and  vanilla.  Continue beating on medium-high speed until the mixture is smooth and glossy white, about 3 minutes.
3.  Scrape down the bowl and add the confectioners’ sugar, salt, and baking powder and pulse to incorporate the powdered sugar.  Once the powdered sugar is mixed in, beat again on medium-high speed for 2-3 minutes, until it is fluffy and white.  Use the frosting immediately.
*Frosting can be stored in the fridge in an airtight container for up to one week, bring to room temperature before using.

Step 4: Assemble the cake
Equipment needed:

  • 2 acetate strips
  • 1 6-inch cake ring
  • 1 6-inch cake board or whatever it is that you would like to use to store your cake on
  • 1 gallon-size zipper bag or pastry bag (for frosting)
  • 1 pastry brush
  • Saran wrap
  • 1 recipe prepared confetti cake
  • 1 recipe prepared frosting
  • 1 recipe prepared confetti cake crumb

1. Make  your cake layers
1.1  Lay your cake on your work surface and cut out 2 6-inch circles using your cake ring.. Using the remaining cake and the cake ring, make a 3rd 6-inch cake out of the cake scraps.  I did this by cutting out the two corner-ish pieces, leaving as big of a piece as possible to be the base for my bottom franken-layer.

confetti cake cut out 8383

There will be a lot of scraps leftover for … quality control.  Yes, that’s what they are for.  Don’t want to get all the way to the end to find out that you don’t like your cake, right?  I put mine in a freezer-safe bag along with my other cake scraps leftover from home made ding dongs.  I’m sure I’ll not have any problem finding something to do with them.

1.2  Clean the cake ring and line it with an acetate strip, and place it Fill your plastic storage zipper bag with frosting, if you haven’t already, and cut a 1/2 to 3/4 inch hole in the corner. Squeeze evenly over the crumbs (see figures 1-4 of the how-to above).onto whatever base you’ve chosen to use – I also placed plastic wrap between the bottom of my cake ring and my cake surface so that I could move my cake as I deemed necessary.

confetti cake 8390 1.3   Place Circle #3 (cake scrap circle) inside the acetate-lined ring.

*Does that sound hard?  If so, cut your rectangular cake into three equal-sized sections and voila – you will have a 3-layer rectangle cake.

2. Mix together your milk soak, and scrape your frosting into a large gallon-size resealable plastic bag or pastry bag.  Cut a ½-inch off the corner of the bag for piping the frosting.

3.  Soak your cake
3.1  Using a pastry brush, generously brush your cake-scrap layer with ⅓ of the cake soak mixture.

4. Layer and frost your cake
4.1  Use the back of a spoon or a small offset spatula to spread the first ⅕ of frosting evenly on the cake.
4.2  Sprinkle the desired amount of the crumbs (up to ⅓ of crumb mixture)  evenly over the frosted cake layer.

*Tip: If you have smaller crumbs your cake will cut more easily when it’s time for slicing

4.3  Here is the tricky part – Now you have to frost on top of cake crumbs.

Pipe frosting in a spiral or grid pattern across the top of your cake.  I was a bit heavy-handed on this so you might want to make sure you only use ⅕ of the frosting here… or make extra frosting if you’re worried about it.  A little extra frosting never hurt anyone.

Use the back of a spoon to spread your lines of frosting evenly over the crumbs.  If you’re confused, please refer to Shannon’s beautiful confetti cake post, as it got me through my Momofuku cake experience.

4.4  Gently tuck your second strip of acetate between the cake ring and the top ¼-inch of the first strip of acetate, so you have a clear ring of acetate 5-6 inches tall-high enough to support the height of the finished cake.

5.  Assemble Layer #2:
5.1  Set Circle #2 on top of the completed layer.  Don’t worry that the acetate strips tend to scrape a bit off of the edges, just fanangle the cake into the ring and then gently press it all together with firm, even pressure.  Be gentle but firm.
5.2  Repeat step 3.1 – 4.3, using 1/3 of the cake soak, then up to 1/3 of crumbs, and 1/3 of frosting on top of the crumb.

6.  Repeat again for the 3rd and final layer – using the remaining cake soak, then we switch it up a little bit. Instead of crumb then frosting, for the final layer we will first frost the top of the cake and sprinkle the top with crumb however you think is most pretty.

7.  You should have a little bit of empty space between the top of your cake and the top of your acetate strip.  Cover with plastic wrap and/or foil and transfer the cake and its base to your freezer.
7.1 Chill for 12 hours (or up to 2 weeks) to set the cake and filling.

momo confetti 2

8.  When ready to serve the cake, remove the cake ring and place on your desired serving piece (this is easiest to do when still frozen).
8.1  Thaw at room temperature at least 3 hours or overnight in the refrigerator.  The cake is best served at room temperature so please let it sit at room temperature at least a few hours before serving.  I left mine wrapped in acetate to protect the sides of the cake layers from drying out.  When ready to serve, remove the acetate strips and slice as desired.

Finished cake can be stored, wrapped in plastic, up to 5 days in the fridge.  After slicing my cake, I very carefully laid each piece on a plastic-wrap-lined baking sheet and put it in the freezer to chill for a few hours.  Once hardened, I wrapped each piece individually in plastic wrap and then foil, and placed them in a freezer-safe gallon-sized bag for future consumption.  God bless whoever invented the freezer. 


[ Adapted from the Momofuku Milk Bar Cookbook & A Periodic Table ]

Brownie Swirl Cake

brownie swirl cake 8362

I’m going to tell you all that I had high hopes for March.  I know that Spring is right around the corner and I was all excited to share some “healthy” (well, more healthy than usual) recipes with you so that you didn’t have to swear off the website while you readied yourself for Spring Break or whatever it is that you have looming around the corner that may require you to wear some less-skin-covering clothing items.

Much to absolutely no one’s surprise, that ended quickly.  I promise that I’ve been making juices and salads for you, but in between all of those green and healthful things there is cake.  So.  Much.  Cake.

Well, since March is my birthday month and I’m always in search of the perfect cake for my birthday anyway, I decided to embrace my cake madness and MAKE ALL THE CAKE!  Followed by eating all the cake, and posting all the cake.

all the cake

Last year I made pretty much the best cake ever – a three layer rich chocolate cake with peanut butter frosting and finished off with a dark chocolate ganache.  It was heavenly.  It’s going to be really hard to top.

But not everyone has hours to dedicate to cake-making.

brownie cake 8354

So, what if you have a birthday say, tomorrow, and you want to do something a little more special than just a box cake mix and you don’t know what to do because you have a job and a life and not enough hours in the day?

That’s where this comes in.

You get the ease of a box mix but with super fancy sprinkles and swirls that make it look like you worked really hard.  And the weirdest part?  Somehow you use brownie mix and a cake mix and it magically turns into this fun and pretty marbled sensation.

Not too shabby, huh?

So in honor of March, I’m going to say IT’S MY BIRTHDAY MONTH AND I CAN EAT CAKE EVERY FRICKIN’ DAY IF I WANT TO AND NO ONE CAN STOP ME.  And if you feel the need to celebrate March (officially renamed “Cake Month”) with me, then more power to you!  We’ll save all that healthy stuff for next month or something (or I’m sure I can sneak a recipe or two in between the cake).

For now, I’ll take another piece of cake please.

Brownie Swirl Cake

Yield: One 9- by 13-inch cake

Ingredients

  • *1 (15.25 oz) box cake mix
  • *1/4 cup vegetable oil
  • *1 egg
  • *1/2 cup milk
  • *1 "Family Size" box Brownie mix
  • *1 recipe frosting (or just a large can of frosting, I won't tell)
  • *Sprinkles, if desired

Instructions

  1. 1. Preheat oven to 350°F and spray 9x13 pan with cooking spray or line with foil/parchment.
  2. 2. In a medium mixing bowl combine cake mix, oil, egg and milk. Beat together for about 1 minute, until ingredients are incorporated.
  3. 3. Spread batter in the bottom of the prepared pan (it will be thick). I find the easiest way to do this is to wet my hands with water and use them to press and spread the mix until it covers the bottom of the pan.
  4. 4. Make your brownie batter according to the directions on the box. Pour the brownie batter on top of the cake layer.
  5. 5. Bake approx 25-30 minutes until center is set, err on the side of slightly underbaking than overbaking. What I ended up with was delicious brownie outsides (I like the dry brownie outside) and a nice, cakey inside. Surprisingly tasty.
  6. 6. Frost and top with sprinkles, if desired.
https://wee-eats.com/2013/03/03/brownie-swirl-cake/


[ Adapted from Cookies N Cups ]